Detailed documentation about all features and settings of CFF.
Welcome to the documentation for the Calculated Fields Form WordPress plugin! This versatile WordPress calculator plugin empowers you to create sophisticated dynamic forms and online calculators (like quote estimators, booking forms, and financial tools) that perform real-time calculations based on user input. Get a comprehensive overview of the entire process—from form creation to successful submission and payment handling—by reviewing the workflow steps below.
This video provides a comprehensive overview of how the Calculated Fields Form plugin functions, demonstrating the creation and submission of a form with a real-time calculation.
The configuration process for creating a new calculated fields form is managed through an intuitive visual builder in your WordPress dashboard:
For visitors interacting with your published form, the experience is fast and seamless:
Note on Payment Gateways: The Platinum version of the plugin supports numerous payment gateways beyond PayPal Standard and Stripe Checkout, including Authorize.Net, Skrill, Mollie (iDeal), and many others. Additional options are available through our complementary plugins.
Use the AI Form Generator to create a complete calculated fields form structure with a simple text description. This feature utilizes powerful Gemini AI models to deliver a full form structure, ready for customization.
The built-in AI Assistant simplifies the process of creating advanced calculated fields. This tool helps you generate precise and efficient equations for complex real-time calculations with ease, eliminating the need for manual coding.
Troubleshoots:
Are you trying to run a local AI model directly in your Chrome browser and suddenly getting the "Quota exceeded" error? Don't worry - it's a common Chrome configuration issue, and in this video I'll guide you step-by-step through the quick fix.
In this tutorial, you'll learn:
The AI writing assistant helps users write longer, clearer, and more detailed messages-without the struggle.
Installing the Calculated Fields Form plugin is the first step to adding powerful, dynamic forms and calculators to your WordPress site. There are two primary methods for installation, depending on whether you are using the free version or a commercial version.
This is the easiest way to install the free version of the Calculated Fields Form plugin directly from the official WordPress plugin repository.
The free version of your WordPress calculator plugin is now active.
Use this method to install a commercial version (Professional, Developer, or Platinum) of the Calculated Fields Form plugin using the downloaded .zip file.
.zip file from your purchase confirmation email or client area and save it to your local computer. Do not unzip the file..zip file you downloaded earlier.Your commercial version of the Calculated Fields Form plugin is now installed and ready to use.
While the Calculated Fields Form (CFF) plugin is fully functional immediately after installation, registering your commercial license is highly recommended. Registration is essential for validating your purchase and ensuring your website receives automatic plugin updates directly within the WordPress dashboard. Accessing these updates keeps your forms secure, compatible with the latest WordPress versions, and equipped with the newest features. Go to the plugin registration.
While the Calculated Fields Form (CFF) plugin is fully functional immediately after installation, registering your commercial license is highly recommended. Registration is essential for validating your purchase and ensuring your website receives automatic plugin updates directly within the WordPress dashboard. Accessing these updates keeps your forms secure, compatible with the latest WordPress versions, and equipped with the newest features.
Follow these quick steps to register your copy of the CFF plugin:

Once successfully registered, all future plugin updates will be seamlessly delivered and notified within the standard "Updates" section of your WordPress dashboard.
After creating a dynamic form using the Calculated Fields Form plugin, you must insert it into a post, page, or widget area for your users to interact with it. The plugin offers multiple flexible methods for embedding, including the standard WordPress shortcode and dedicated blocks/widgets for popular page builders.
Every form you create is assigned a unique shortcode, which is the default method for publishing your form anywhere on your WordPress site. The shortcode is visible in the form list and when editing the form.
The basic shortcode structure is: [CP_CALCULATED_FIELDS id="X"], where X is the unique ID of your form.

You can modify the form's appearance and loading behavior by adding attributes to the shortcode:
id: Specifies the unique ID of the calculated fields form to load.
[CP_CALCULATED_FIELDS id="1"]
class: Allows you to assign one or more CSS class names to the form and customize its design.
[CP_CALCULATED_FIELDS id="1" class="class-name"]
iframe (1 or 0): Loads the form inside an HTML iframe tag for better compatibility and isolation.
[CP_CALCULATED_FIELDS id="1" iframe="1"]
asynchronous (1 or 0): Must be used with iframe="1". This defers the form loading until the rest of the page has completed loading to significantly increase page load speed.
[CP_CALCULATED_FIELDS id="1" iframe="1" asynchronous="1"]
template: Allows you to override the form's default design and apply different predefined templates through the shortcode.
[CP_CALCULATED_FIELDS id="1" template="cp_cff_14"]
The predefined template internal names include:
cp_cff_letter
cp_cff_professional
cp_cff_natural
cp_cff_elegant
cp_cff_decorative
cp_cff_clean
cp_cff_minimalist
cp_cff_dark_notebook
cp_cff_box
cp_cff_pastel
cp_cff_11
cp_cff_12
cp_cff_13
cp_cff_14
The Calculated Fields Form includes multiple predefined designs to quickly change the look of your forms.

You can pass custom variables directly into your form's equations via the shortcode. The plugin converts these custom attributes into globally scoped JavaScript variables that can be referenced in your calculated field formulas:
Example Shortcode: [CP_CALCULATED_FIELDS id="1" custom_attr="234"]
Example Formula Usage: cff_var['custom_attr']*fieldname1 or cff_var.custom_attr*fieldname1
For a more visual and streamlined process, the Calculated Fields Form plugin includes dedicated elements for popular WordPress editors and page builders, eliminating the need to manually copy shortcodes.
To insert a form into your content, use the specific CFF block, widget, or icon in your chosen editor:
Using the Gutenberg Editor: Select the CFF Block.

Using the WordPress Classic Editor: Click the CFF icon in the toolbar.

Using Elementor: Drag and drop the CFF widget.

Using Page Builder by SiteOrigin

Using Beaver Builder

Using DIVI Builder

After inserting via any method, the shortcode tag (e.g., [CP_CALCULATED_FIELDS id="1"]) will be present. When the page is viewed publicly, this tag will be replaced by your fully functional calculated form:

The Calculated Fields Form (CFF) provides a centralized area within the WordPress dashboard for managing your entire catalog of dynamic forms and reviewing all collected submission data. Access this main management screen by navigating to the WordPress administration menu >> Calculated Fields Form.
The main plugin screen displays a comprehensive list of all your created calculated forms, each accompanied by essential management links:

For each form in the list, you have the following control options:
[CP_CALCULATED_FIELDS id="1"]) needed to embed the form on any WordPress page or post. Second, it shows the Category assigned to the form, which allows you to efficiently group and organize your calculated forms by subject matter (e.g., 'Finance Calculators' or 'Booking Forms').Clicking the "Build" button takes you directly to the form builder for editing the structure and formulas of your dynamic form.
Submission data is centrally managed on the Entries Screen. You can access this section either by clicking the "Entries" button located next to the form on the main list or by navigating directly to the WordPress menu option: Calculated Fields Form >> Entries. This crucial data management feature, which lets you view, filter, and edit all submitted information (The edition feature is only included in the commercial versions of the plugin).
All Versions of the Plugin

The Message List interface is the central hub for managing data collected by your Calculated Fields Forms. The buttons are organized to facilitate efficient filtering, payment status updates, and data export.
These actions control the overall view and apply to the message list or the entire form's data.
| Back to forms list... | Navigates the user back to the main CFF dashboard to manage the list of all created dynamic forms. |
| Show all entry details (Checkbox) | Toggles the display mode, showing the full submission details for every entry in the current view, ideal for comprehensive data review. |
| Delete all checked | Executes a bulk delete operation, permanently removing only the specific submissions that have been checked by the administrator. |
| Generates a printable version of the current message list, including all expanded entry data. | |
| Delete all (Red) | CAUTION: This is a final, destructive action that permanently deletes every single submission for the currently viewed form from the database. |
These controls are essential for data retrieval and integration, allowing users to filter submissions and prepare data for external analysis.
| Filter | Refines the submissions list based on criteria entered in the search fields (e.g., keyword, date range), facilitating quick data retrieval. |
| Export to CSV | Initiates the export process, downloading the filtered submission data as a CSV file. This is critical for moving CFF data into spreadsheets or third-party systems. |
These buttons manage the status and content of a single submission entry. They are crucial for CRM and payment management workflows.
| Change to PAID | Manually updates the payment status of a submission from "Not Paid" to "Paid," useful for tracking offline payments or resolving payment gateway issues. (The text changes dynamically to "Change to NOT PAID" for paid entries). |
| Edit (Raw) | Opens a dedicated screen for the administrator to edit the raw data of the submission, allowing for manual correction of errors or updates to submitted information. |
| Send Mails | Retriggers the automated email notifications (both the user confirmation and the admin notification) for this specific entry. |
| Delete | Permanently deletes only the selected individual submission record from the database. |
The AI Filter allows you to search and filter form entries using natural language. Instead of relying only on predefined filters, such as the form name or a date range, you can describe the information you are looking for, and the selected AI model will generate the corresponding filter automatically.
The generated filter is applied to the entries list, allowing you to locate submissions based on the information entered by users, without having to manually define filtering conditions.
Professional Version Developer Version Platinum Version
To modify the stored information for an entry, press the corresponding "Edit" button in the list. This action loads a separate interface showing all submitted fields in a raw data mode, allowing site administrators to correct or update values as needed.

The buttons in the Editing entry screen control the administrative actions for saving changes and navigating away from the individual submission record.
| Save Changes (Blue) | Saves all modified data within the form fields (Check-in, Check-out, Total Cost, etc.) to the database, ensuring that the updated submission record is permanently stored. This button is essential for correcting or manually updating submission errors. |
| Back to events list... (Grey) | Navigates the administrator away from the entry editor and returns to the main **Submissions/Entries list** (the "Message List"), discarding any unsaved changes to the current entry. |
For offline analysis and integration with external systems, the CFF plugin allows you to export all form submissions to a CSV file. This feature is available in commercial versions:
Professional Version Developer Version Platinum Version

To export, go to the Entries Screen and click the "Export to CSV" button. The file will be generated instantly and downloaded to your computer. The first row of the CSV uses the field's short label (or the full label if the short label is empty) as the column header, ensuring data integrity and readability.
Related Information....
The Import/Export feature is a valuable tool for developers and owners who manage multiple sites. It allows you to export the structure and settings of a calculated fields form from one WordPress website and import it into another, avoiding repeated design work.
Professional Version Developer Version Platinum Version

Important Note: Both the source and destination websites must be running the same version of the CFF plugin to ensure the exported file is compatible for import.
.cpfm file will be downloaded to your computer..cpfm file from your computer.The newly imported form will now appear in your main list of forms, ready for use and modification via the "Build" button.
The Calculated Fields Form utilizes a powerful, visual Form Builder interface, which is the primary tool for designing your dynamic forms. The builder allows you to add, edit, or remove form fields and to specify comprehensive validation rules (e.g., required fields or specific email formats) to ensure data quality.

The top area provides essential links to form-level settings and tools:
The left panel organizes all available form elements into three precise categories, allowing administrators to easily drag-and-drop fields onto the canvas:
The central area is the visual structure of your form. It acts as the live editor where you arrange fields, edit text, and see the application of calculation logic and design in real-time. Any changes made in the field settings are immediately reflected here.
Create Forms Automatically with AI
Quickly generate fully functional forms using artificial intelligence. Simply describe the form you need, and your preferred AI model will build the complete structure for you — no manual setup required.
To create a form with AI, go to Calculated Fields Form → Add New Entry, select the "AI Form Generator" option, choose your preferred AI provider and model, and enter a description of your form. The AI assistant will instantly generate your form based on your requirements.
Creating a Form Using a Pre-existing Template: Accelerate your workflow by starting with one of the plugin's ready-made templates.
Building a Form from Scratch: A step-by-step guide on creating a custom calculated form without using a template.
The "Form Settings" tab is where you define the core identity and runtime behavior of your form.
In this tab, you can set the form's Title and Description, and configure the default placement of field labels (e.g., at top, at left, aligned to the right).
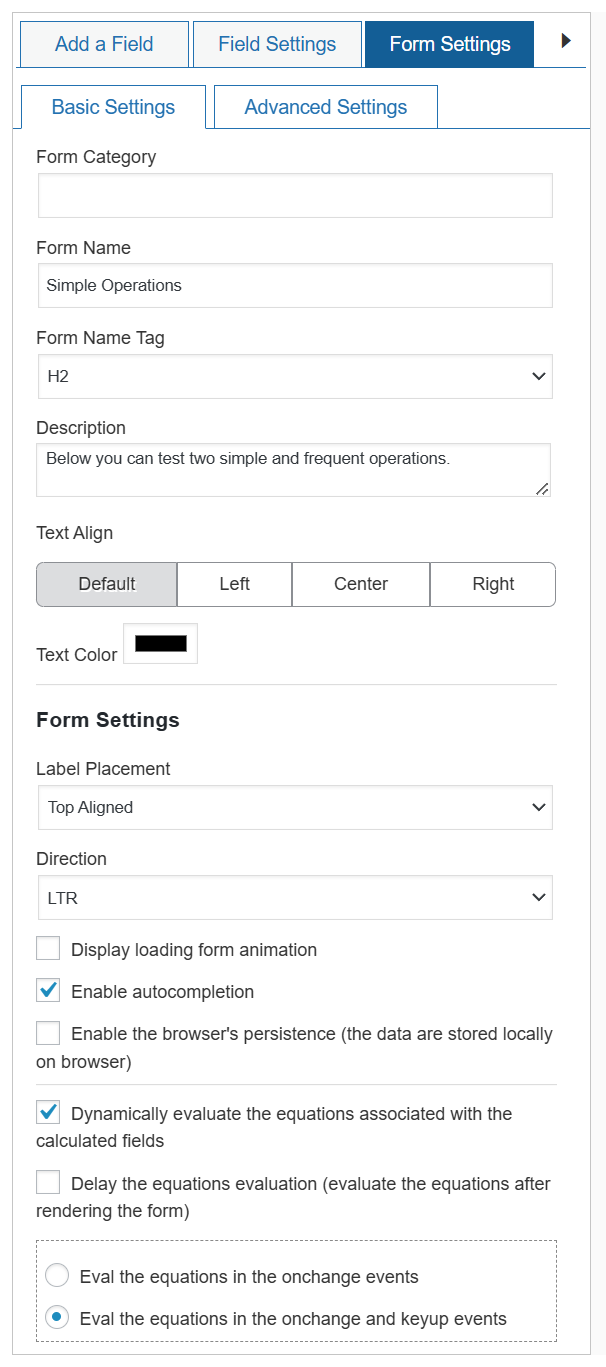
The Basic Settings tab within the Form Settings area allows administrators to define the form's essential identity, appearance, and core behavior.
| Form Category | Allows you to assign the form to a specific category (e.g., 'Finance', 'Booking'). This is used to organize and filter forms in the administration area. |
| Form Title | This is the public-facing title of your dynamic form. This title appears at the top of the form when embedded on your website. |
| Form Name Tag | Defines the HTML heading tag (e.g., H1, H2, H3) used for the form's title when displayed on the public webpage, impacting page structure and SEO. |
| Description | A brief text field for providing context or instructions to the user at the top of the form and below the title. |
| Text Align | Controls the horizontal alignment of the form's main text elements (Title and Description) to Default, Left, Center, or Right. |
| Text Color | Sets the color for the form's Title and Description text. |
This section controls the layout and the crucial real-time calculation behavior of your dynamic form.
| Label Placement | Defines the position of field labels relative to their input fields (e.g., Top Aligned, Left, Right). |
| Direction | Controls the text direction for the form layout (e.g., LTR - Left-to-Right, or RTL - Right-to-Left). |
| Display loading form animation | Shows a small loading animation while the form's scripts and data are being prepared on the page. |
| Enable autocompletion | Allows the user's browser to suggest and fill in form data based on previously entered information, improving data entry speed. |
| Enable the browser's persistence |
Activates the Autosave feature, storing the user's input data locally in their browser so it can be pre-filled if they return to the form before submitting it. If the Browser Persistence option is enabled, the plugin will use the user's browser's |
Within Form Settings, you can specify how the calculated fields should be evaluated:
| Dynamically evaluate the equations... |
Main Calculation Control. When checked, this setting enables real-time calculation, causing the calculated fields to update instantly based on user input. Manual Evaluation: Equations are only processed when the user explicitly clicks a "Calculate" button you provide on the form. |
| Delay the equations evaluation... | If checked, delays the final calculation result until after the form has finished rendering on the page, which can sometimes improve initial page load performance. |
| Eval the equations in the onchange events | A dynamic evaluation mode where the calculation is triggered when the user moves focus away from an input field (the onchange event). |
| Eval the equations in the onchange and keyup events | The most responsive dynamic evaluation mode; the calculation is triggered both when the user leaves a field and as the user types in an input field (the onchange and keyup events). |
How to Customize Form Design in Calculated Fields Form
Learn how to fully customize the appearance of your forms and their components using the Calculated Fields Form plugin. This tutorial explains how to change the form layout, apply design templates, adjust visual settings, and use CSS to control the style of form elements.
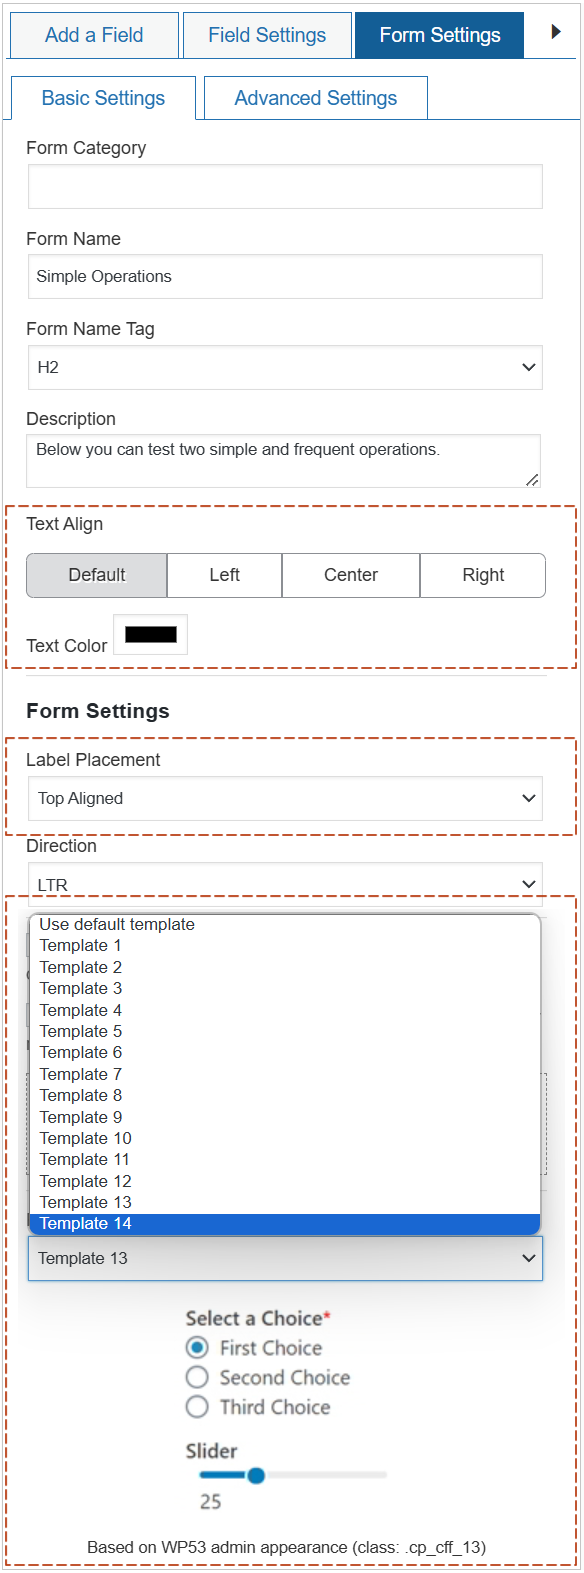
To customize your form design, open the Form Settings tab and select a predefined template. Templates define key visual elements such as background colors, input field layout, button styles, text sizes, and pagination. You can preview changes using the Save and Preview option.
The "Basic Settings" section within the Form Settings tab provides attributes for quick visual customization:
The "Advanced Settings" section provides full control over the form's CSS:
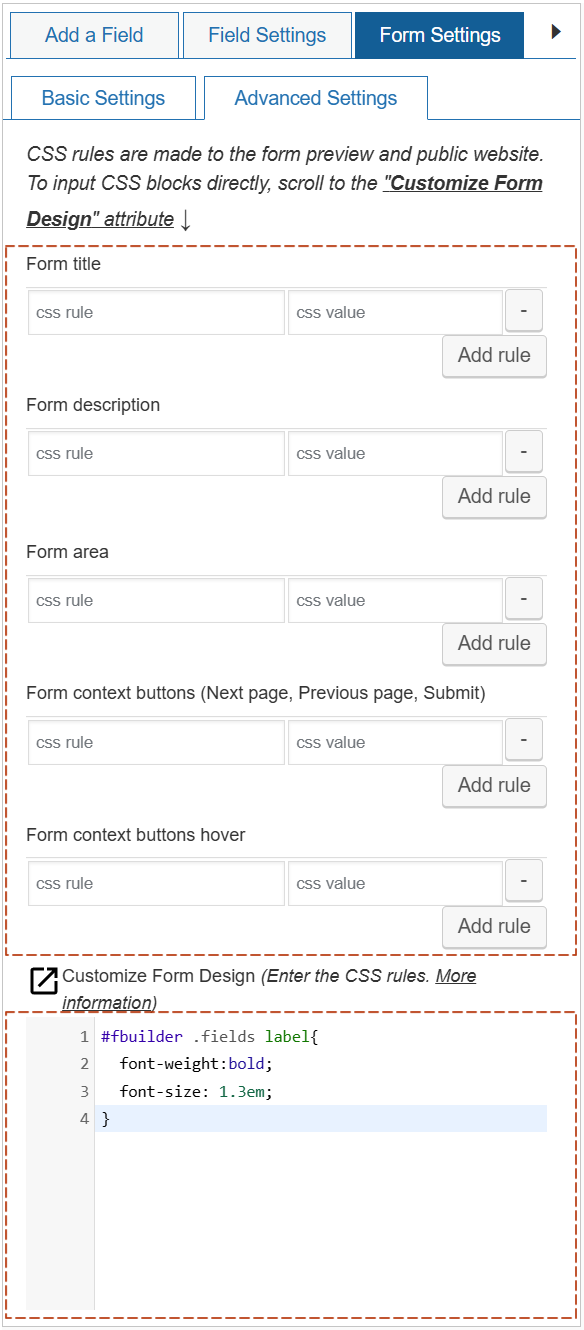
The "Customize Form Design" field serves as a comprehensive CSS editor equipped with syntax highlighting and error checking. Here, you can input CSS blocks to personalize every aspect of the form, including the form title, description, form area, and navigation buttons in multi-page forms (Next Page, Previous Page, and Submit).
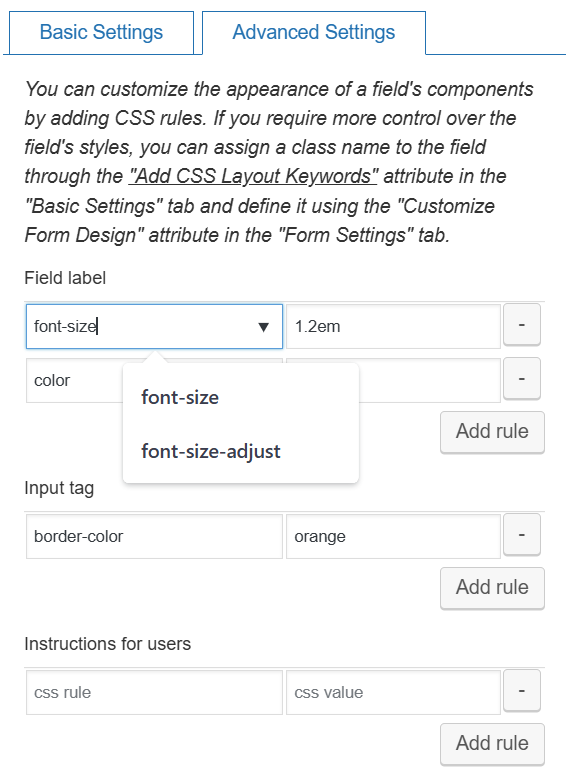
For fine-tuning the design of individual elements, the "Advanced Settings" tab within each field's configuration allows you to enter specific CSS rules that will apply only to that field, overriding global styles where necessary.
Related Design Information....
To optimize space and readability, the builder allows you to easily format your form fields into columns, creating complex, multi-column layouts without manual CSS editing.
The plugin provides two methods to distribute form fields into columns. You can use container fields (such as DIV, Fieldset, or Popup containers) to group fields and define the number of columns from the container settings, or you can assign predefined CSS class names directly to individual fields for more flexible layout control.
To format fields using container fields, insert a container into your form, drag the desired fields inside it, and select the number of columns through the container’s settings. You can also enable the rearrange option to automatically adjust field positions when some fields are hidden by dependencies. On smaller screens, container fields automatically display content in a single column to improve usability and data entry.
For advanced layout control, you can assign predefined column classes to fields through the Add CSS Layout Keywords setting. The plugin uses a 12-column grid system, allowing fields to occupy specific column widths and adapt to different screen sizes. These responsive classes ensure your form layout adjusts automatically for desktops, tablets, and mobile devices while maintaining the column structure.
Formatting form fields into columns improves form organization, enhances readability, and creates responsive layouts that provide a better user experience across all devices.
Related Layout Information....
The Single-Line Text Control is a standard input field intended for capturing short, concise text entries that fit naturally on a single line. It is commonly used for inputs such as usernames, street addresses, email subjects, or any other brief textual data. This control can be configured to require user input, ensuring that essential fields are not left blank. Additionally, it supports character length constraints, allowing developers to define minimum and maximum limits—for instance, when collecting structured data like credit card numbers or identification codes. For more advanced validation needs, the control also accepts regular expressions, enabling precise formatting rules and pattern matching to ensure data integrity and consistency.
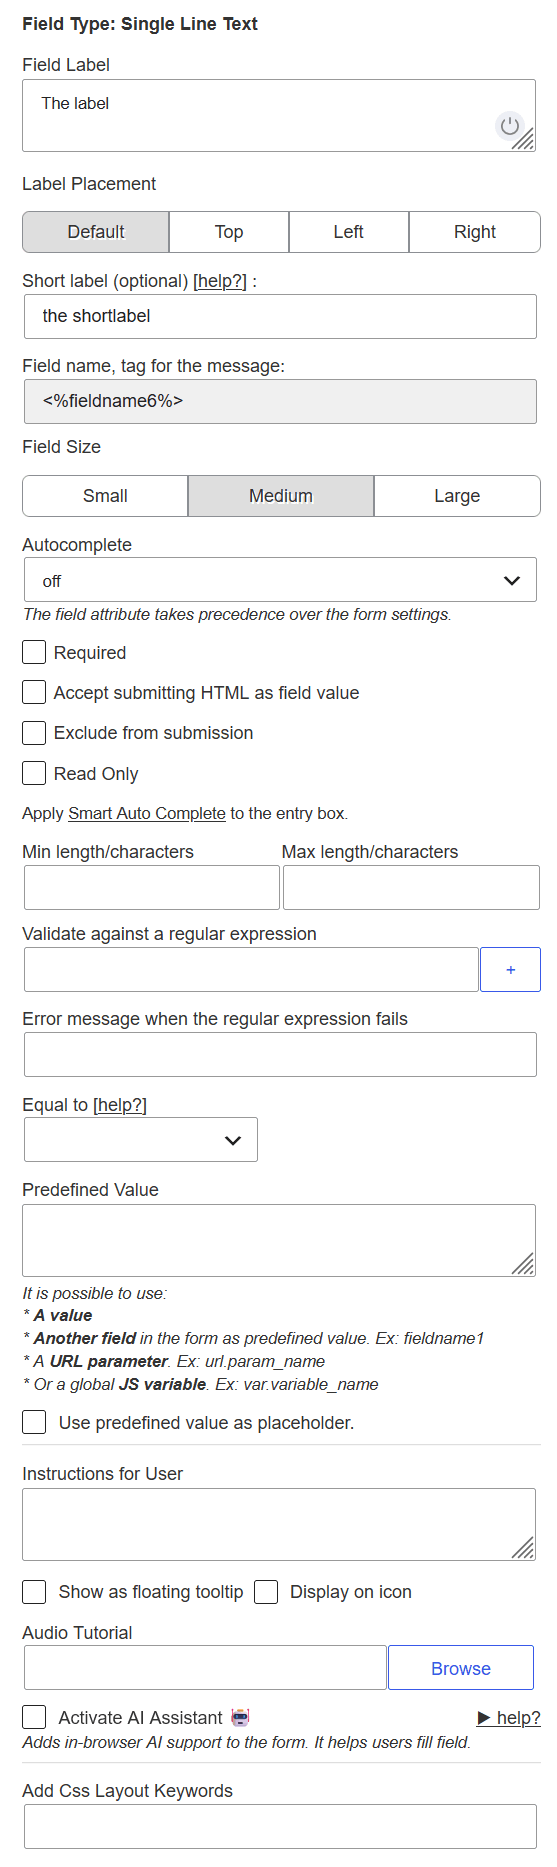
These settings define the basic identification and physical appearance of the field within the form.
sTitle)sFieldLayout)sShortlabel)sNametag, sName)<%fieldname6%>) used to reference the field's data in messages, emails, or calculations.sSize)These settings enforce rules on what the user is allowed to type into the field.
sRequired)sMinlength, sMaxlength)sRegExp)sRegExpMssg)sEqualTo)These options dictate how the browser and the form process the data entered into the field.
sPredefined)fieldname1), a URL parameter, or a global JavaScript variable.sPredefinedClick)sAutocomplete)name, email). This attribute overrides general form-level autocomplete settings.sReadonly)sExclude)sAccept_HTML)Settings designed to help the user understand how to fill out the field accurately.
sUserhelp)sUserhelpTooltip, sTooltipIcon)sAudioSrc)sAiAssistant)sCsslayout)The Currency Field is a specialized input designed for entering monetary values. Unlike generic numeric fields, it includes dedicated attributes such as currency symbols, thousand separators, and decimal indicators to ensure accurate and regionally appropriate formatting. Developers can configure the field to automatically apply the correct format once the user inputs a value, including options to allow decimal values or restrict input to whole numbers only. Additionally, the field can be marked as required to enforce user input and can include constraints for minimum and maximum values. This is particularly useful in financial applications—for example, when setting investment thresholds where a minimum or maximum amount is required to open a fund.
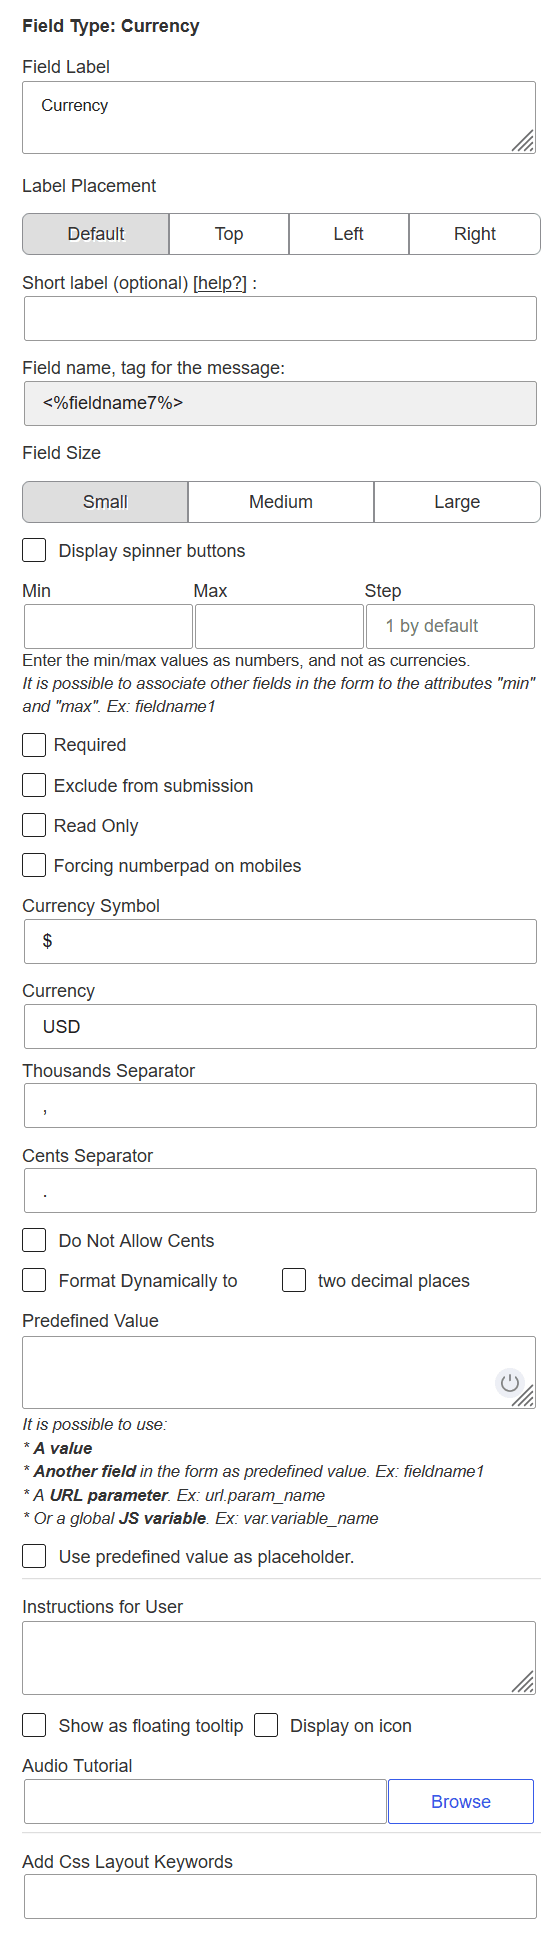
Basic identification and layout settings for the currency input.
sTitle)sFieldLayout)sShortlabel)sNametag)<%fieldname7%>) for data processing.sSize)Rules governing the numeric range and behavior of the input.
sMin, sMax, sStep)fieldname1).sSpinner)sNumberpad)sRequired)sReadonly)Settings to define the visual representation of monetary data.
sCurrencySymbol)sCurrencyText)sThousandSeparator, sCentSeparator)sNoCents)sFormatDynamically)sTwoDecimals)Advanced styling and visibility controls.
sHideField)SHOWFIELD operations.sCsslayout)sPredefined)sUserhelp)sAudioSrc)The Number Field is a versatile input control designed to accept various numeric formats, including plain digits, standard numbers, and percentages. It ensures that user input aligns with the selected data type, automatically validating entries based on the field's configuration. When configured for numeric input, the field offers additional customization options such as prefix and suffix symbols—ideal for displaying units of measurement—as well as support for thousand separators and decimal indicators to enhance readability and precision.
If the field is set to accept percentages, the system internally converts the user-entered percentage into its decimal equivalent for accurate calculations and data processing. Beyond formatting, the Number Field also supports validation rules, allowing developers to mark it as required and define acceptable value ranges through minimum and maximum constraints. This makes it particularly useful in scenarios where numeric accuracy and controlled input are critical, such as financial forms, measurement entries, or statistical data collection.
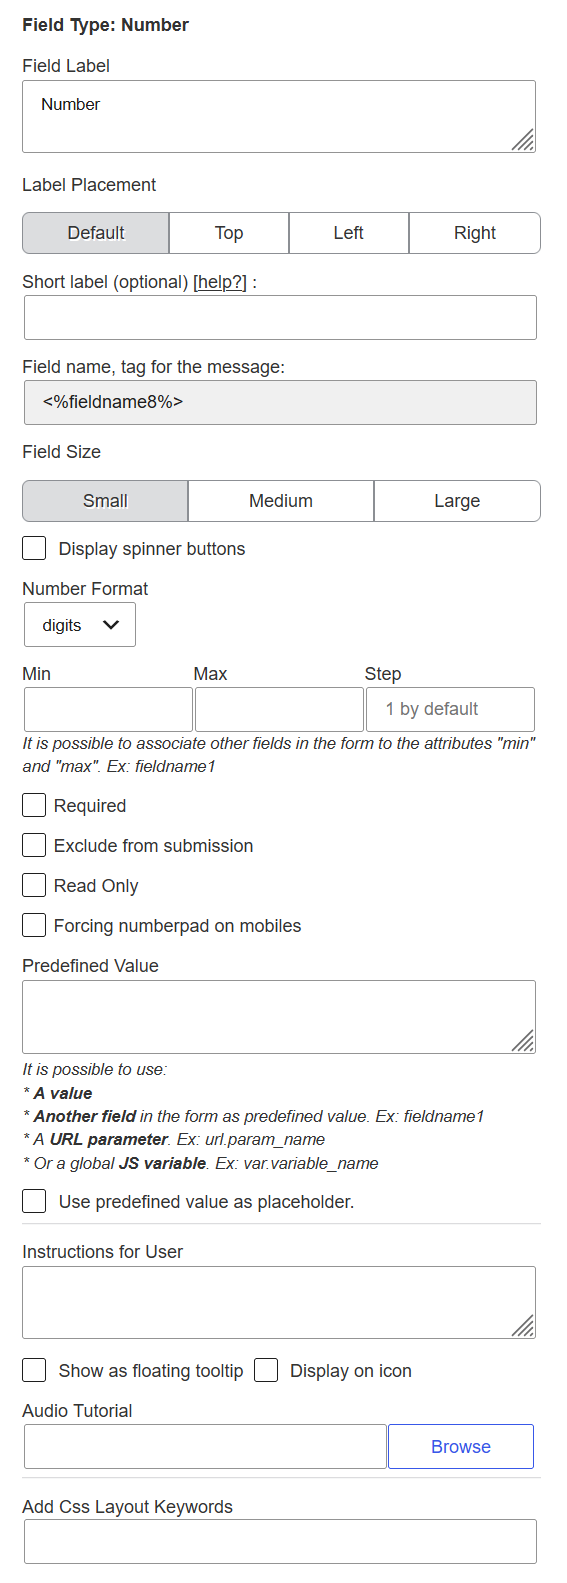
Basic settings for field identification and display.
sTitle)sFieldLayout)sShortlabel)sNametag)<%fieldname8%>).sSize)Controls how the number is displayed and interpreted by the form engine.
sFormat)sDecimalSymbol, sThousandSeparator)sPrefix, sPostfix)sFormatDynamically, sTwoDecimals)Validation rules to ensure data integrity.
sMin, sMax, sStep)fieldname1).sSpinner)sNumberpad)sHideField)SHOWFIELD operation to display.sCsslayout)sPredefined)sUserhelp)sAudioSrc)The Slider Control is a numeric input field with an interactive and intuitive interface. Instead of typing values directly, users select a number by dragging a slider, which is configured by the developer with a defined minimum and maximum range, as well as a step value to control the granularity of movement. For users who prefer manual input, the control can optionally display a text field alongside the slider. Both input methods remain synchronized in real time, ensuring consistency between the visual selection and the typed value.
The slider can be configured in two modes: a single-handle slider for selecting one value within the defined range, or a dual-handle slider for selecting a range of values—ideal for filtering or setting thresholds. Additionally, developers can choose between a linear or logarithmic scale, depending on the nature of the data and the desired user experience. This flexibility makes the Slider Control particularly useful for applications involving dynamic filtering, data visualization, or any scenario where numeric input benefits from a more tactile and visual interaction.
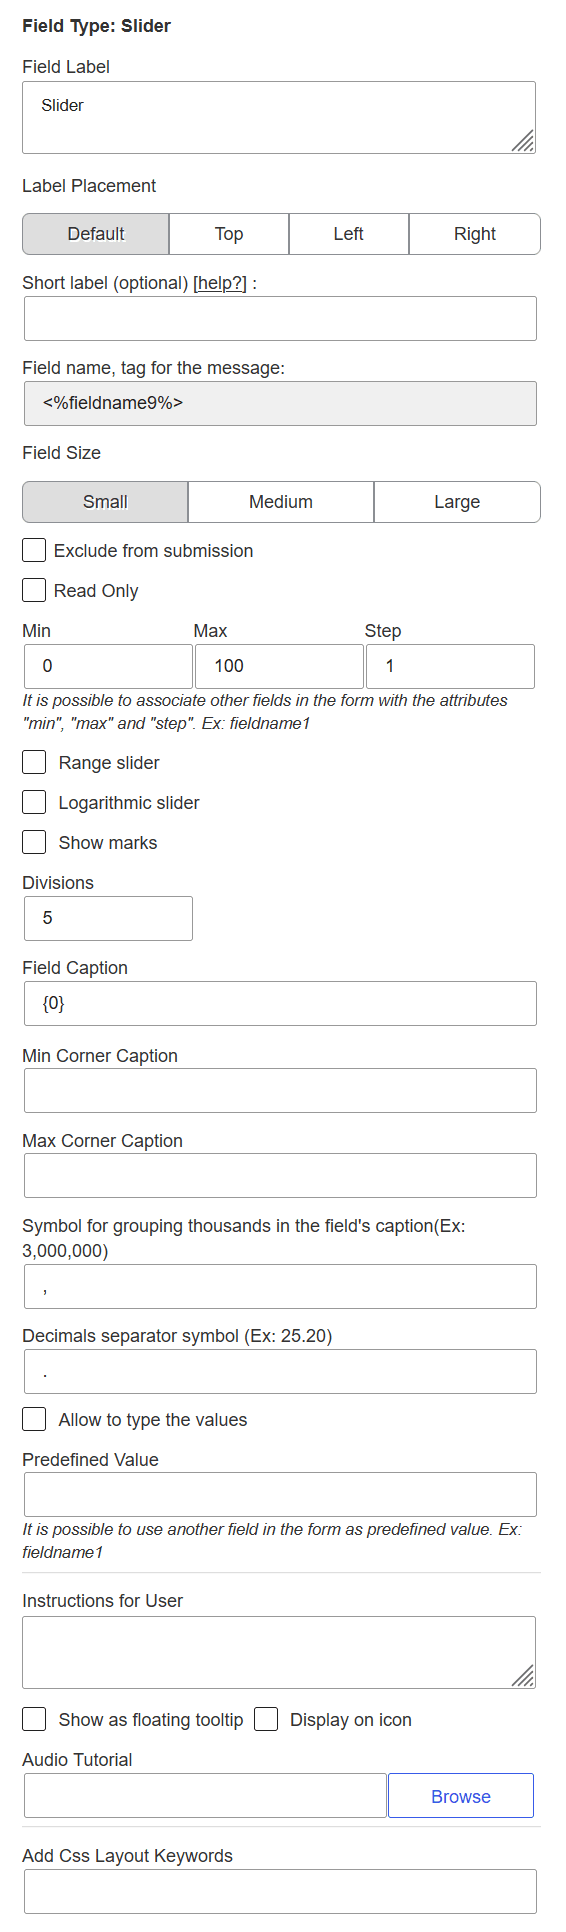
Basic configuration for identification and display.
sTitle)sFieldLayout)sShortlabel)sNametag)<%fieldname9%>) used in form logic and notifications.sSize)Defines the boundaries and behavior of the slider handle.
sMin, sMax, sStep)fieldname1).sRange)sLogarithmic)sMarks, sDivisions)Settings for the visual text surrounding the slider component.
sCaption){0} placeholder to represent the current selected value.sMinCaption, sMaxCaption)sThousandSeparator, sCentSeparator)sTypeValues)sPredefined, sPredefinedMin, sPredefinedMax)fieldname1).sReadonly)sExclude)sUserhelp)sAudioSrc)sCsslayout)The Color Picker Control provides an intuitive interface within the form that allows users to select a color effortlessly. It includes a built-in color picker tool, enabling users to visually choose a color from a palette or, for more precision, manually enter its RGB components. This flexibility accommodates both casual users looking for quick selection and advanced users who require exact color values. The control is ideal for applications involving design customization, branding, or any feature where color input is essential.
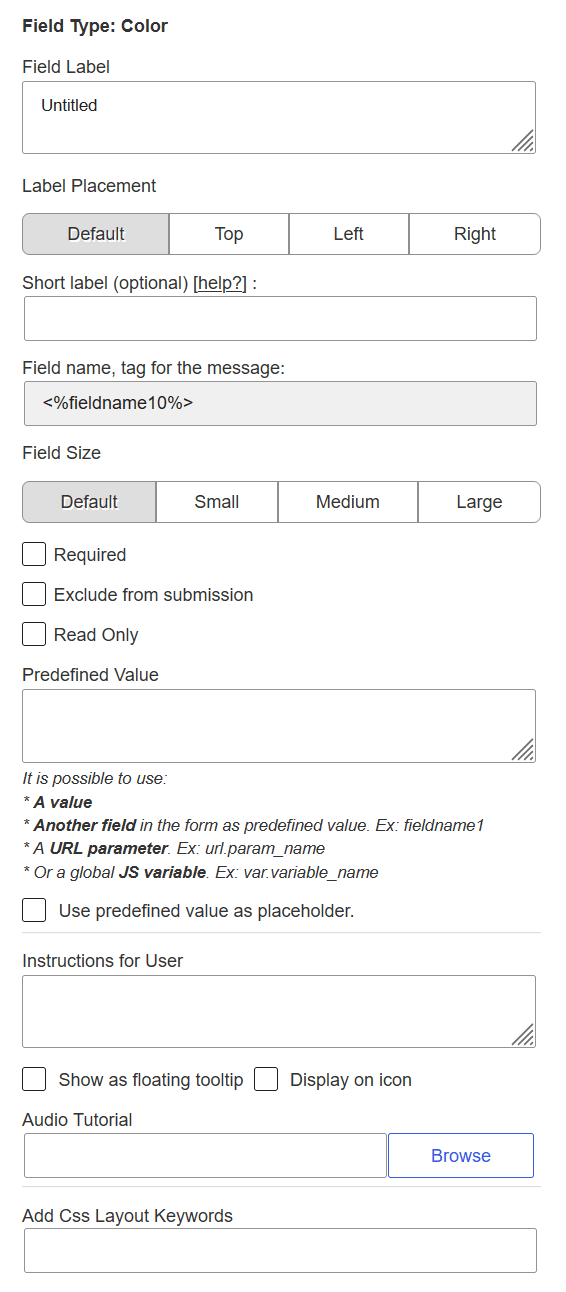
Basic configuration for the color picker's label and physical appearance.
sTitle)sFieldLayout)sShortlabel)sNametag)<%fieldname10%>) used to reference the selected color in calculations or notifications.sSize)Rules regarding how the field behaves during form completion and submission.
sRequired)sReadonly)sExclude)Methods for pre-filling the color picker with a specific value.
sPredefined)fieldname1).sPredefinedClick)Instructions and custom styling options to improve the user experience.
sUserhelp)sUserhelpTooltip, sTooltipIcon)sAudioSrc)sCsslayout)The Email Field is designed to validate user input against the standard format of an email address, ensuring that entries contain the necessary components such as the "@" symbol and a valid domain. Beyond basic validation, developers can implement advanced rules using regular expressions. This allows for greater control over accepted email addresses—for example, excluding personal email providers like Gmail, Yahoo, or Outlook, or restricting input to addresses from a specific domain.
The Email Field also integrates seamlessly with other modules within the plugin, serving as a key component in workflows such as sending confirmation emails or verifying users through one-time passcodes. Its flexibility and reliability make it essential for forms that require secure and accurate communication channels.
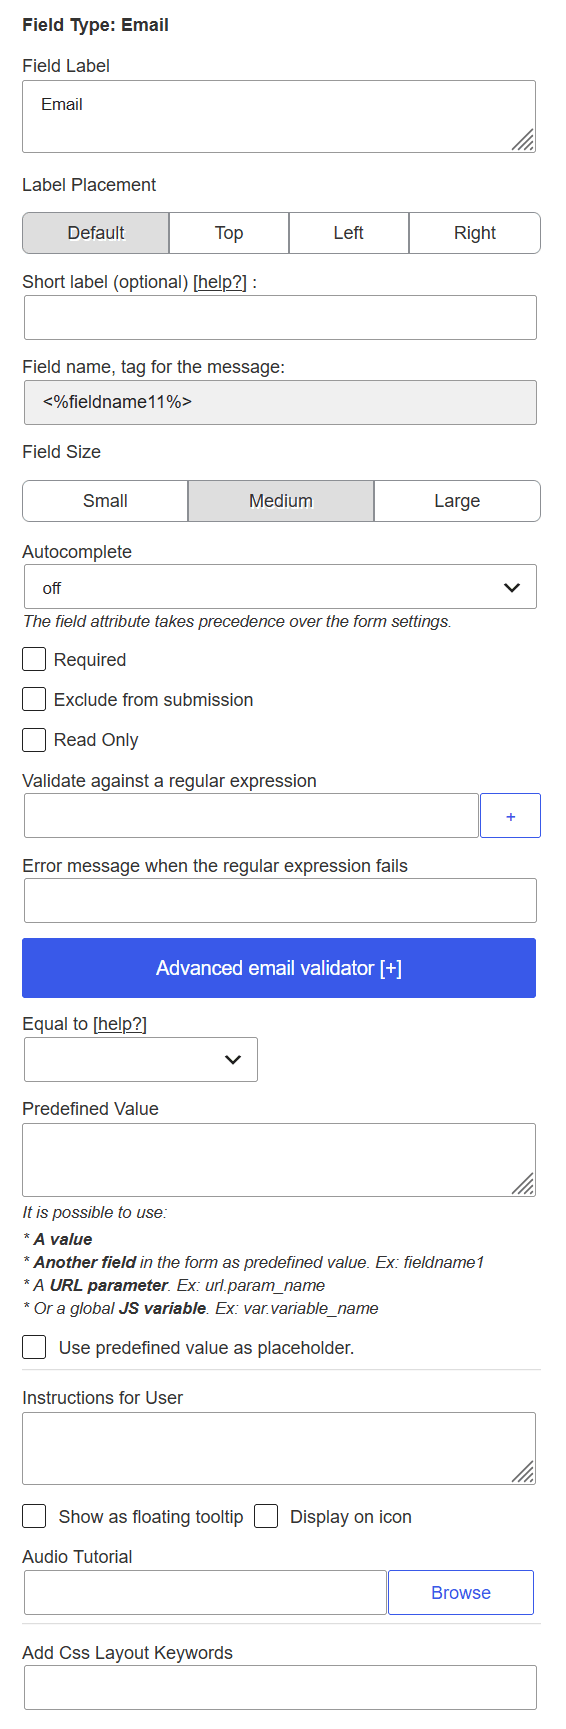
Basic settings that define the field's identity and its visual placement in the form.
sTitle)sFieldLayout)sShortlabel)sNametag)<%fieldname11%>) used for formulas, email templates, and data processing.sSize)Rules to ensure the data entered is accurate and follows specific requirements.
sRequired)sRegExp)sRegExpMssg)sEqualTo)Settings governing how the browser interacts with the field and how data is pre-populated.
sAutocomplete)sReadonly)sExclude)sPredefined)sPredefinedClick)sUserhelp)sAudioSrc)sCsslayout)The Date/Time Field offers a flexible input solution that combines both date and time components, each of which can be enabled or disabled independently based on the needs of the form. When configured to display the date component, the field includes a text input paired with a date picker, accommodating users who prefer either manual entry or visual selection. The time component can be presented using dropdown lists—either two for hour and minute selection in 24-hour format, or three to include AM/PM for 12-hour formatting.
This field is highly customizable, allowing developers to define minimum and maximum date ranges, specify valid days of the week (such as enabling only weekdays and excluding weekends), and mark certain date intervals or specific dates as invalid. For instance, holidays like Christmas or public holidays can be disabled to prevent selection. In scenarios where the form is tied to a time-sensitive event, the field can be configured to allow only specific dates, automatically disabling all others to guide user input.
The time component also supports configuration of a valid time window, enabling developers to set a start and end time to restrict selections within a defined schedule. This makes the Date/Time Field ideal for booking systems, event registrations, and any application requiring precise temporal input.

sTitle)sFieldLayout)sShortlabel)sNametag)<%fieldname12%>) for formulas and notifications.sSize)Settings for the visual date picker and formatting.
sFormat) & Separator (sSeparator)sShowFormatOnLabel)sMondayFirstDay): Sets the week start to Monday.sAlwaysVisible): Embeds the calendar directly in the form rather than as a popup.sShowWeek): Displays the week number of the year in the calendar.sShowDropdown): Enables Month and Year selectors with a configurable Year Range (e.g., "-10:+10").Controls the boundaries of selectable dates.
sCurrentDate)sValidDates, sInvalidDates)Settings for adding a time selector to the date picker.
sShowTimepicker)sTimeFormat)sUserhelp)sPredefined)sDisableKeyboardOnMobile)sCsslayout)The Date/Timeslots Field closely resembles the Date/Time Control and shares many of its configurable attributes. However, unlike the Date/Time Field, it does not include a traditional time component. Instead, it offers the ability to generate predefined time slots of fixed duration, providing a structured and user-friendly way to select appointment or booking times.
Developers can customize the availability of these time slots by disabling specific periods—such as lunch breaks or off-hours—to reflect real-world scheduling constraints. Additionally, the field supports configuration of the maximum number of slots a user can select at once, allowing for controlled and efficient booking behavior. This makes the Date/Timeslot Field particularly useful for applications such as appointment scheduling, resource reservations, or event registration systems where time needs to be segmented and managed precisely.

sTitle)sFieldLayout)sNametag)<%fieldname13%>).sSize)Configures how users interact with the calendar component.
sFormat, sSeparator)sAlwaysVisible): Keeps the calendar expanded on the page at all times.Defines the availability and behavior of the time booking intervals.
sMinHour to sMaxHour)sTimeslotsDuration, sBetweenDuration)sMaxSlots)sPreventEarlierSlots): Blocks selection of times that have already passed on the current day.sSameForAllDays): If checked, applies a uniform slot schedule to every active day. If unchecked, allows per-day customization.sDisableKeyboardOnMobile)sPredefined)sUserhelp)The Text Area Field is designed for multi-line text input, making it ideal for capturing longer messages such as those found in contact forms, feedback submissions, or detailed user comments. Unlike single-line fields, it provides a spacious input area that can be configured to display a specific number of visible rows. For extended content, the field automatically introduces a scroll bar, allowing users to navigate through their text without overwhelming the layout.
To help manage input length, developers can set a maximum character limit. A visual character counter is displayed within the public-facing form, offering users real-time feedback on how much space remains. This feature enhances usability by guiding users to stay within the desired length while still expressing their message clearly.

Core configuration for the identification and visual footprint of the text area.
sTitle)sFieldLayout)sShortlabel)sNametag)<%fieldname14%>) used in form logic and data mapping.sSize)sRows)Rules governing the amount and type of content allowed in the field.
sMinlength, sMaxlength)sRequired)sAccept_HTML)sReadonly)Advanced settings that utilize browser or external intelligence to aid the user.
sAutocomplete)sAiAssistant) 🤖sPredefined)fieldname1), URL parameters, or global JS variables.sPredefinedClick)sExclude)sUserhelp)sAudioSrc)sCsslayout)The Checkbox Control allows developers to insert a multi-select field into a form, enabling users to choose one or more options from a group of checkboxes. Each checkbox option is associated with both a display label and an underlying value. By default, the labels of the selected checkboxes are submitted to the server when the form is sent, while the values are used for internal calculations. However, this behavior is fully configurable—developers can choose whether to submit the labels, or values, depending on the needs of the application.
An additional feature of the Checkbox Control is the ability to associate a quantity input with each checkbox. When enabled, users can specify a numeric value for each selected option, and the control will automatically calculate a total by multiplying the quantity by the corresponding checkbox value. This makes it particularly useful for scenarios such as product selection, service customization, or donation forms where quantity matters.
The control can also be marked as required, and developers can define constraints on the minimum and maximum number of checkboxes a user must or can select. This ensures that users provide sufficient input without exceeding predefined limits.
One of the most powerful features of the Checkbox Control is its support for conditional dependencies. Developers can configure other fields in the form to appear only when specific checkboxes are selected. This dynamic behavior allows for highly personalized and context-sensitive forms. For example, if the checkbox field is used to select a type of pet, selecting "Dog" could reveal fields related to breed and size, while selecting "Snake" or "Tarantula" might display entirely different fields relevant to those animals. This makes the Checkbox Control an essential tool for building intelligent, responsive forms.
Additionally, the Radio Button Control supports inline HTML within option labels, allowing developers to embed images directly alongside the checkboxes. For example, using a tag like <img src="https://www.yourwebsite.com/path-to-the-images/image.png"> will display the image next to the corresponding option in the public-facing form. This visual enhancement is especially useful for product selection, visual surveys, or any form where imagery improves clarity and engagement.
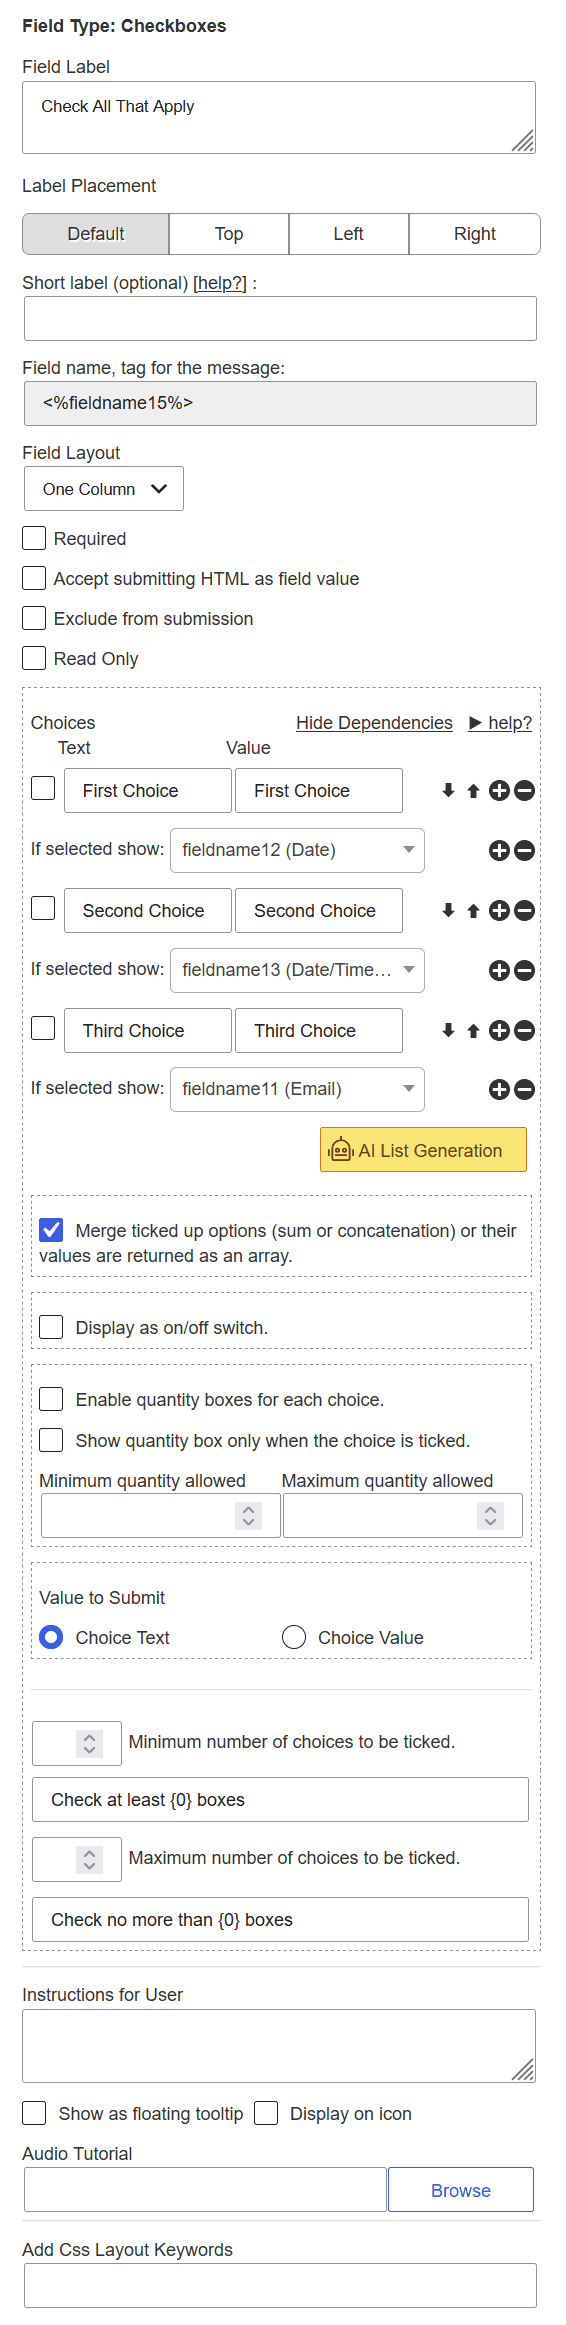
sTitle)sLayout)sFieldLayout)sOnOff)This section governs the individual options available to the user.
choice_check)choicesEditDep)fieldname12) only if a particular checkbox is ticked.sQuantity)sMin, sMax)sMinError, sMaxError).sMerge)sRequired)sToSubmit)sReadonly)sUserhelp)sAudioSrc)The Radio Button Control is specifically designed for scenarios where users must select a single option from a predefined set. Unlike the Checkbox Control, which allows multiple selections, the Radio Button Control enforces exclusivity—only one option can be chosen at a time. Each radio option consists of a display label and an associated value. By default, the label of the selected option is submitted to the server when the form is sent, while the value is used internally for calculations. However, developers can customize this behavior to submit the value instead of the label, depending on the application's requirements.
A standout feature of the Radio Button Control is its support for conditional dependencies. Developers can configure other fields in the form to appear only when a specific radio option is selected. This enables dynamic and context-sensitive form behavior. For instance, if the radio field is used to select a property type, choosing "House" could reveal fields related to yard size and number of floors, while selecting "Apartment" or "Commercial Unit" might display entirely different fields tailored to those property types.
Additionally, the Radio Button Control supports inline HTML within option labels, allowing developers to embed images directly alongside the radio buttons. For example, using a tag like <img src="https://www.yourwebsite.com/path-to-the-images/image.png"> will display the image next to the corresponding option in the public-facing form. This visual enhancement is especially useful for product selection, visual surveys, or any form where imagery improves clarity and engagement.
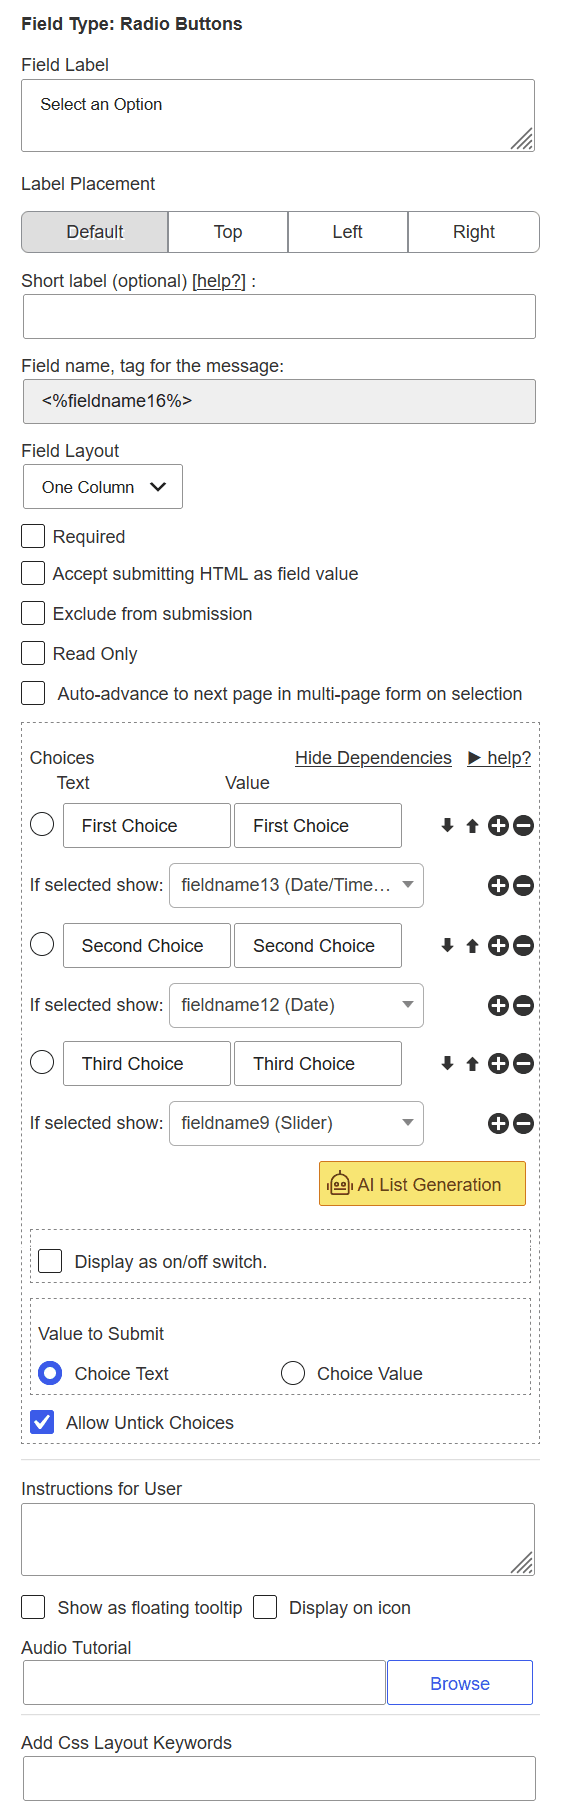
Core attributes for naming and arranging the radio button group.
sTitle)sLayout)sFieldLayout)sShortlabel)Individual options and the reactive behaviors they trigger.
choice_radio)choicesEditDep)fieldname13).sNextPage)sUntickAccepted)sRequired)sOnOff)sUserhelp)sAudioSrc)sNametag)<%fieldname16%>) used in equations and email templates.The Dropdown List Control presents users with a structured list of selectable options. It can be configured to allow either a single selection or multiple selections, depending on the form's requirements. When set to support multiple selections, developers can also define how many options are visible at once before scrolling becomes necessary, improving usability for longer lists.
Each option within the dropdown consists of a display text and an associated value. By default, the text of the selected option is submitted to the server upon form submission, while the value is used internally for calculations. This behavior is fully customizable—developers can choose to submit the value instead of the text if needed. Additionally, options can be grouped using the optgroup attribute, which organizes related choices under a non-selectable heading, enhancing clarity and navigation within complex lists. The control also supports an initial placeholder option to guide users before they make a selection.
A key feature of the Dropdown List Control is its support for conditional dependencies. Developers can configure other fields in the form to appear only when specific dropdown options are selected. This dynamic behavior allows for highly responsive and personalized forms. For example, if the dropdown is used to select the number of guests, the form can automatically display the appropriate number of input fields to collect guest details based on the user's selection.
One often-overlooked attribute is the "Include a search box" option. When enabled, this feature adds a search field to the dropdown, allowing users to quickly locate and select an option without scrolling—especially useful in long lists. As a bonus, dropdown options can include inline HTML such as image tags (e.g., <img src="https://www.yourwebsite.com/path-to-the-images/image.png">), allowing for visually enriched selections. However, it's important to note that while these image tags can be included in the option text, they are supported only when the "Include a search box" option is ticked.
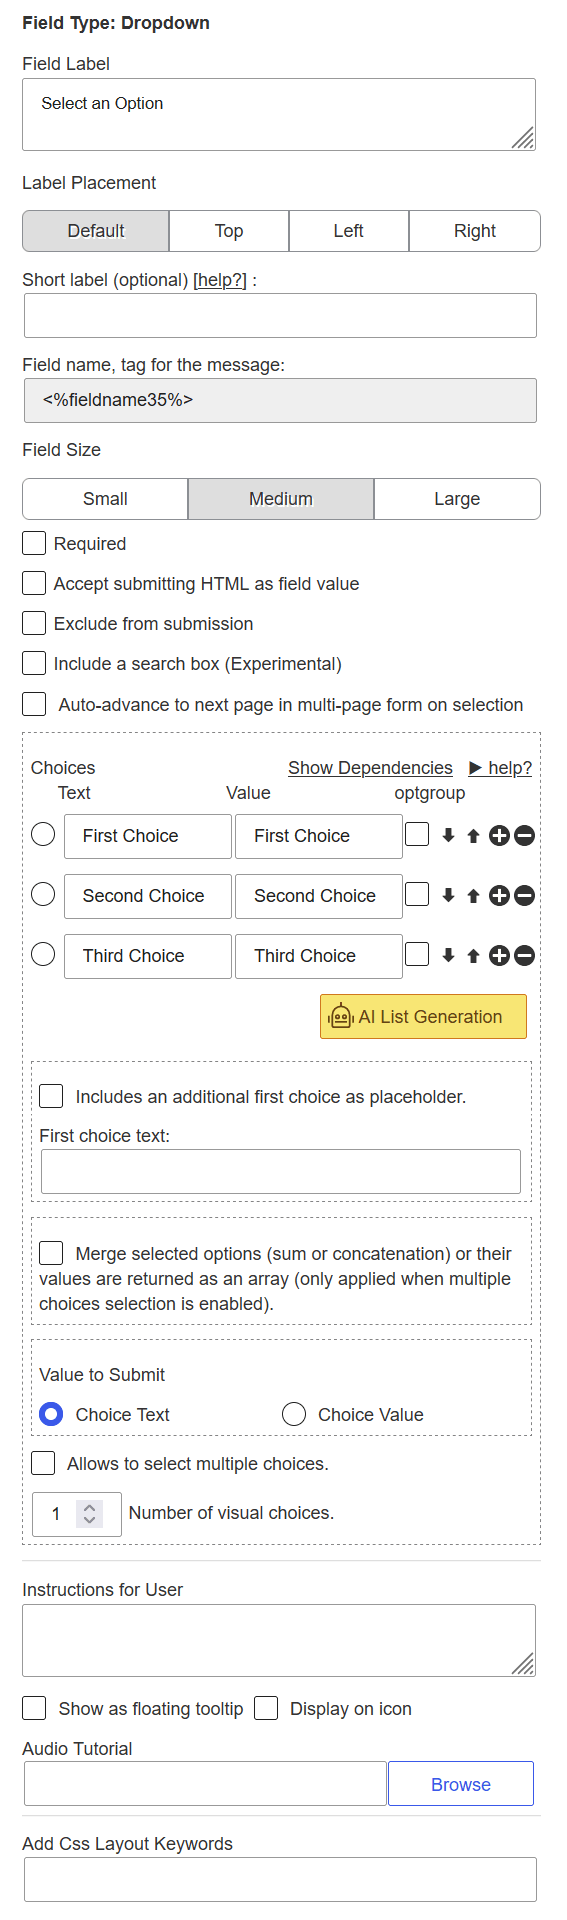
Core attributes for naming, sizing, and positioning the dropdown interface.
sTitle)sFieldLayout)sSize)sShortlabel)sNametag)<%fieldname35%>) used for data processing, calculations, and email templates.Management of selectable items and the dynamic behaviors they trigger.
choice_select)choicesEditDep)optgroup)Functional configurations for user interaction and submission data format.
sMultiple)sVChoices) to set the visible list height.sToSubmit)sSelect2)sFirstChoice)sFirstChoiceText).sNextPage)sRequired)Features designed to guide the user and provide additional context.
sUserhelp)sUserhelpTooltip) or via a help icon (sTooltipIcon).sAudioSrc)sCsslayout)sExclude) and Accept submitting HTML (sAccept_HTML) for advanced data handling.The Upload File Field enables users to submit local files to the server as part of a form submission. This functionality is especially useful in scenarios such as uploading images for a printing service, submitting documents for translation, or attaching files for verification or review. Developers have full control over the field's configuration, including setting a maximum file size to ensure performance and security, and specifying accepted file types to restrict uploads to formats relevant to the application.
The field can be configured to accept either a single file or multiple files, depending on the use case. For image uploads, an optional thumbnail preview can be displayed, allowing users to visually confirm that they've selected the correct file before submitting the form. This enhances the user experience by reducing errors and improving confidence in the upload process.
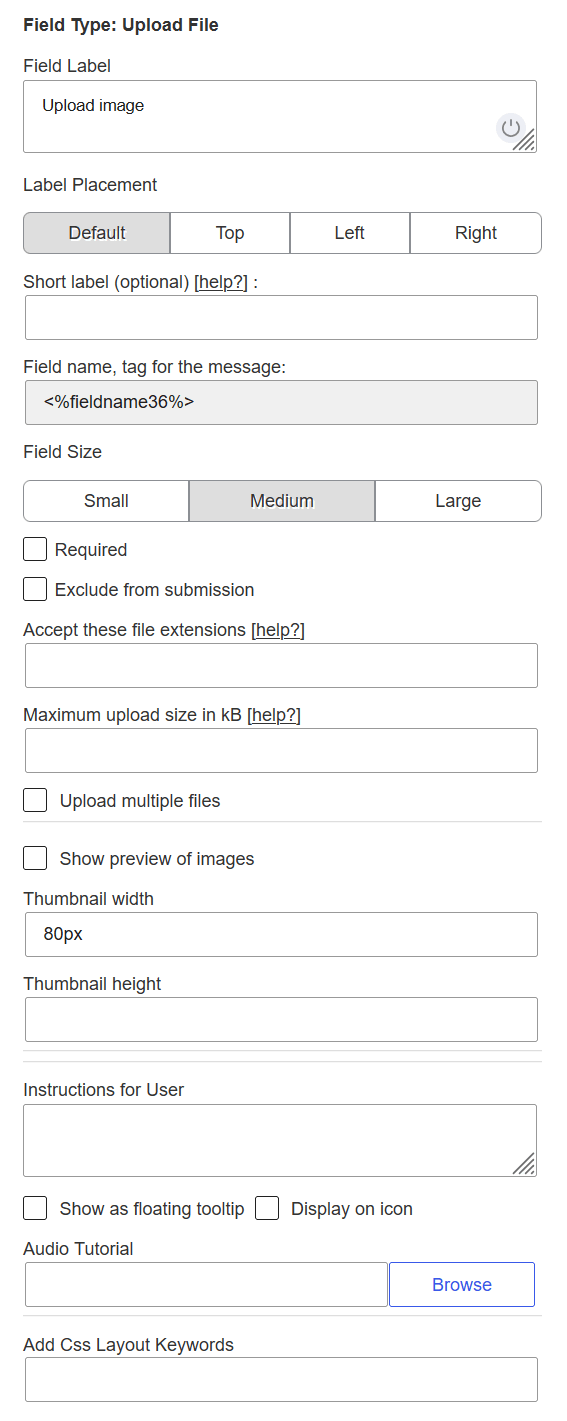
Core attributes for naming and defining the appearance of the file upload interface.
sTitle)sFieldLayout)sSize)sShortlabel)sNametag)<%fieldname36%>) used to reference the uploaded file in emails and server-side processing.Technical limits to control the types and sizes of files users can submit.
sAccept)jpg, png, pdf, docx).sUpload_size)sMultiple)sRequired)Visual feedback options for users uploading image-based files.
sPreview)sThumbWidth)80px).sThumbHeight)Support features to assist users in completing the upload process.
sUserhelp)sUserhelpTooltip) or attached to a help icon (sTooltipIcon).sAudioSrc)sCsslayout)sExclude)The Password Field introduces a secure input field into the form, making it an essential component for login and user registration workflows. This field automatically masks the characters entered by the user, preventing nearby individuals from viewing the input and enhancing privacy during data entry.
Beyond basic masking, the Password Field offers robust validation capabilities. Developers can enforce minimum and maximum length requirements and apply advanced validation rules using regular expressions. These rules can require passwords to include both letters and numbers, enforce the use of uppercase and lowercase characters, or mandate the inclusion of special symbols—ensuring strong password practices and improving overall security.
A common feature in user registration forms is password confirmation, and the Password Field supports this by allowing developers to activate the verification that the value entered matches another password field within the same form. This helps prevent user errors and ensures consistency before submission.
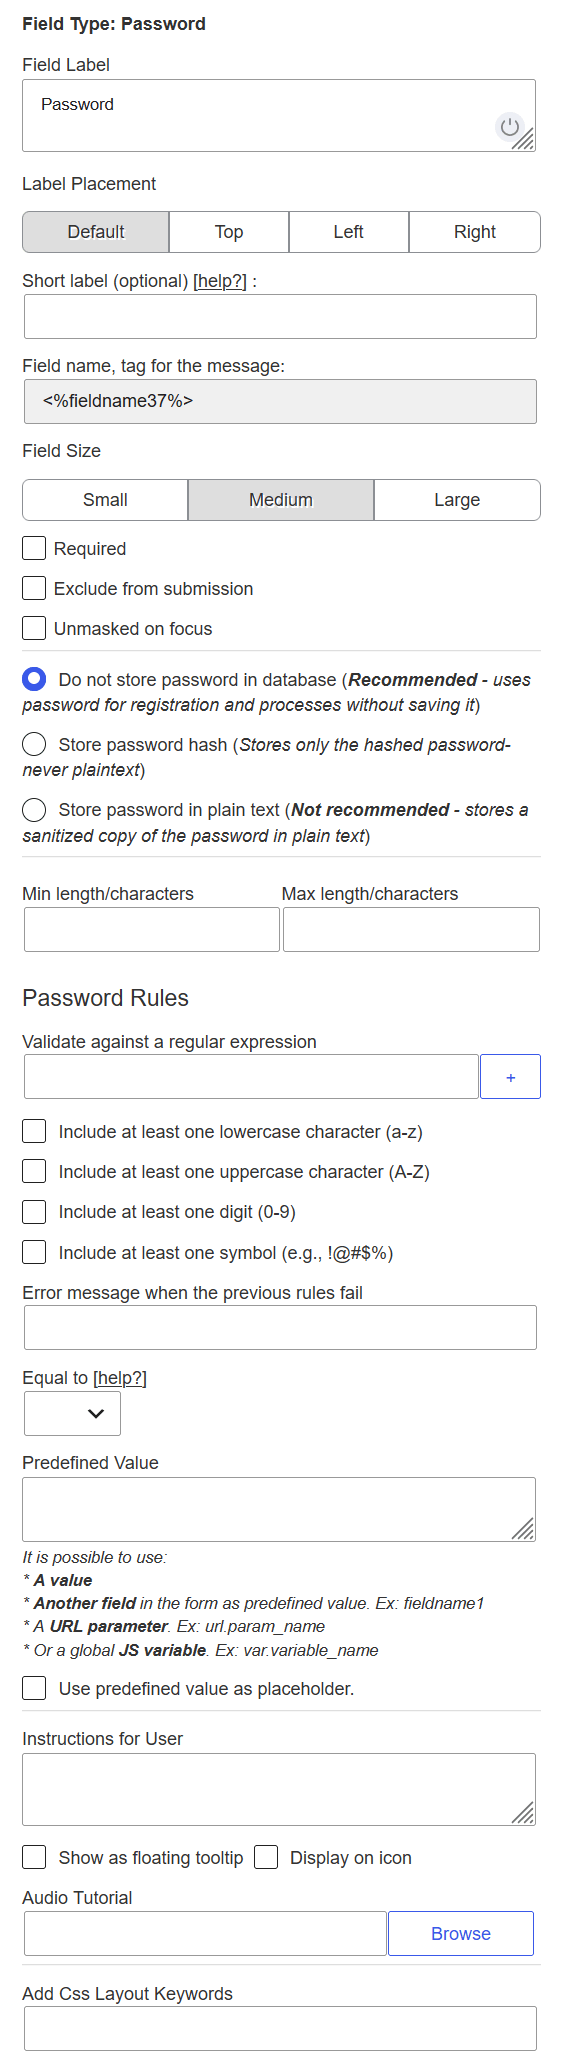
Core attributes for naming and defining the structural appearance of the password input.
sTitle)sFieldLayout)sSize)sShortlabel)sNametag)<%fieldname37%>) used for logic and referencing the field in messages.Critical settings governing how sensitive password data is handled and stored.
sStore)sUnmaskedOnFocus)sExclude)Requirements that must be met for the password to be considered valid.
sMinlength / sMaxlength)sLowercase), Uppercase (sUppercase), Digit (sDigit), or Symbol (sSymbol).sRegExp)sRegExpMssg).sEqualTo)Options for default values, placeholders, and user assistance.
sPredefined)sPredefinedClick).sUserhelp)sUserhelpTooltip) or via a Help Icon (sTooltipIcon).sAudioSrc)sCsslayout)The Phone Number Field allows users to input telephone numbers while supporting international formats, making it a highly flexible and globally relevant component. Developers can include a country code selector within the field, which enhances usability by allowing users to choose from a list that includes country flags, full country names, and not just the prefix or ISO code—streamlining identification and selection.
Additionally, the field can dynamically adjust its formatting based on the selected country code, helping users enter numbers that comply with that country's specific length and structure requirements. This intelligent formatting improves validation accuracy and minimizes user errors, making it ideal for applications with international audiences, such as registration forms, contact systems, or communication platforms.
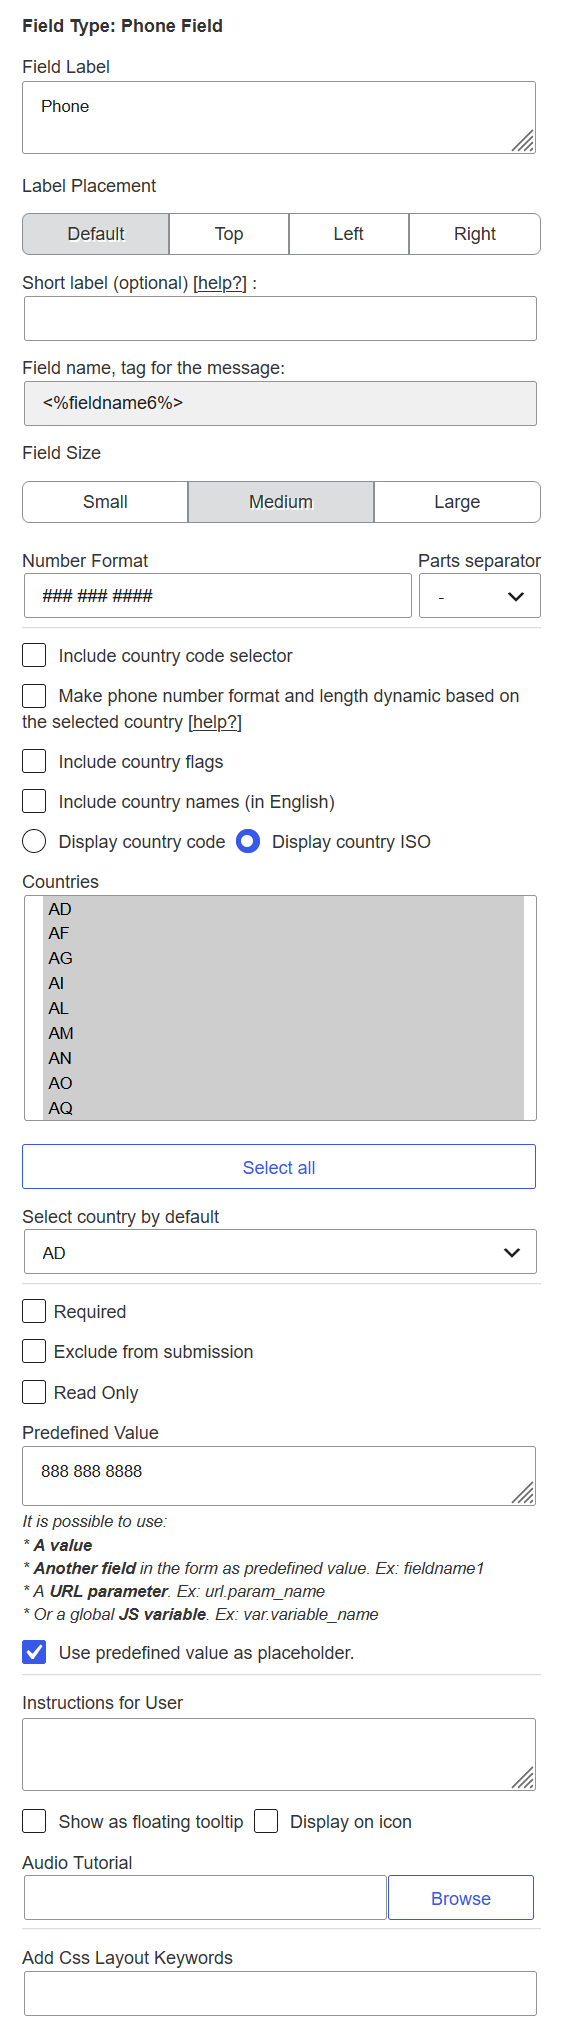
Core attributes that define the field’s label, internal name, sizing, and label placement.
sTitle"Phone". Supports multi-line text (textarea control).sFieldLayoutdefault.sShortlabelsNametag + sName<%fieldnameN%>. The hidden sName stores the raw slug (e.g., fieldname6).sSizeDefine the default display mask and digit grouping before enabling international features. These settings are overridden when “dynamic country format” is active.
sFormat# as a digit placeholder. Default: "### ### ####" (US-style grouping). Example: ###-###-#### for dash separation.sSeparatorsDynamic) is enabled — the plugin then applies country‑specific rules.Robust country‑aware settings: enable country code dropdown, dynamic validation, flags, and pre‑selected territories.
sCountryComponentsDynamic smart validationsIncludeFlagssIncludeCountryNamessToDisplaycode) shows numeric prefix (e.g., +1), or Display country ISO (iso, default) shows two‑letter codes (e.g., US).sCountriessDefaultCountryUS, GB). If none selected, the first allowed country is used.sDynamic) also affects validation error messages and input masking. For best results, combine with the country code selector and allowed countries list.Control whether the field is mandatory, read‑only, or excluded from final submissions.
sRequiredsExcludesReadonlyDefault values, placeholders, tooltips, audio guides, and contextual assistance to improve user experience.
sPredefined888 888 8888 (default).fieldname1.url.param_name.var.variable_name.sPredefinedClicksUserhelpsUserhelpTooltipsTooltipIconsAudioSrcInject custom layout keywords and fine‑tune the appearance without touching global stylesheets.
sCsslayoutThe Instruct Text Field is a non-interactive element used purely for informational purposes within a form. It does not contain any input controls, but it serves as a valuable tool for guiding users by displaying helpful content. This field supports basic HTML formatting, allowing developers to include bold and italic text, hyperlinks to external pages, and other inline elements to enhance readability and context.
By leveraging HTML tags, the Instruct Text Field can be used to highlight important instructions, provide clarification, or direct users to additional resources—ensuring a smoother and more informed form-filling experience.
The Section Break Field serves as a visual divider between different parts of a form, enhancing readability and helping users navigate long or complex layouts more easily. It typically features a prominent heading—styled with a larger font size than other text elements—and, in many form layouts, a horizontal line for added separation. This field is purely decorative and does not include any interactive input controls. It also does not transmit any data to the server upon form submission, as its purpose is solely to organize and visually structure the form's content.
The Page Break Field enables the creation of multi-page forms by dividing content across separate form pages. When a Page Break is inserted, it automatically segments the form so that fields placed before and after the break appear on different pages. In a multi-page form, only one page is visible at a time, and each displays a header indicating the current page number alongside the total number of pages. Additionally, two navigation buttons appear at the bottom of the form: one to return to the previous page, and another to proceed to the next. Both the page header and button labels are fully customizable via the "Texts Definition" section in the form's settings.
Multi-page forms integrate seamlessly with the "Progress Bar for Calculated Fields Form" plugin, which enhances the navigation experience by allowing users to jump directly to specific pages instead of progressing through them sequentially. The plugin also supports personalized page titles, offering greater flexibility in designing complex, user-friendly form flows
The Summary Field displays the values of other fields (selected by the form developer) directly within the form, including both user-entered data and dynamically calculated results. It serves as an effective review tool, offering users a consolidated view of their inputs before final submission. This feature is especially valuable in multi-page forms, as it allows users to confirm the accuracy and completeness of all entries on the final page—eliminating the need to navigate backward through previous sections. By reinforcing clarity and transparency, the Summary Field helps reduce errors and improve confidence in the submission process.
The Media Field allows developers to embed rich multimedia content—such as images, audio, and video—directly into the form, enhancing both functionality and user engagement. Each media type can be individually configured with relevant attributes. For example, developers can define alternative text for accessibility, set custom dimensions to control layout, and enable playback controls for audio and video files, allowing users to interact with the media intuitively. Images may also be linked to external pages or different sections of the form, guiding users or offering additional context.
This field offers a versatile solution for integrating dynamic content into forms—perfect for tutorials, product showcases, promotional materials, or any use case where visual or auditory information strengthens user understanding and interaction.
The Recording Field is considered a niche control, with limited use in general-purpose forms but serving a critical role in specialized applications—particularly within financial services. This field allows users to record live audio or video directly from the form interface, making it an essential tool for scenarios where verifying consent or understanding requires more than a checkbox. For example, it can capture a verbal or visual confirmation of terms and conditions, providing a stronger and more traceable form of user acknowledgment.
To function correctly, the Recording Field requires that the user's device has access to a microphone and/or camera. This prerequisite ensures the user can generate the required media content during form completion. Its inclusion adds a layer of security and accountability, making it ideal for regulated services, identity verification workflows, or high-trust environments where clear and recorded user consent is mandatory.
The QRCode Field is another niche control, yet it offers a wide range of applications. It enables the input of QR and barcode data either by scanning directly with a device's camera or by selecting an image containing the code. This control serves multiple purposes. For instance, it can be used on a supermarket website to allow customers to instantly access product details and pricing, or in a warehouse for inventory management, or on a retailer's site to facilitate order processing. Additionally, many documents include barcodes as identifiers, and this control supports creating a form to capture such data in a simple, intuitive, and fully visual way.
The Acceptance (GDPR) Field includes a mandatory checkbox that must always be selected. When this field is included in a form, users are required to check the box before submitting the form. In Europe, it is compulsory for any form that collects sensitive user information—such as personal data. This field also features attributes that allow developers to insert the terms and conditions directly into the form or provide a link to a dedicated terms and conditions page, ensuring transparency around how user data will be used.
The HTML Content Field is a highly versatile control that allows for rich information input in various formats, including plain text and HTML. Its Content attribute acts as an HTML editor featuring syntax highlighting and error checking, which greatly enhances the user experience. But its capabilities extend well beyond simple content display.
This field offers two particularly powerful attributes:
"Replace shortcodes in the HTML content" – This allows integration of third-party shortcodes directly within the content.
"Accept advanced code in content as JavaScript code" – This enables expanded logic in calculated fields, and for advanced developers, it offers full control over the form's workflow.
⚠️ Key considerations when using advanced features of the HTML Content field:
Some third-party shortcodes may require specific properties and might not render properly within the form or may only be replaced on the public-facing site, meaning they won't appear in form previews.
When embedding JavaScript code via the content attribute, it is the developer's responsibility to ensure the code is valid and secure. Improper code execution can directly impact the behavior and performance of the form.
When clicking over a calculated field in the form builder the following settings will appear:

In addition to the general fields settings there are three additional settings:
If you are implementing a complex equation, you can press the "ADVANCED EQUATION'S EDITOR" button in the field's settings, to load a javascript editor with auto-completion, colors code for reserved words, errors detection and more:

Note for advanced users: The JavaScript ternary operator is also supported: (condition ? value_if_true : value_if_false). See the "Ideal Weight Calculator" for a sample.
The form builder includes some container controls. The container controls allow to insert another controls in them:
Using the container fields to distribute the fields in columns
Related Information....
Developer Version Platinum Version
In addition to the above, the following fields are available only in the Developer and Platinum versions of the plugin:
Related Information....
Widgets and Components is a controls category in the form builder that allows you to reuse and integrate controls from multiple sources within a single form.
This category enables the inclusion of controls not only from the current form context, but also from external contexts such as third-party plugins, custom modules, or external services. By using Widgets and Components, you can extend the functionality of your forms without recreating existing elements, ensuring consistency, reducing development time, and improving maintainability.
In practical terms, this means you can import, display, and interact with controls that were originally defined outside the current form, treating them as native elements within your form builder environment.
Here is the revised HTML description focused on the **purpose and usage** of the "Import Form Fields" component, following AEO principles for AI clarity. You can copy this directly into your documentation page.This component allows form builders to import an entire set of fields from an existing form into the current form being edited. It eliminates the need to manually recreate field structures, supporting template reuse and efficient form assembly.
This component integrates an interactive geographical map into your form, allowing users to view a specific location or place a pin to provide address context. It supports both public mapping services and private tile servers, with options to associate the pin location with a separate address text field for data consistency.
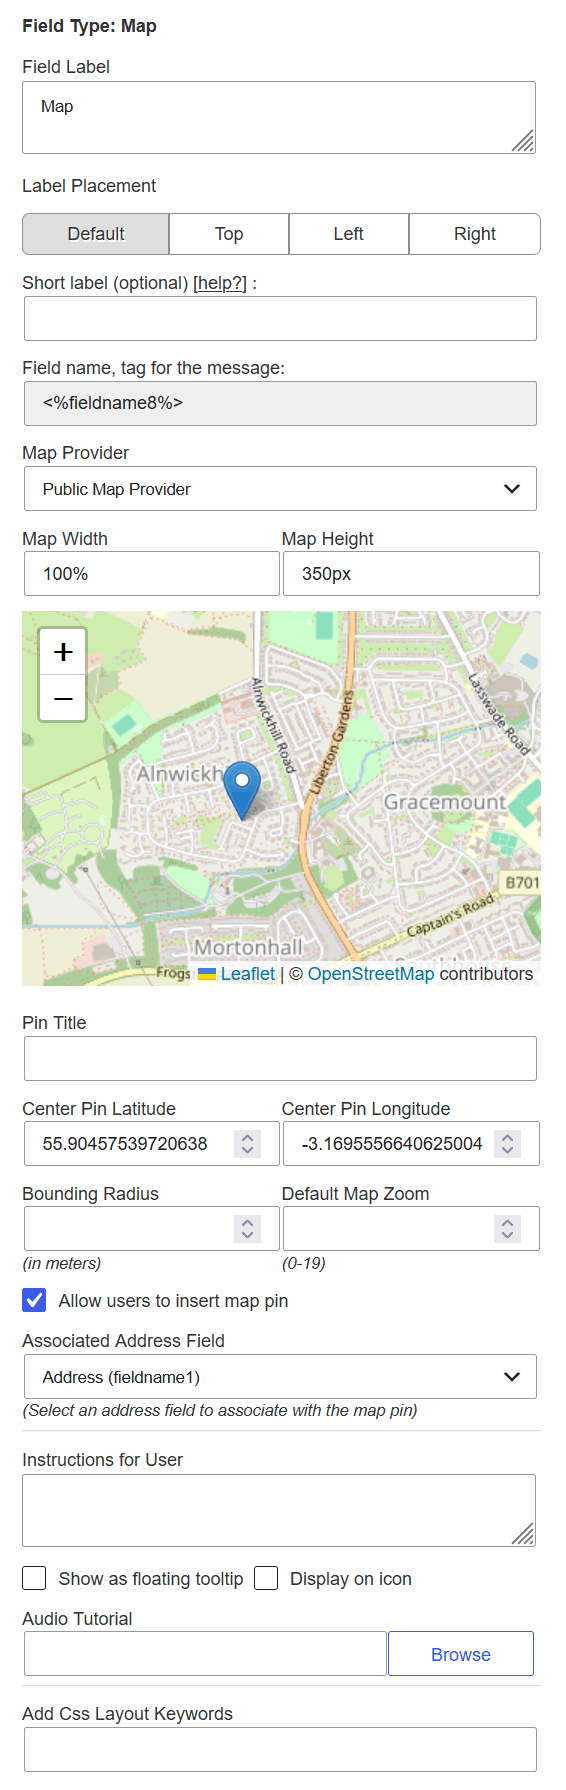
The following settings are available under the "Basic" tab when configuring a Map field.
<%fieldname8%>) used to reference this field in email templates and notification messages. This value cannot be modified by the user to ensure data mapping integrity.100%, 350px, 50vw). Defaults: Width 100%, Height 350px.column2, hidden-label).
When you click a field already added, you can edit its details and validation rules. The following properties are useful:
The plugin includes predefined classes that you can assign to the fields through the "Add CSS Layout Keywords" attribute:
hide to hide the field by default.
ignorefield hides the field, but unlike the hide class, ignorefield disables the field so that it does not affect the equations.
Related Information....
Developer Version Platinum Version
This is a step by step about the use of datasource controls
There are different datasources: Database, CSV file, Recordset, Post Type, Taxonomy, User Data, and Forms Submissions.
Note: Depending of control selected will be available all available datasources, or not.
So, suppose we want populate the field with the data stored in a database table.
Note: If the database is the same used by WordPress, leave empty the fields above.
Now its time to enter the query to database
If your query is very complex, and you prefer create it manually; selects the option "Custom Query", but in this case you should type all the query. Pay attention because you should use alias in the "SELECT" clause, to indicate the colum used to get the values, and the column used to get the texts. For example, a hypothetical query:
SELECT column1 AS value, column2 AS text FROM tablename WHERE column3 > 5 ORDER BY column2 ASC LIMIT 5
The use of database as datasource, allows filtering the information to populate the fields with the values on other fields in the form, or javascript variable. The use of variables are only accepted in the "Condition" section ("WHERE" clause), and requires the format: <%varname%>. For example, to get the title of a post, filtering by its ID, if the ID is entered through the fieldname3 field, the "Condition" attribute of the query would be: ID=<%fieldname3%>
Related Information....
Besides the variables, the plugin allows the use of some constants in the queries. The constants must be enclosed between curly brackets, for example: {user.id}
Assuming you want to insert a "DropDown DS" field where the texts of the choices are the posts' titles, and the values of choices are their IDs, but only for the posts belonging to the logged user, in this case the query to associate with the "DropDown DS" field would be:
SELECT ID as value, post_title as text FROM {wpdb.posts} WHERE post_author={user.id}
In the previous query the constants: wpdb.posts corresponds to the name of the posts table in your WordPress, and user.id to the id of logged user.
The complete list of constants:
blog.id, the id of the current blog (useful in multisite WordPress installations)
wpdb.prefix, prefix used by WordPress in the name of database's tables, for example, the text "wp_" into the table's name "wp_posts"
wpdb.comments, the name of Comments table
wpdb.commentmeta, the name of Comment Metadata table
wpdb.links, the name of Links table
wpdb.options, the name of Options table
wpdb.postmeta, the name of Post Metadata table
wpdb.posts, the name of Posts table
wpdb.terms, the name of Terms table
wpdb.term_relationships, the name of Term Relationships table
wpdb.term_taxonomy, the name of Term Taxonomy table
wpdb.termmeta, the name of Term Meta table
wpdb.usermeta, name of User Metadata table
wpdb.users, the name of Users table
wpdb.blogs, the name of Multisite Blogs table
wpdb.blog_versions, the name of Multisite Blog Versions table
wpdb.site, the name of Multisite Sites table
wpdb.sitecategories, the name of Multisite Sitewide Terms table
wpdb.sitemeta, the name of Multisite Site Metadata table
user.id, the id of the current user
user.login, the username of the current user
user.nicename, the URL-friendly name for the current user
user.email, the email address of the current user
user.url, the URL associated to the current user
user.display_name, the user's name that is shown on the site for the current user
user.first_name, the first name of current user
user.last_name, the last name of current user
The CSV files can be used as data sources for fields with multiple choices (DropDown DS, Radio Btns DS, Checkboxes DS). The initial steps are similar to the previous section, but selecting the "CSV" option as data-source instead of selecting "Database".
A comma-separated values (CSV) file stores tabular data (numbers and text) in plain text. Each line of the file is a data record. Each record consists of one or more fields, separated by commas. The use of the comma as a field separator is the source of the name for this file format.
For CSV files, the plugin includes the attributes:
Select CSV file: allows to select between a local or online file. For local files, the field displays a file field for selecting the CSV file. For online files the field displays a text field for entering the URL to the CSV file.
Use headline: tick the checkbox if the first line of CSV file is a headline to identify the data in the next records.
Delimiter: enter the delimiter symbol used as the field separator on each record.
Press the "Import CSV" button to import the records into the form. This action will feed the lists "Select column for texts" and "Select column for values", that are used for selecting which fields will be used texts and values of the choices in the DS field.
Where the value is equal to: allows filtering the rows to include in the field. The value entered in the attribute must be equal to the value in the column selected for the field's values. It is possible to use the values in other fields in the form, or variables, for filtering the rows, similar to the "Database" datasource.
Enter the conditions for filtering.
This clause require additional instructions, that are explained with an example:
Assuming the values in the "RecordSet DS" fields, selected as datasource, is a list of records with the structure:
{
	'First Name' : 'John',
	'Last Name' : 'Smith',
	'Birth Date' : '1th Jan, 2001'
}
and you want populate a "Line Text DS" field with the "Birth Name" of the user "John Smith"
Type the property name: Birth Date in the "value" attribute.
Enter the properties for filtering in the condition field (pay attention to the use of the reserved word "record" in the conditions):
record['First Name']=='John'&&record['Last Name']=='Smith'
Tips: Javascript is casesensitive, please, be careful with the properties names.
In the conditions can be used the following comparison operators:
equal to: ==
non equal to: !=
less than: <
less than or equal to: <=
bigger than: >=
bigger than or equal to: >=
And the logical operators:
and: &&
or: ||
Related Information....
Some fields, like radio groups, checkboxes and drop-down menu, allow dependencies in function to the option selected.
For example, suppose your form includes a radio-group control with multiple choices: - House, - Car, - Electrodomestics, and each of them, uses different attributes. The house requires fields for address, number of rooms, etc; the car requires a field for trademark, model, etc. and finally the electrodomestics, will need type of electrodomestic,and more. So, if you want display the fields, depending of choice selected:
The calculated fields allow dependencies too, but in function to its value. For example, if you are designing a form for selling electrodomestics, and you want display additional fields for finance the purchase, if the amount is bigger than or equal to $1000usd. In this case:
To configure dependencies with other fields different from radio buttons, checkbox, and dropdown fields, you must use Calculated Fields as auxiliary. Auxiliary fields might be irrelevant in the form's interface. You can hide them by ticking the "Hide Field From Public Page" attribute in their settings.
Related Information....
For each form you will be able to edit the following settings:
Form Builder: Already explained in the previous sections (see above).

Area were to enter the texts for the general elements in the form

This area contains the "texts" used for the validations. You can easily translate them to other languages.

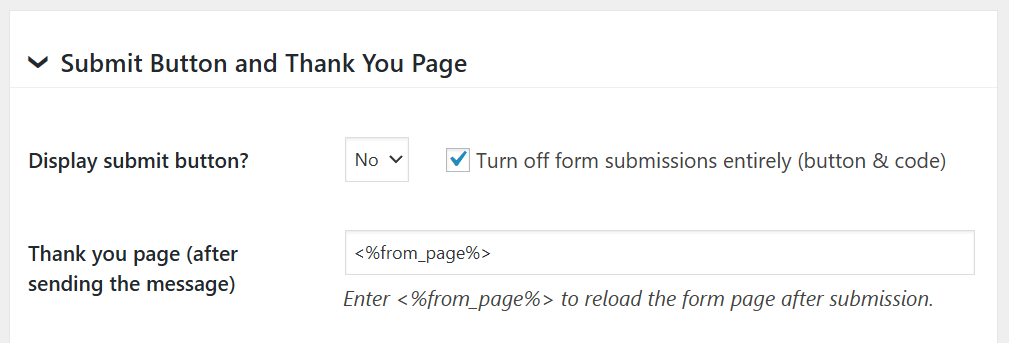
If you select "No" for the "Display submit button?" attribute, the plugin will show a checkbox. This checkbox allows you to disable all form submissions and enhance form protection.
Related Information....
Professional Version Developer Version Platinum Version


For recurring payments it is possible configure a first payment different to the recurring payments, and delay the first payment to offer a trial period.
The Stripe Payments addon provides a way to accept all major cards from customers around the world on web. The Stripe checkout accepts every payment method enabled in your Stripe account.
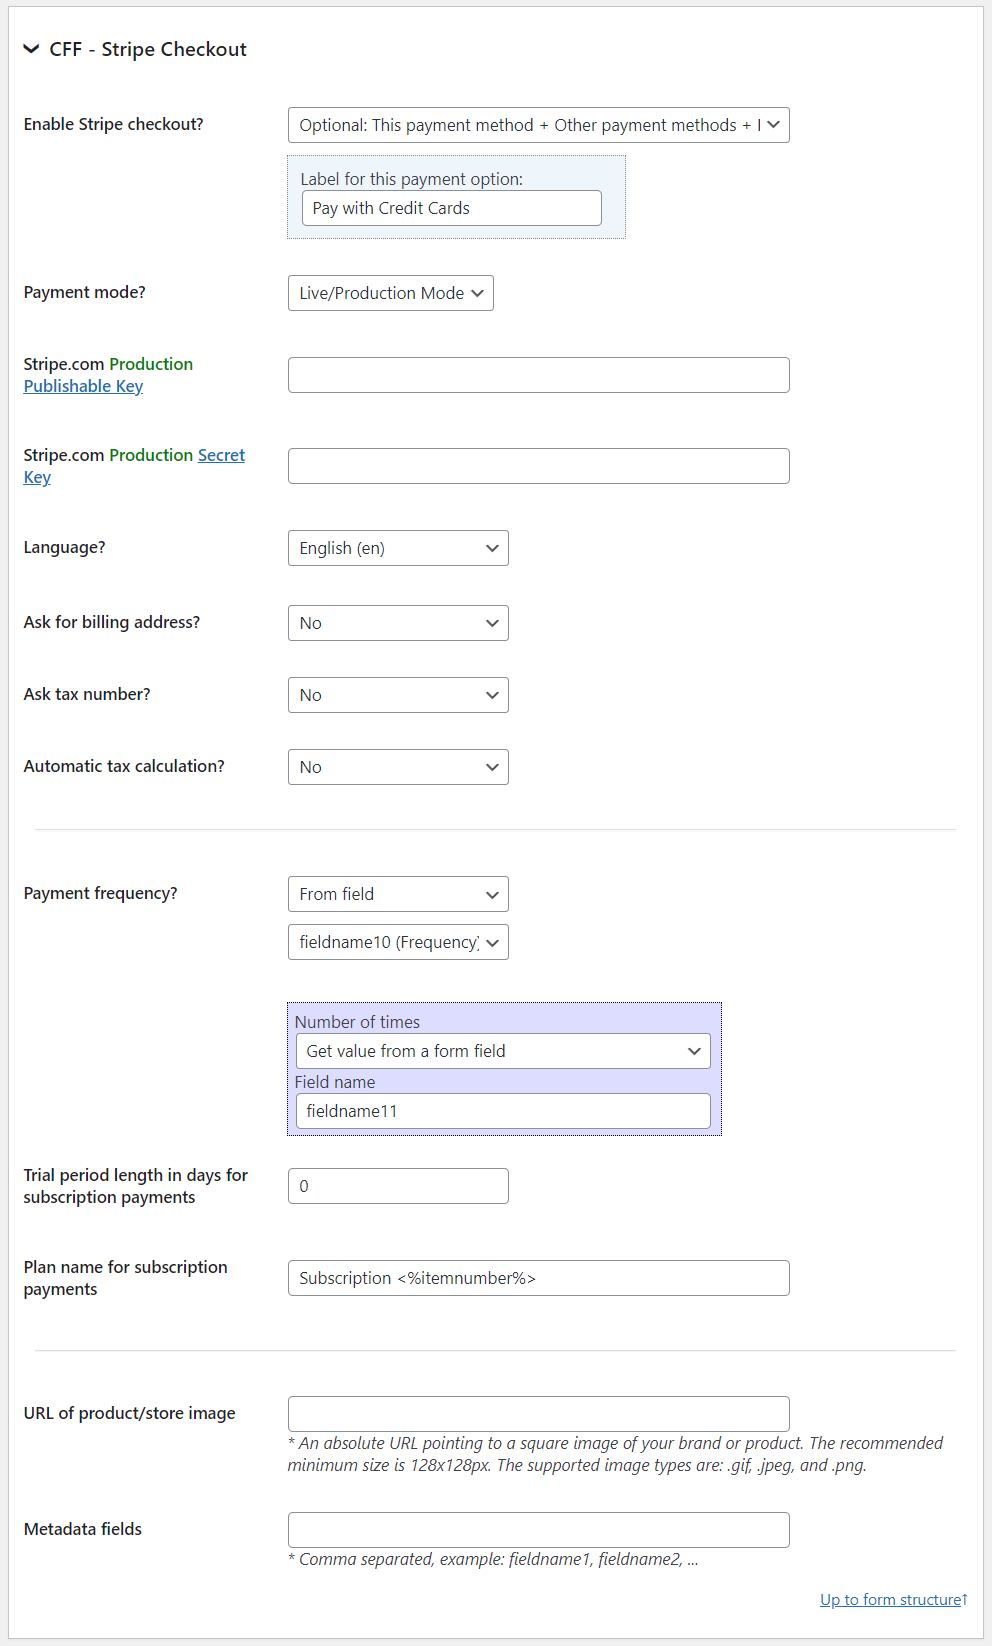
When enabled, after clicking the Calculated Fields Form submit button, the plugin opens the Stripe Checkout page to complete the payment.
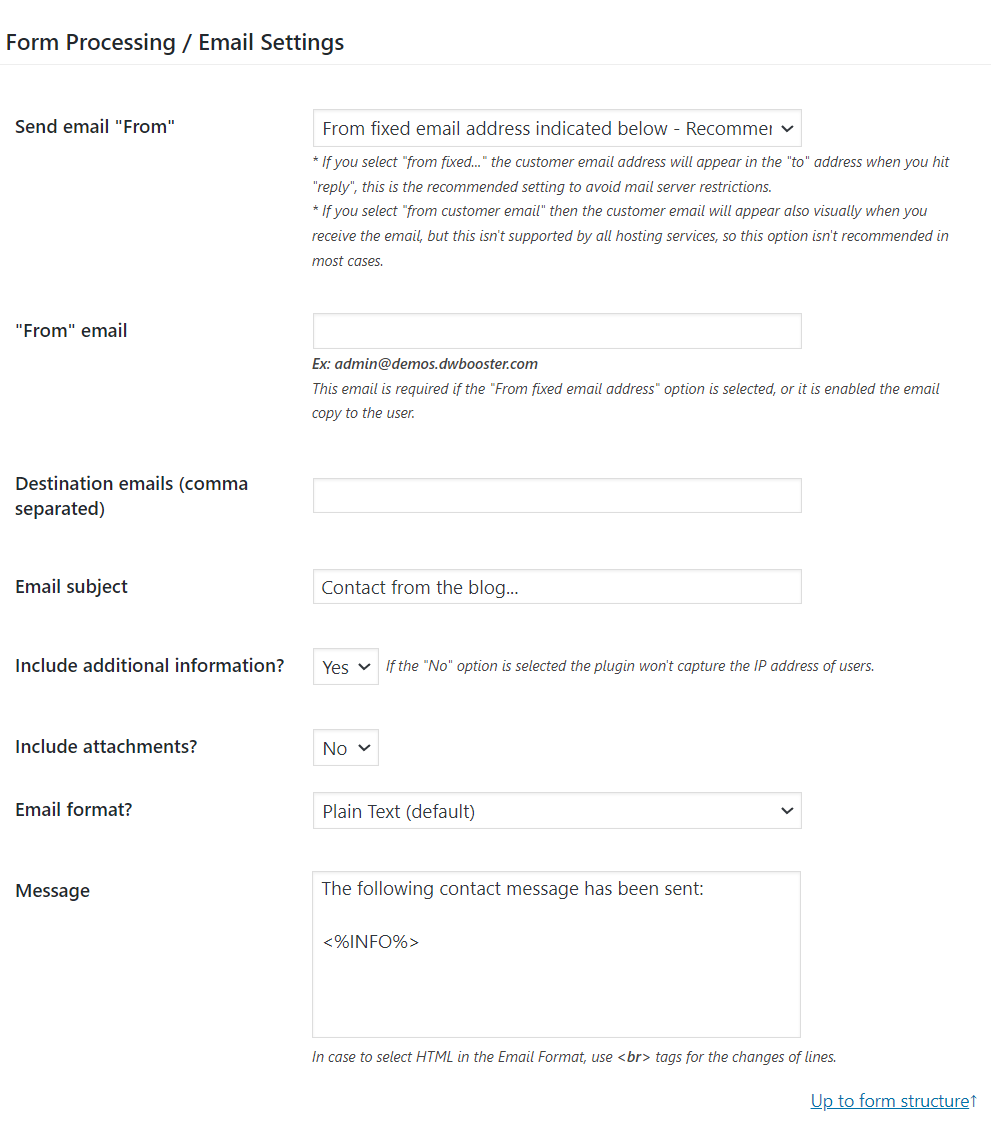
It is strongly recommended the use of an email address in the website's domain. The main emails services (as Gmail, Hotmail, Yahoo, MSN, etc.) check the correspondence between the email address in the "Sender" header on emails, and the domains that send the emails. If the correspondence fails, the emails can be managed as Spam or as a "Phishing" email, in whose case, they would be deleted for security reasons.
Related Information....
Professional Version Developer Version Platinum Version
Related Information....
Professional Version Developer Version Platinum Version
The Captcha Verification feature protects your form against spam and automated submissions by requiring users to complete a challenge. You can choose between two built‑in methods (Classic Captcha or Math Captcha) or integrate external services like Cloudflare Turnstile, hCaptcha, or CleanTalk.
To activate it, first set Use Captcha Verification? to Yes, then select the desired method.
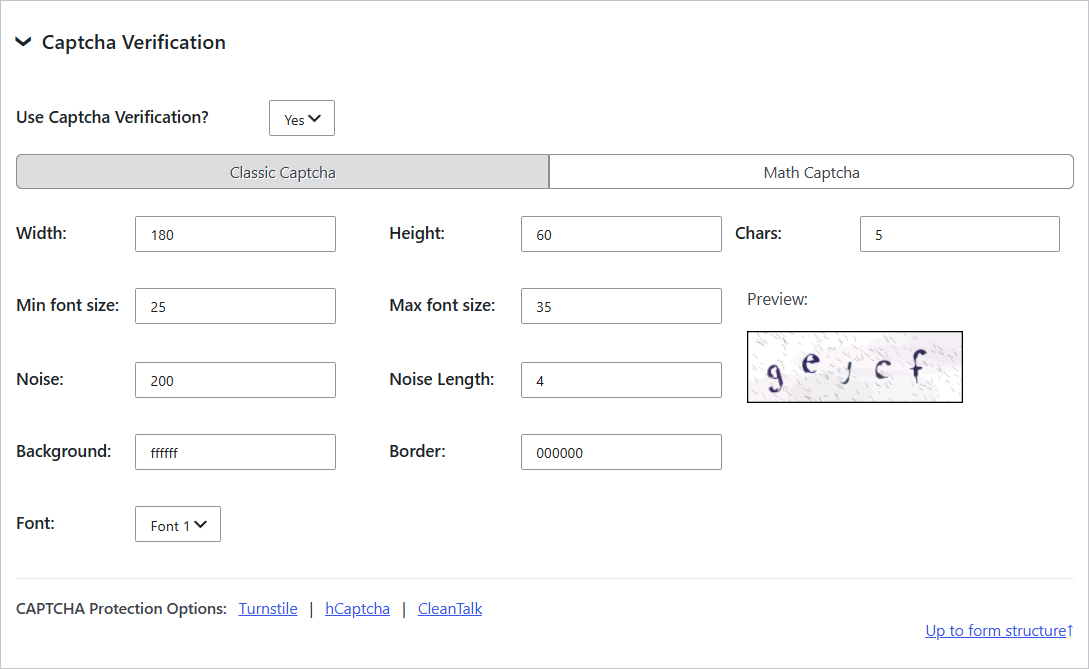
The Classic Captcha displays a distorted sequence of characters that the user must read and retype. Every setting updates the live preview immediately.
# (e.g., ffffff for white).# (e.g., 000000 for black).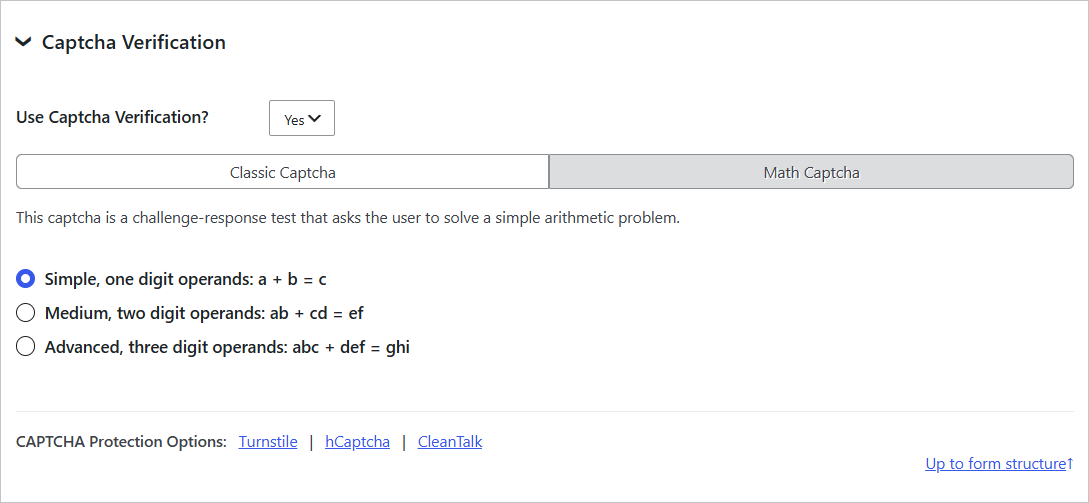
The Math Captcha asks the user to solve a simple addition problem. It is fully accessible because it does not rely on image distortion.
For advanced bot protection with minimal user friction, you can integrate one of the following third-party services instead of the built‑in captcha:
Related Information....
Professional Version Developer Version Platinum Version


The shortcode to insert in the thanks page allows a total control over the content to display with it.
In case to display all fields submitted with the form, is as simple as insert the shortcode: [CP_CALCULATED_FIELDS_RESULT]. But what to do if you want include in the thanks page only some of submitted fields, and not all?
The shortcode supports the "fields" attribute, to select the fields to include in the thanks page, separated by the comma symbol. For example, suppose the form has three fields: fieldname1, fieldname2, and fieldname3, but we want include only the fieldname1, and fieldname3, and exclude the fieldname2, in this case the shortcode would be:
[CP_CALCULATED_FIELDS_RESULT fields="fieldname1,fieldname3"]
But in some cases, we need more control over the content to display. By default, the shortcode is replaced by pairs of label-value for each field included in the thanks page. But what happen if you want display the label of fieldname1 in bold, or use a different label for the fieldname2, that the label used in the form?. In this case, you should use the shortcode in format [CP_CALCULATED_FIELDS_RESULT]...[/CP_CALCULATED_FIELDS_RESULT]. Its content would be a combination of HTML tags and the fields tags: <%fieldname#%>, to display only the label <%fieldname#_label%>, and to display only the value <%fieldname#_value%>. So, in this case, the shortcode would be similar to:
[CP_CALCULATED_FIELDS_RESULT]
<p><%fieldname1_label%>:<%fieldname1_value%></p>
<p>New Label: <%fieldname2_value%></p>
<p><%fieldname3%></p>
[/CP_CALCULATED_FIELDS_RESULT]
To get the complete list of tags to include in the thank you page, read the "SPECIAL TAGS IN THE NOTIFICATION EMAILS" section .
The shortcode accepts too the if_latest attribute, whose accepted values are: 0 or 1 (0 by default) to replace the shortcode, only if it corresponds to the latest submitted form. This attribute should be used in combination with the formid attribute described in the next section.
[CP_CALCULATED_FIELDS_RESULT formid="3" if_latest="1"]
The if_paid attribute in the result shortcode will display the submitted information, only if its payment status is paid
[CP_CALCULATED_FIELDS_RESULT if_paid="1"]
The forms' structures can be very different, and an unique shortcode wouldn't be sufficient to represent all forms. An option would be to insert a different summary shortcode for each form by entering the "formid" attribute indicating the form ID, in each of shortcodes, in whose case the plugin will replace only the shortcode corresponding to the form that has been submitted:
[CP_CALCULATED_FIELDS_RESULT fields="fieldname1,fieldname3" formid="1"]
[CP_CALCULATED_FIELDS_RESULT fields="fieldname8,fieldname9,fieldname14" formid="2"]
[CP_CALCULATED_FIELDS_RESULT formid="4"]
[CP_CALCULATED_FIELDS_RESULT formid="5"]
<p><%fieldname1_label%>:<%fieldname1_value%></p>
<p>New Label: <%fieldname2_value%></p>
<p><%fieldname3%></p>
[/CP_CALCULATED_FIELDS_RESULT]
Related Information....
Professional Version Developer Version Platinum Version
What does this feature do?
The [CP_CALCULATED_FIELDS_RESULT_LIST] shortcode displays a list of form submissions on your WordPress pages or posts. It allows you to show all submitted entries, filter them by date or ID, control their format, and present them as a list or a table.
How do I display submissions?
Examples:
[CP_CALCULATED_FIELDS_RESULT_LIST formid="1"]
[CP_CALCULATED_FIELDS_RESULT_LIST formid="1,2,3"]
[CP_CALCULATED_FIELDS_RESULT_LIST submission="123"]
This shortcode is similar to [CP_CALCULATED_FIELDS_RESULT], but it is designed to display multiple submissions instead of a single entry.
[CP_CALCULATED_FIELDS_RESULT_LIST formid="url.form"]https://www.website.com/page?form=1The shortcode will behave as:
[CP_CALCULATED_FIELDS_RESULT_LIST formid="1"][CP_CALCULATED_FIELDS_RESULT_LIST formid="url.form" submission="url.submission"]
[CP_CALCULATED_FIELDS_RESULT_LIST formid="url.form" from="url.from_date" to="url.to_date"]https://www.website.com/page?form=2&submission=45 https://www.website.com/page?form=1&from_date=2024-01-01&to_date=2024-12-31
How can I filter the submissions list?
[CP_CALCULATED_FIELDS_RESULT_LIST formid="1" submission="8,20,230"]
[CP_CALCULATED_FIELDS_RESULT_LIST formid="1" from="2018-04-09"]from="+3weeks -1day", from="-1year"
[CP_CALCULATED_FIELDS_RESULT_LIST formid="1" to="2018-04-09"]to="+2months +15days", to="-1week"
[CP_CALCULATED_FIELDS_RESULT_LIST formid="1" order="DESC"]
[CP_CALCULATED_FIELDS_RESULT_LIST formid="1" limit="10"]
[CP_CALCULATED_FIELDS_RESULT_LIST formid="1" events_per_page="10"]
Can I restrict who sees the submissions?
Yes. Use the role attribute to display submissions only to specific WordPress user roles.
[CP_CALCULATED_FIELDS_RESULT_LIST formid="1" role="administrator"]How do I control how each submission is displayed?
Wrap the shortcode with content and use field tags to define the layout of each submission.
[CP_CALCULATED_FIELDS_RESULT_LIST formid="1"]
<p><%fieldname1_label%>: <%fieldname1_value%></p>
<p>New Label: <%fieldname2_value%></p>
<p><%fieldname3%></p>
[/CP_CALCULATED_FIELDS_RESULT_LIST]
The full list of available tags is described in the "SPECIAL TAGS IN THE NOTIFICATION EMAILS" section.
How do I show only paid entries?
Use the if_paid attribute to display only submissions with payment status "paid".
[CP_CALCULATED_FIELDS_RESULT_LIST formid="1" if_paid="1"]Can I display submissions in a table format?
Yes. Set layout="table" and define the columns using table_head and table_fields.
Example:
[CP_CALCULATED_FIELDS_RESULT_LIST formid="1" layout="table" table_head="ID, Column A, Column B, Column C" table_fields="itemnumber,fieldname1,fieldname2,fieldname3" view_details="1"]How do I translate the table controls?
Create a JavaScript file with translated texts and pass its URL using the table_language_url attribute.
{
    "decimal": "",
    "emptyTable": "No data available in table",
    "info": "Showing _START_ to _END_ of _TOTAL_ entries",
    "infoEmpty": "Showing 0 to 0 of 0 entries",
    "infoFiltered": "(filtered from _MAX_ total entries)",
    "lengthMenu": "Show _MENU_ entries",
    "loadingRecords": "Loading...",
    "processing": "Processing...",
    "search": "Search:",
    "zeroRecords": "No matching records found",
    "paginate": {
        "first": "First",
        "last": "Last",
        "next": "Next",
        "previous": "Previous"
    }
}
Example:
[CP_CALCULATED_FIELDS_RESULT_LIST formid="1" layout="table" table_head="ID, Column A, Column B" table_fields="itemnumber,fieldname1,fieldname2" table_language_url="https://www.website.com/path/lang.js"]Related Information
All Versions of the Plugin
Gutenberg block to create variables

WordPress classic editor

The icon with the "X" symbol, that appears when editing the contents of pages or posts, inserts a shortcode in the content with the structure:
[CP_CALCULATED_FIELDS_VAR name="..."]
The ... symbol should be replaced by the parameter or variable name. The variables are created as properties of the cff_var variable. For example, in the [CP_CALCULATED_FIELDS_VAR name="varname"] shortcode, you can access the variable value from the equations by using cff_var['varname'], or cff_var.varname
To restrict the source of variable, enter the "from" attribute in the shortcode with any of following values: get, post, session, or cookie. For example, to create the javascript variable: varname, only if exist a session variable with the same name, insert the shortcode: [CP_CALCULATED_FIELDS_VAR name="varname" from="session"]
The shortcode: [CP_CALCULATED_FIELDS_VAR] accepts two other attributes:
The "default_value" attribute allows to enter the value to use by default if there is not a parameter with the specified name, or session variable or cookie:
[CP_CALCULATED_FIELDS_VAR name="varname" default_value="mydefault"]
If there is not a parameter, or session variable, or cookie, with the "varname" name, the plugin will create the javascript variable with the name: cff_var["varname"], and value: "mydefault".
[CP_CALCULATED_FIELDS_VAR name="varname" value="myvalue"]
It creates the cff_var["varname"] javascript variable with "myvalue" value.
After insert the shortcode to create the javascript variable, a valid equation would be: fieldname1*cff_var.varname
There is another way to create variables to be used in the equations, directly from the form's shortcode. All attributes in the shortcode, except the "id" that identifies the form, are converted in javascript properties of cff_var variables with global scope. The properties names correspond to the attributes' name, and their values, the attributes' values:
[CP_CALCULATED_FIELDS id="1" varname="varvalue"]
It is possible create multiple variables by entering multiple attributes.
The variables created through the form's shortcode have a particularity, for each global variable will be created another one with the structure: <variable name>_arr, for example: if the shortcode is:
[CP_CALCULATED_FIELDS id="1" varname="varvalue"]
The plugin will create the varaible, cff_var['varname'] (another valid notation would be cff_var.varname) value varvalue, and the varname_arr variable, whose value is a hash with the varvalue as one of their items.
How to access to the value of the varname_arr?
Simply should be called the varname_arr variable, using as the index, the form_identifier constant: fieldname1*varname_arr[ form_identifier]
Note: If there are multiple shortcodes on the page, and all of them have configured the same variable name, accessing to the variable name through the <variable name>_arr[ form_identifier] format, each form will have access to its own value for the variable, because the cff_var['variable name'] will contain the latest value.
The list of add-ons available in the plugin, appear in the "Add-ons area" of settings page of the plugin. For enabling the add-ons, simply should tick the corresponding checkboxes, and press the "Activate/Deactivate Addons" button.
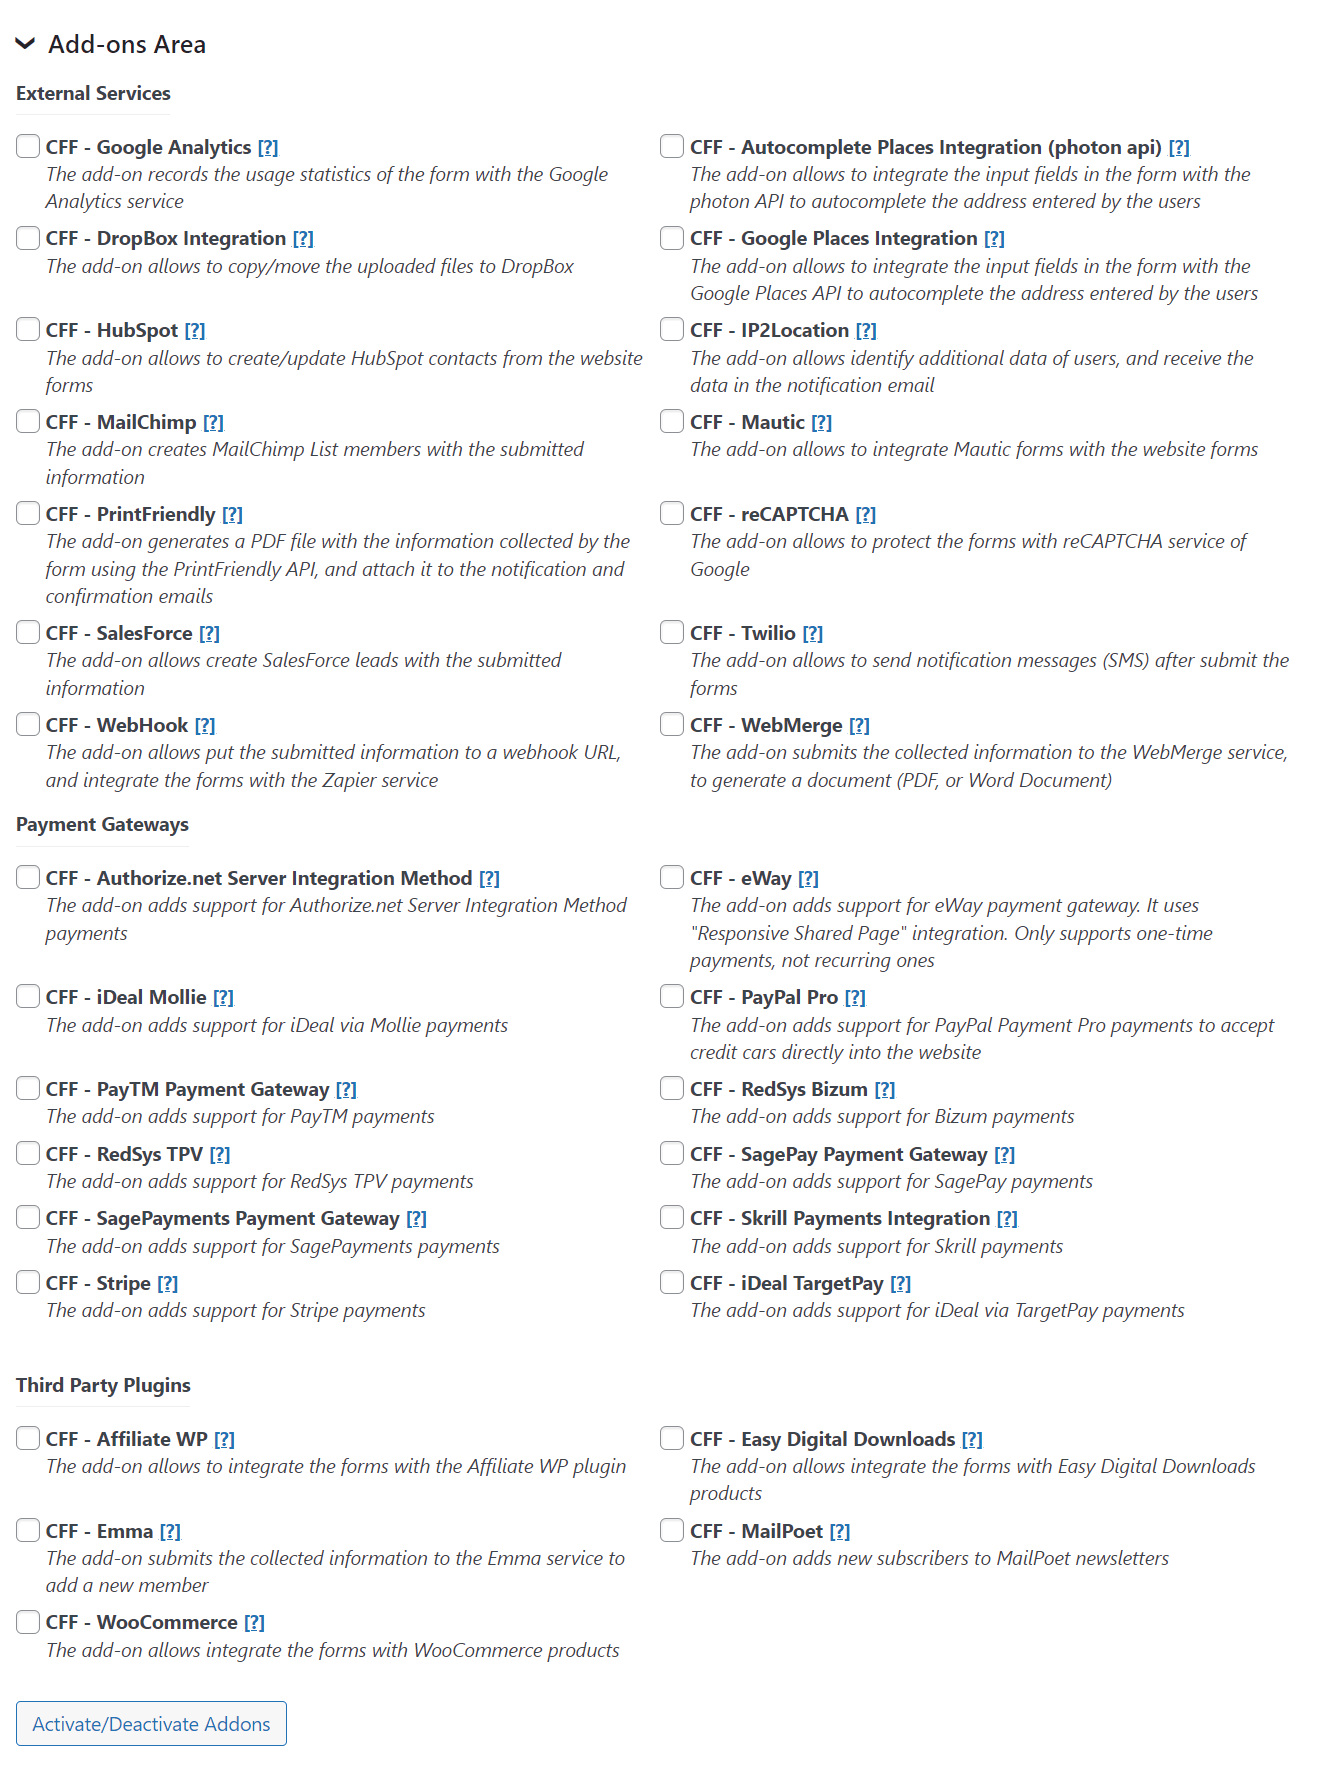
Developer Version Platinum Version
The Server Side Equations add-on allows to enter equations in the server side to protect the business logic, and call them with AJAX from the public form.
The server side equations are entered from the settings page of the plugin, through the "Server Side Equations section".
The server side equations are shared by all forms in the website, reducing the development time.
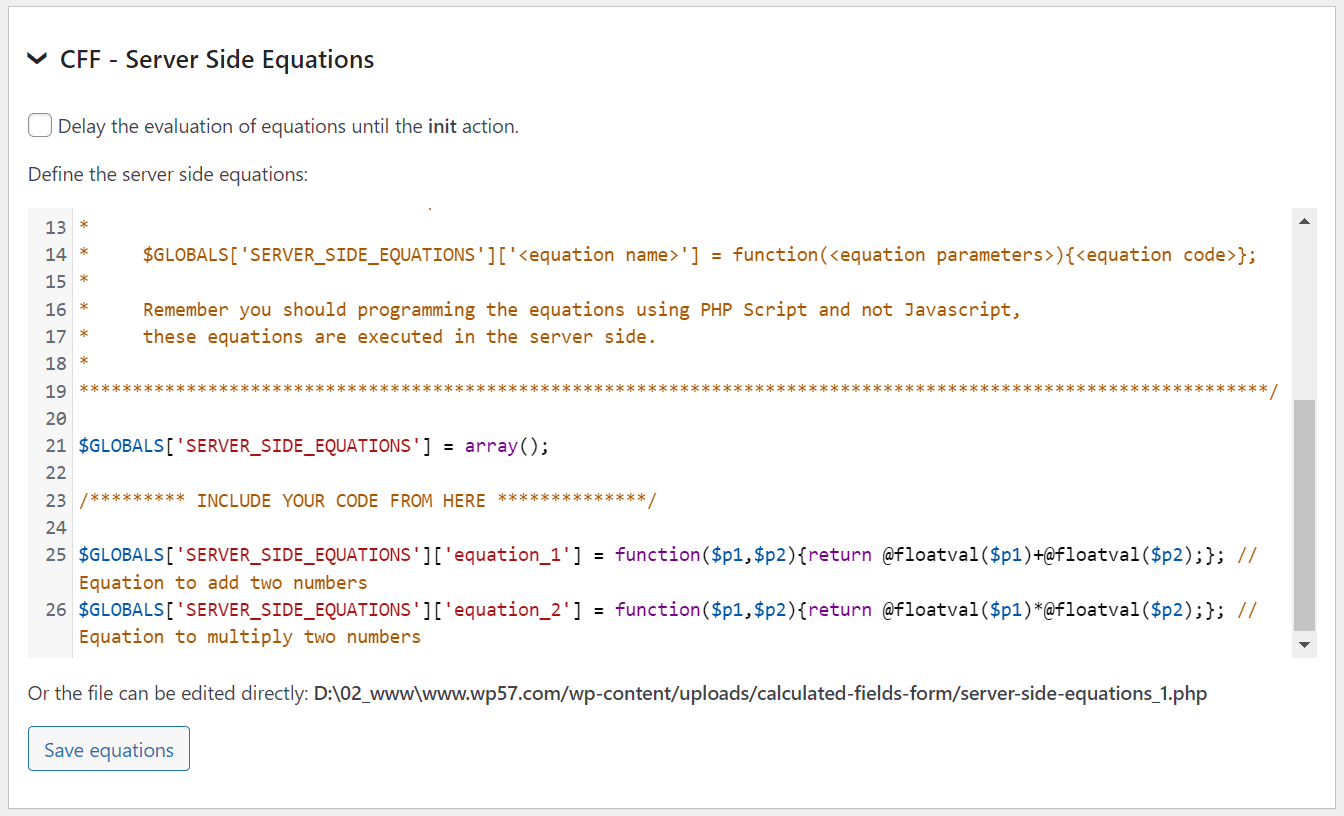
The server side equations are implemented with PHP programming language. The equations should be entered below the line of comment: INCLUDE YOUR CODE FROM HERE.
The equations should be entered in the GLOBAL array: "SERVER_SIDE_EQUATIONS", where the items' indexes are the names of the equations, and the items values are functions with the code of the equations.
For example, assuming you want to implement an equation that calculate the square root of a number, a possible equation would be:
$GLOBALS['SERVER_SIDE_EQUATIONS']['square_root_equation'] = function($number){return sqrt($number);};
Pay attention: The plugin includes a mechanism to prevent overwrites the "server-side-equations_#.php" file in the update process. However, I recommend to copy the file into the "/wp-content/uploads/calculated-fields-form" directory, and the plugin would use this copy of the file instead.
The add-on includes a new operations module with the operation: SERVER_SIDE for calling the server side equations using AJAX.
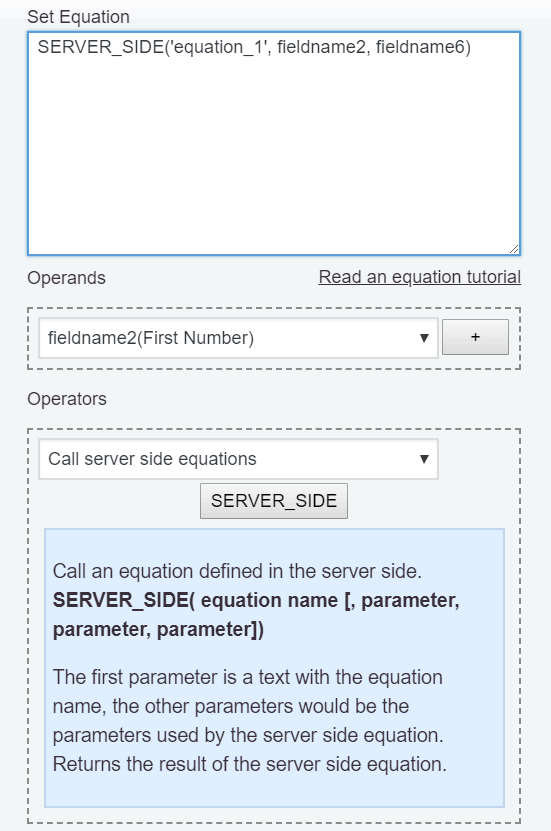
The "SERVER_SIDE" operation requires at least one parameter, the name of the server side equation (following with the previous example, the first parameter would be: 'square_root_equation') and the other parameters would be the parameters required by the server side equation.
SERVER_SIDE('square_root_equations',4)

the result would be 2
To get the square root of a field in the form, for example, the fieldname1, the equation would be:
SERVER_SIDE('square_root_equations',fieldname1)
The Server Side Equations add-on includes a new section in the form's settings to allow calculate the final price through a server side equation, after the form be submitted.
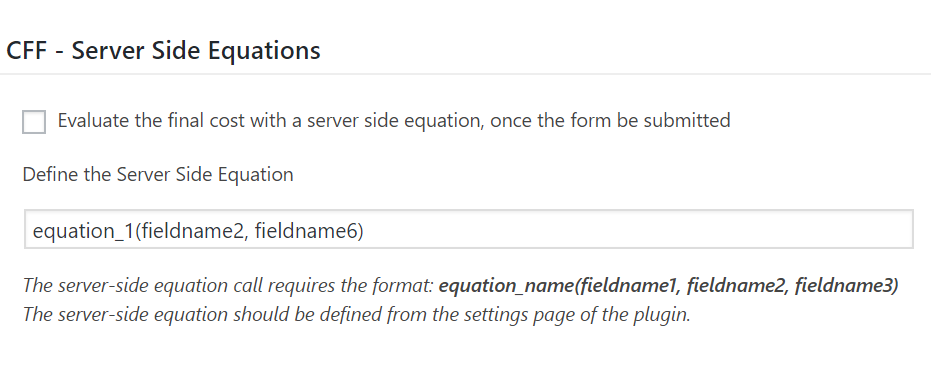
To calculated the final price with a server side equation:
Tick the checkbox: "Evaluate the final cost with a server side equation, once the form be submitted"
Enter the server side equation call with the format: equation_name(fieldname1, fieldname2, fieldname3)
Related Information....
Developer Version Platinum Version
The new add-on: "Users Permissions", allows restrict the access to the forms, and associate the submitted information to the submitter.
The options to restrict the access to the form are: Only for registered users, for registered users with specific roles, or allow the access to the form only to specific users.
With the "Users Permissions" add-on it is possible restrict the number of submissions to only one by user.
The add-on includes a new shortcode: [CP_CALCULATED_FIELDS_USER_SUBMISSIONS_LIST], to display the list of submissions belonging to an user. If the shortcode is inserted without attributes, the list of submissions will include those entries associated to the logged user. This shortcode accepts the attributes: id, for the user's id, and login, for the username (the id attribute has precedence over the login), in whose case the addon will list the submissions of the user selected, furthermore it is possible restrict the list to a specific form using the attribute: formid="#", where # should be replaced by the form's id. Additionally, it is possible to decide the number of items per page (10 by default), configuring the "events_per_page" attribute through the shortcode, E.g. [CP_CALCULATED_FIELDS_USER_SUBMISSIONS_LIST events_per_page="20"]
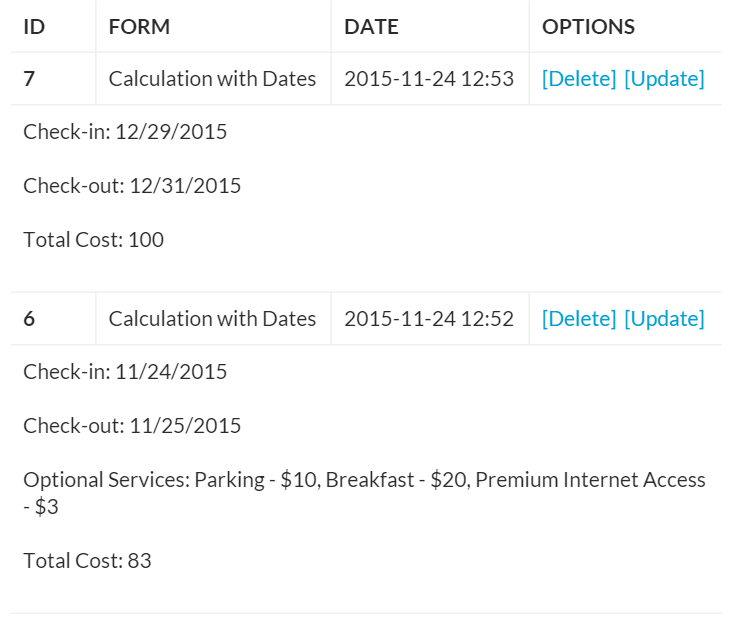
Pay attention: If the page with the shortcode is visited by an user with administrator role, then he/she will have access to the other users' submissions and will have permission to edit or delete them.
Other attributes supported by the [CP_CALCULATED_FIELDS_USER_SUBMISSIONS_LIST] shortcode:
from: a text with date format (yyyy-mm-dd) to display the list of submissions from a specific date. [CP_CALCULATED_FIELDS_USER_SUBMISSIONS_LIST from="2018-04-09"]
The from attribute accepts relative dates, like from="+3weeks -1day", from="-1year", etc.
to: a text with date format (yyyy-mm-dd) to display the list of submissions until a specific date. [CP_CALCULATED_FIELDS_USER_SUBMISSIONS_LIST to="2018-04-09"]
The to attribute accepts relative dates, like to="+2months +15days", to="-1week", etc.
The add-on allows configuring the summary of the submitted data that will displayed in the list of submissions. Enter the summary's structure in the "Summary" attribute. In the summary can be use all the special tags, available for the notification emails, and the thank you pages.
Note, that it is possible to configure the structure of data directly through the shortcode, and this takes precedence over the "Summary" attribute. E.g.
[CP_CALCULATED_FIELDS_USER_SUBMISSIONS_LIST]
<p><b><%fieldname1_label%></b>: <i><%fieldname1_value%></i></p>
[/CP_CALCULATED_FIELDS_USER_SUBMISSIONS_LIST]
The add-on allows to assign permissions for "edit" or "delete" the entries. Actually, the submissions are not deleted, or its data modified from these actions, the real control over the data is only for the website's administrator. In the first case, the submission will be disabled, and will be hidden from the list of user's submissions, but the submission is always accessed by the website administrator through the messages section, and if the data are edited, the original entry will be disabled, and a new entry is generated and associated to the user.
There are other features included by this add-on, the "Messages" section is modified to include in the list of submissions the name of the submitter, furthermore, includes a new input field for filtering the events by users.
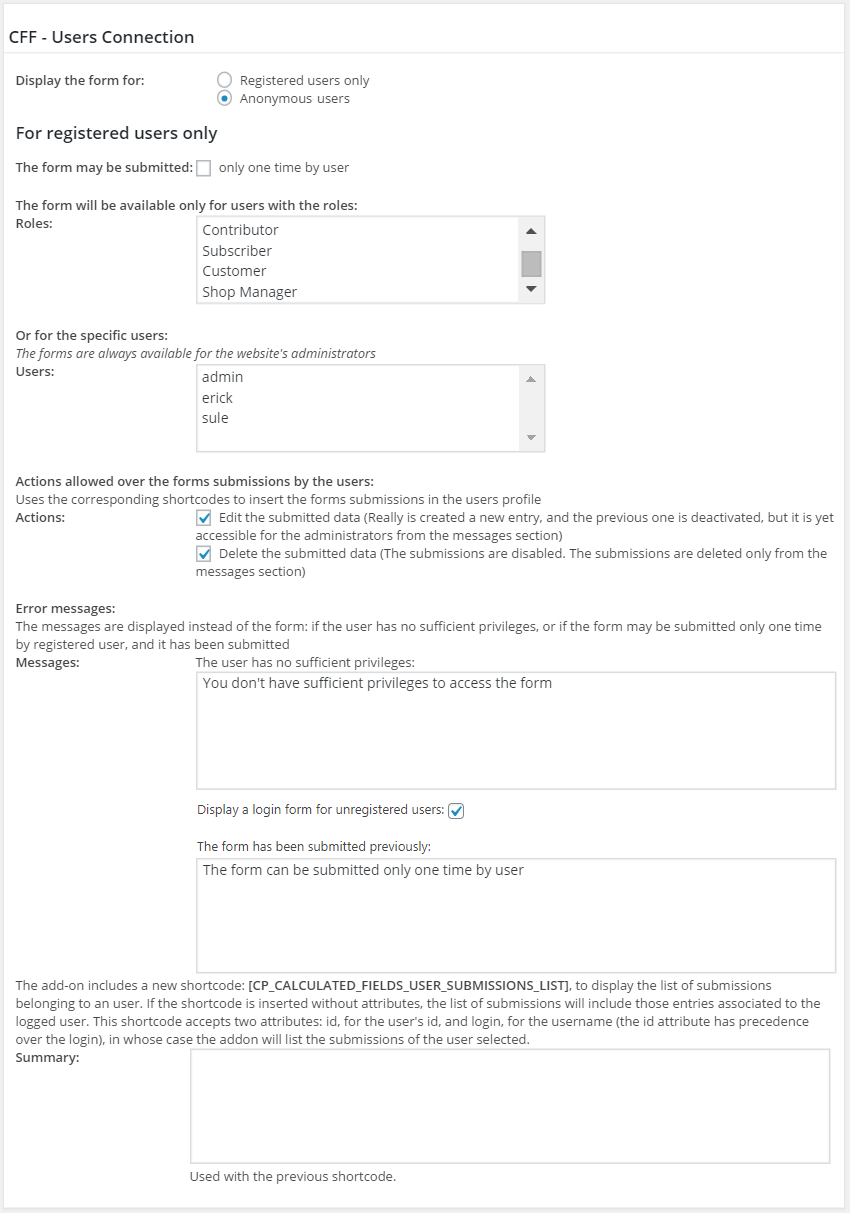
Related Information....
Developer Version Platinum Version
The new add-on: "User Registration Form", allows allows register new users through a form created with the Calculated Fields Form plugin.
The add ons allows even create the users' metadata required by other plugins.
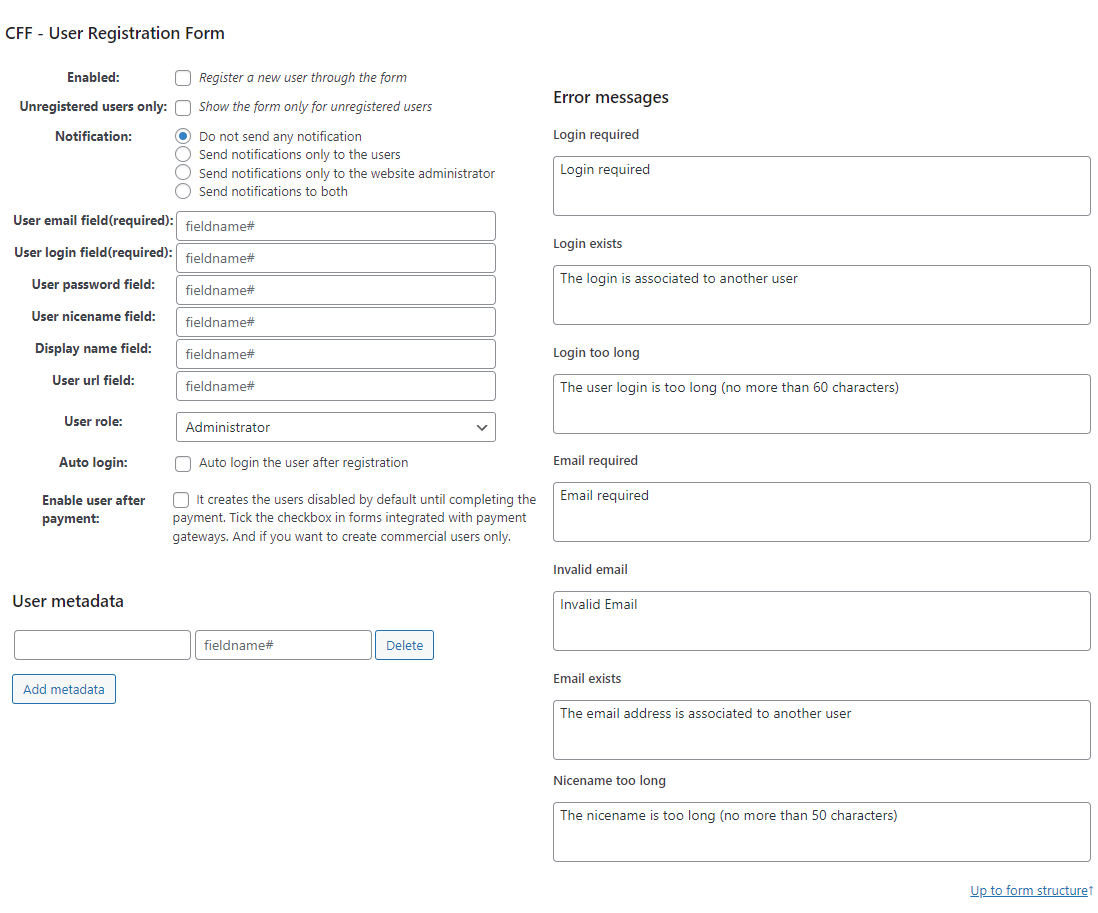
Enabled: Allows to enable/disable the users registration through the form.
Notification: Send a notification email to the new user, the website's administrator, both, or to none of them.
User email field(required): name of field in the form for the user's email.
User login field(required): name of field in the form for the user's login.
User password field: name of field in the form for the user's password. If there is not a field for password it is generated dynamically.
User nicename field: name of field in the form for the user's nicename.
Display name field: name of field in the form for the user's display name.
User url field: name of field in the form for the URL to the user's webpage.
User role field: This field in the form specifies the role to apply. If the submitted role does not match any of the user roles selected in the "User Role" list, the plugin will ignore it and apply the most restrictive role among those selected.
User role: Select the accepted roles for new users. If multiple roles are selected and the form does not submit a specific role, the plugin will assign the most restrictive role among the selected options.
Auto login: auto login of users after registration.
Enable user after payment: creates the users disabled by default until completing the payment. Tick the checkbox in forms integrated with payment gateways. And if you want to create commercial users only.
User metadata section. Allows to add pairs of input boxes for entering the metadata name, and the field's name corresponding to the user's metadata.
Login required: Error message to display if the login is empty.
Login exists: Error message to display if there is an user with the same login.
Login too long: Error message to display if the login is longer than 60 characters.
Email required: Error message to display if the email is empty.
Email invalid: Error message to display if the value entered by the user has no valid email format.
Email exists: Error message to display if there is an user with the same email.
Nicename too long: Error message to display if the nicename is longer than 50 characters.
Developer Version Platinum Version
The "Verification Code" add-on allows verifying the user's email and phone number by sending verification codes and blocking the form's submission until the verification codes are entered.
When the user presses the submit button, the add-on will send to his/her a verification code via email and/or via SMS and will open a dialog to validate them.

The form's submission is blocked until the user enters valid codes through the dialog.
To activate the add-on, go to the settings page of the plugin through the menu option "Calculated Fields Form", tick the "CFF - Verification Code" add-on, and press the "Activate/Deactivate addons" button.
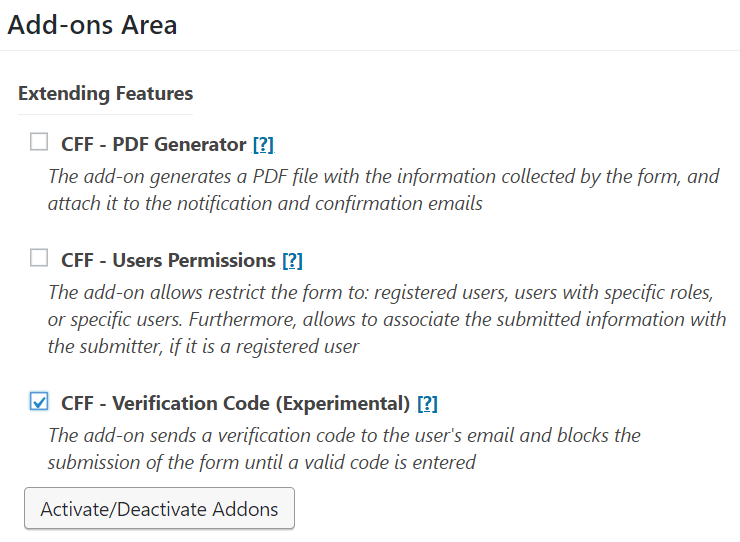
The add-on includes a new section in the form's settings to configure it.
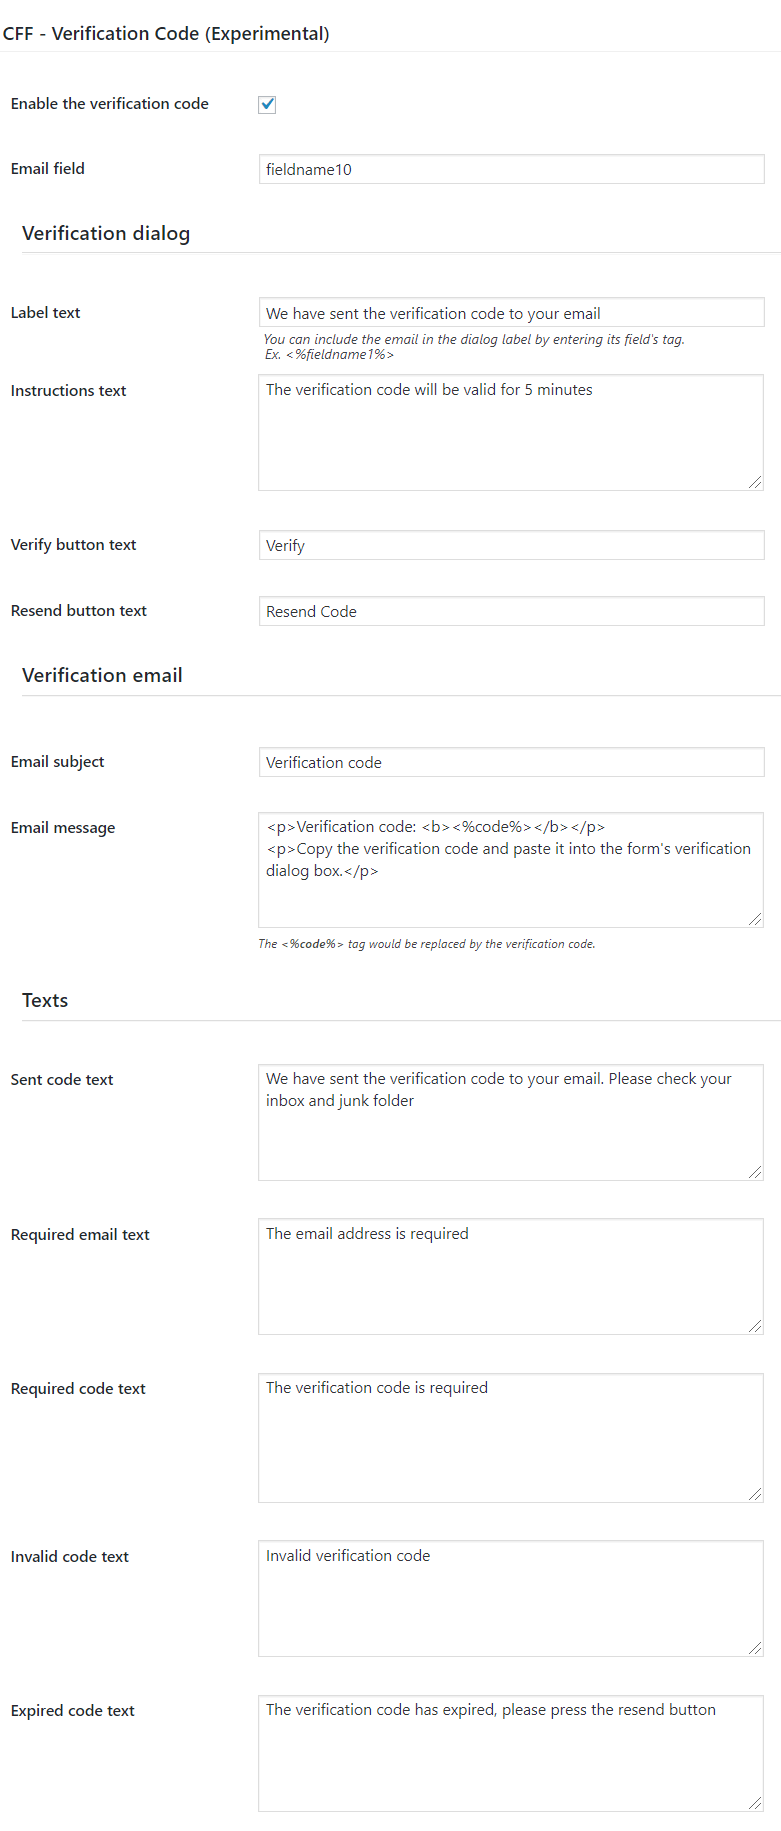
Verification Code Settings:
The plugin requires a Twilio account to send the verification code via SMS.
Texts to display on the pop-up dialog and error messages.
Platinum Version
The "Unique Fields Values" add-on verifies that the values entered by users have not been used in previous submissions. It allows to enter simple and complex verification rules (one or multiple fields separated by comma symbols).
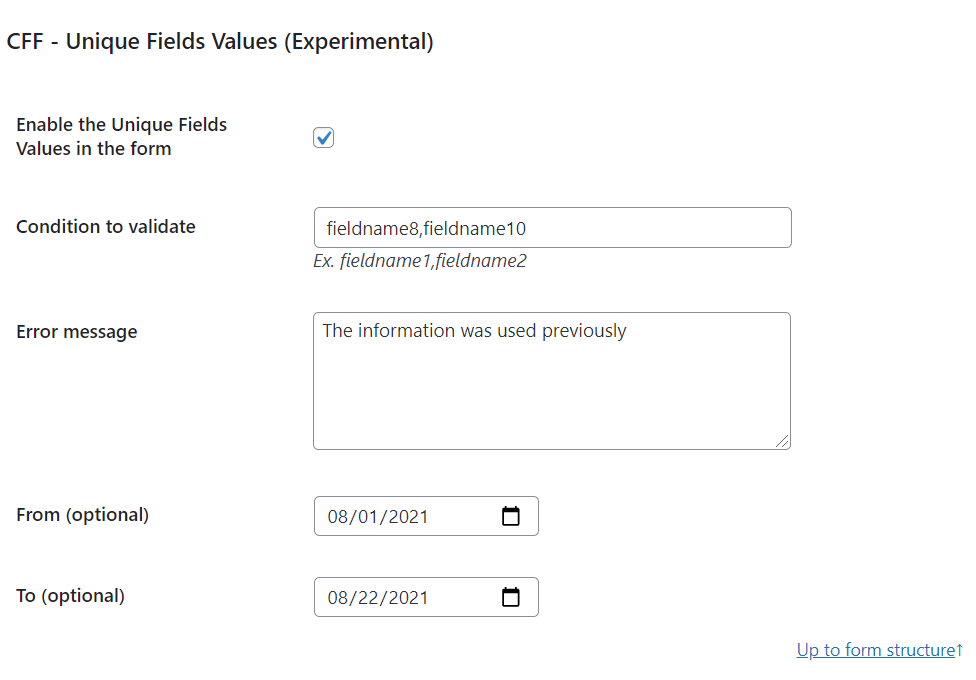
When the user presses the submit button, the add-on verifies the previous submissions. If the field value (or combination of fields values) was used before, the add-on opens an alert with the error message. If everything is OK, the form is submitted properly.
To activate the add-on, go to the settings page of the plugin through the menu option "Calculated Fields Form", tick the "CFF - Unique Fields Values" add-on, and press the "Activate/Deactivate addons" button.

The add-on includes a new section in the form's settings to configure it.
Unique Fields Values Settings:
Platinum Version
The "Upload Files" add-on allows to add the uploaded files through the forms to the Media Library, and access to them from the pages and posts of website.
Furthermore, it allows to include the support of new mime types, than files format supported by default by WordPress.
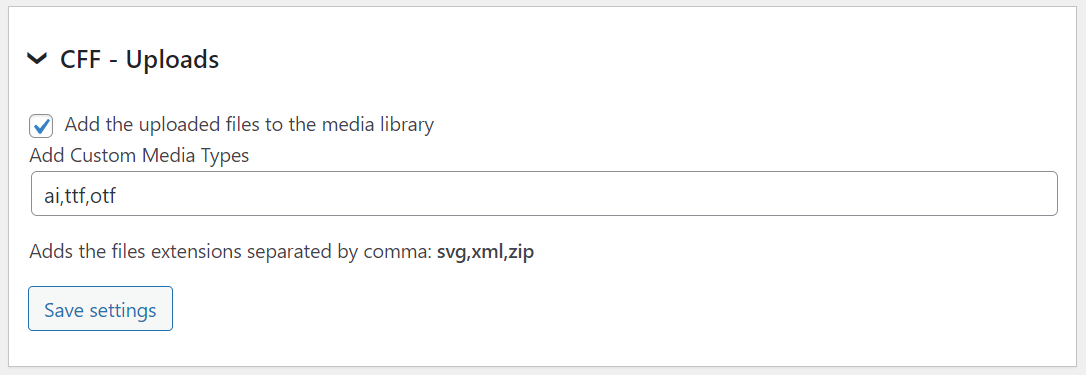
To add the uploaded files to the "Media Library" ticks the checkbox: "Add the uploaded files to the media library".
WordPress supports some specific mime types, for supporting new mime types, you simply should enter the files' extensions separated by comma.
Platinum Version
(Platinum version of the plugin)
The add-on converts the form fields selected in "Signature" fields, allowing the users to sign with the mouse or directly in the touchscreens.

To activate the add-on, simply visit the plugin page through the menu option: "Calculated Fields Form > Addons", tick the checkbox: "CFF-Signature", and press the "Update" button.
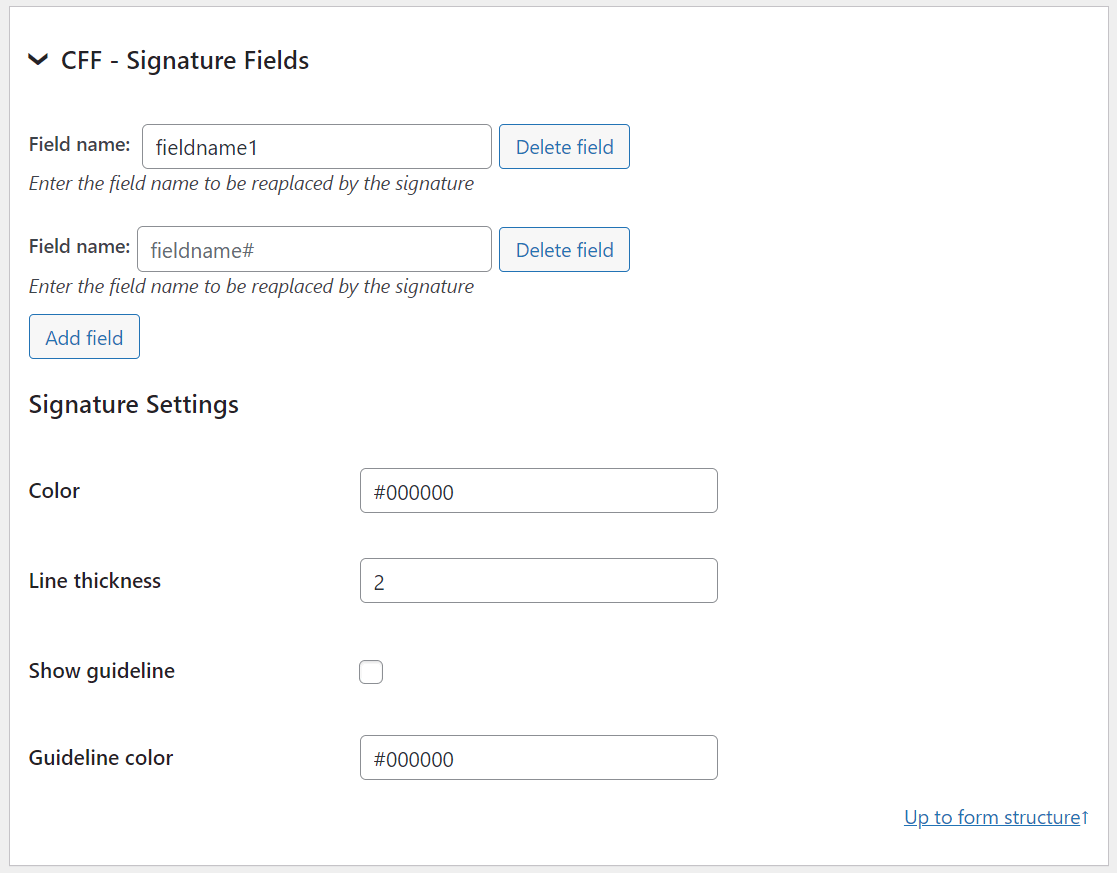
From the form's settings, selects the fields to convert in Signature fields. It is possible convert multiple fields in the form in signature fields.
Signature settings:
Color: the color code for signatures. For example: #000000
Line thickness: an integer number configuring the line thickness of the signature.
Show guideline: checkbox to include or not a guideline in the signature fields.
Guideline color: the color code for guideline. For example: #000000

Pay attention
* In the signature field settings, please ensure you enable the "Accept submitting HTML as field value" option. This will prevent the sanitization module from stripping out the image tag containing the user's signature.
* To include the user's signature in notification emails (Select the HTML option in the "Email format" attribute within the form settings) and PDF files, simply use the field's tag directly. For example, if the signature field is named "fieldname1", use either the <%fieldname1%> or <%fieldname1_value%> tag.
Related Information....
Platinum Version

The iCal add-on allows you to export form submissions in iCal (.ics) format, which can be imported into calendar applications like Google Calendar, Outlook, Apple Calendar, etc. Users will receive an iCal file as part of the confirmation email after the form submission. It also generates a public endpoint URL to access the iCal feed dynamically.
To activate the new iCal attachment add-on, simply visit the plugin page through the menu option: "Calculated Fields Form > Addons", tick the checkbox: "CFF - iCal Export Attached", and press the "Activate/Deactivate addons" button.
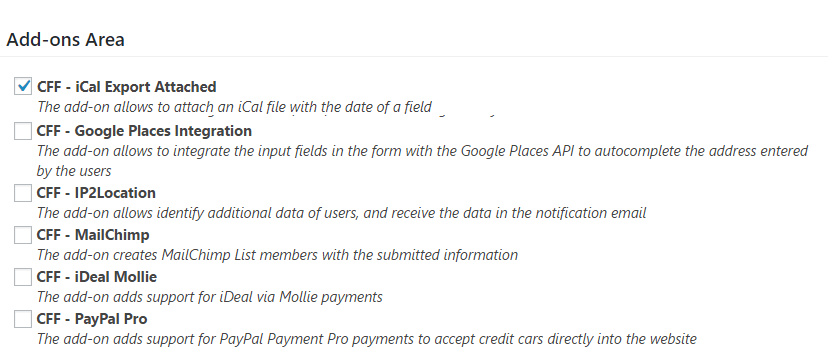
With the add-on activated go to the form settings page and at the bottom of that page you can configure the iCal file that will be attached into the emails. You will need to specify the ID of the field that contains the date and you can modify the iCal content and time conversion settings if needed.
In the settings area the following information is needed to activate and setup the addon:
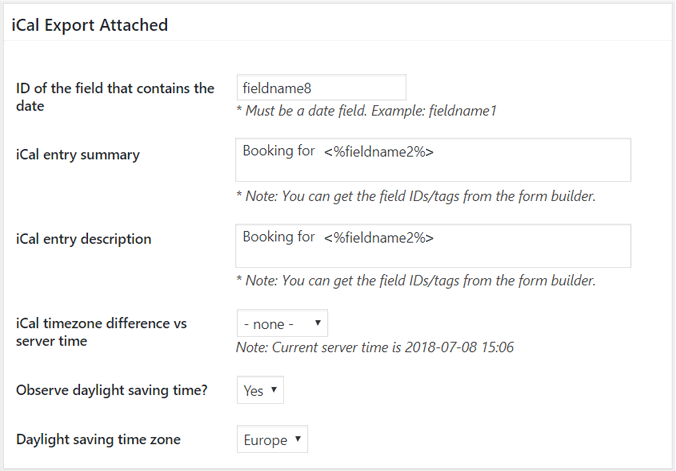
fieldname1fieldname2Note: Both fields must be date fields in your form.
You can find field IDs in the Form Builder under field settings.
<%form_title%> to include dynamic data.Booking for <%form_title%> or Booking for <%fieldname1_value%>Tip: Use form field tags (e.g., <%fieldname1%>) to include submission-specific details.
- none -EuropeServer Time Reference:
Current server time is displayed for guidance (e.g., 2026-01-30 00:17).
https://www.yourwebsite.com/wp-json/cff-ical/form/123/622eee75e57dbe24c2f576b6b5de8d0410) to show events starting within the last X days.Platinum Version
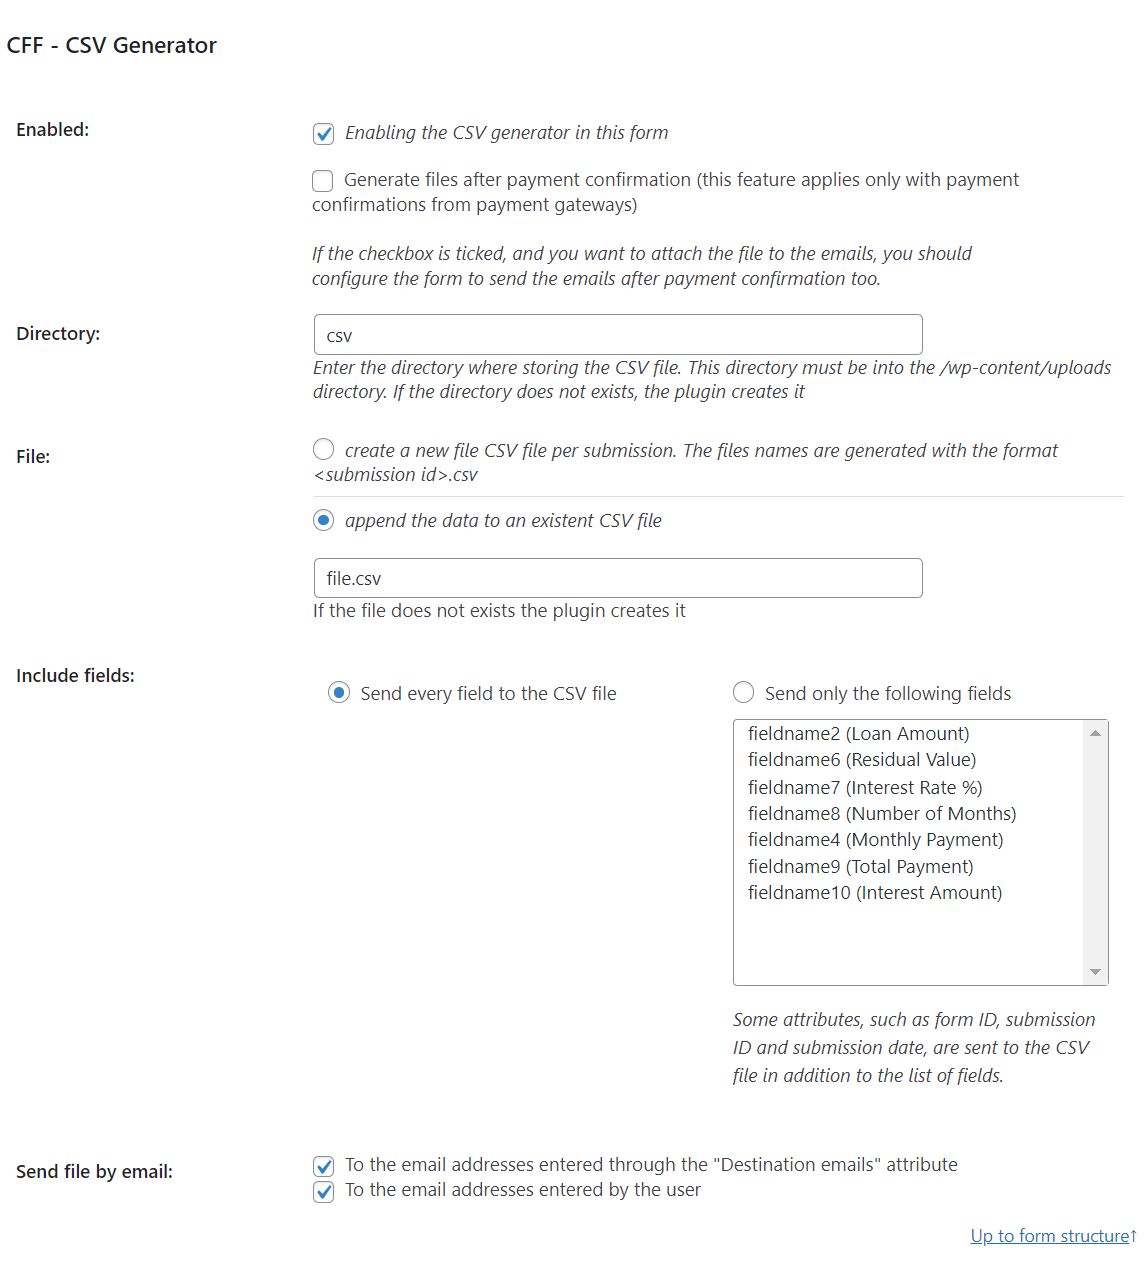
The CSV Generator add-on allows to export dynamically the information collected by the form to a CSV file, and send it as attachment in the notification emails.
To activate the CSV Generator add-on, visit the plugin page through the menu option: "Calculated Fields Form > Addons", tick the checkbox: "CFF - CSV Generator", and press the "Activate/Deactivate addons" button.
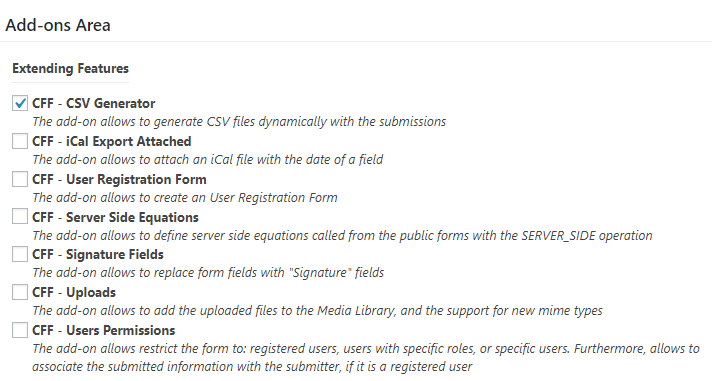
After activated the add-on go to the form settings, pressing the "Settings" button associated to the form, and configure the add-on as follows:
Related Information....
Platinum Version
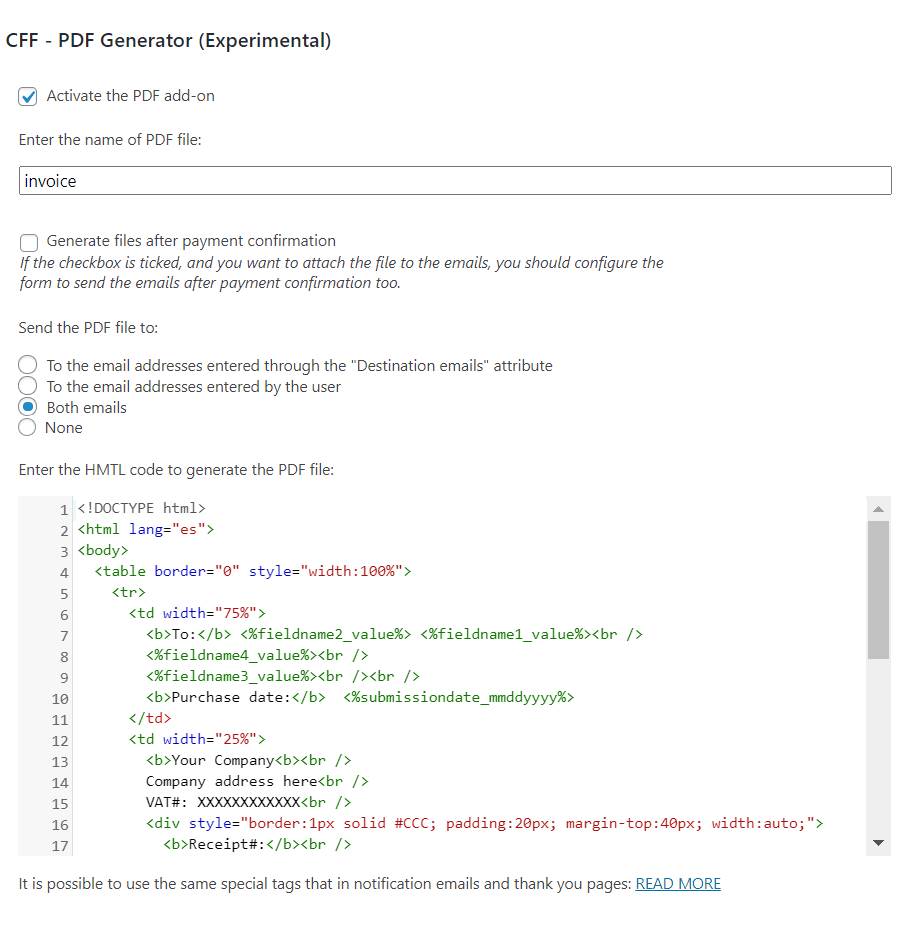
The PDF Generator addon, based on the dompdf api or the PDFtk application, allows to generate PDF files with the information collected by the forms, and send them as attachment of notification emails.
To activate the add-on, simply visit the plugin page through the menu option: "Calculated Fields Form > Addons", tick the checkbox: "CFF-PDF Generator", and press the "Activate/Deactivate Addons" button

The PDF Generator add-on shown a new section in the form's settings allowing you to select between two methods to generate the PDF files, "From HTML Structure" or "From PDF Template".
When "From HTML Structure" is selected, the add-on allows to you to generate the PDF file by combining HTML and fields' tags.
Note: into the file's structure you can use the same special tags supported by the thank you pages and notification emails.
For the "From PDF Template" option, the add-on activates two input boxes: one to enter the path of the PDFtk application on the server and one to select the PDF file with the form fields that will be used as the template.
After entering both paths, press the "Extract Fields" button to get the fields from the template file to be populated with the information collected by the form.
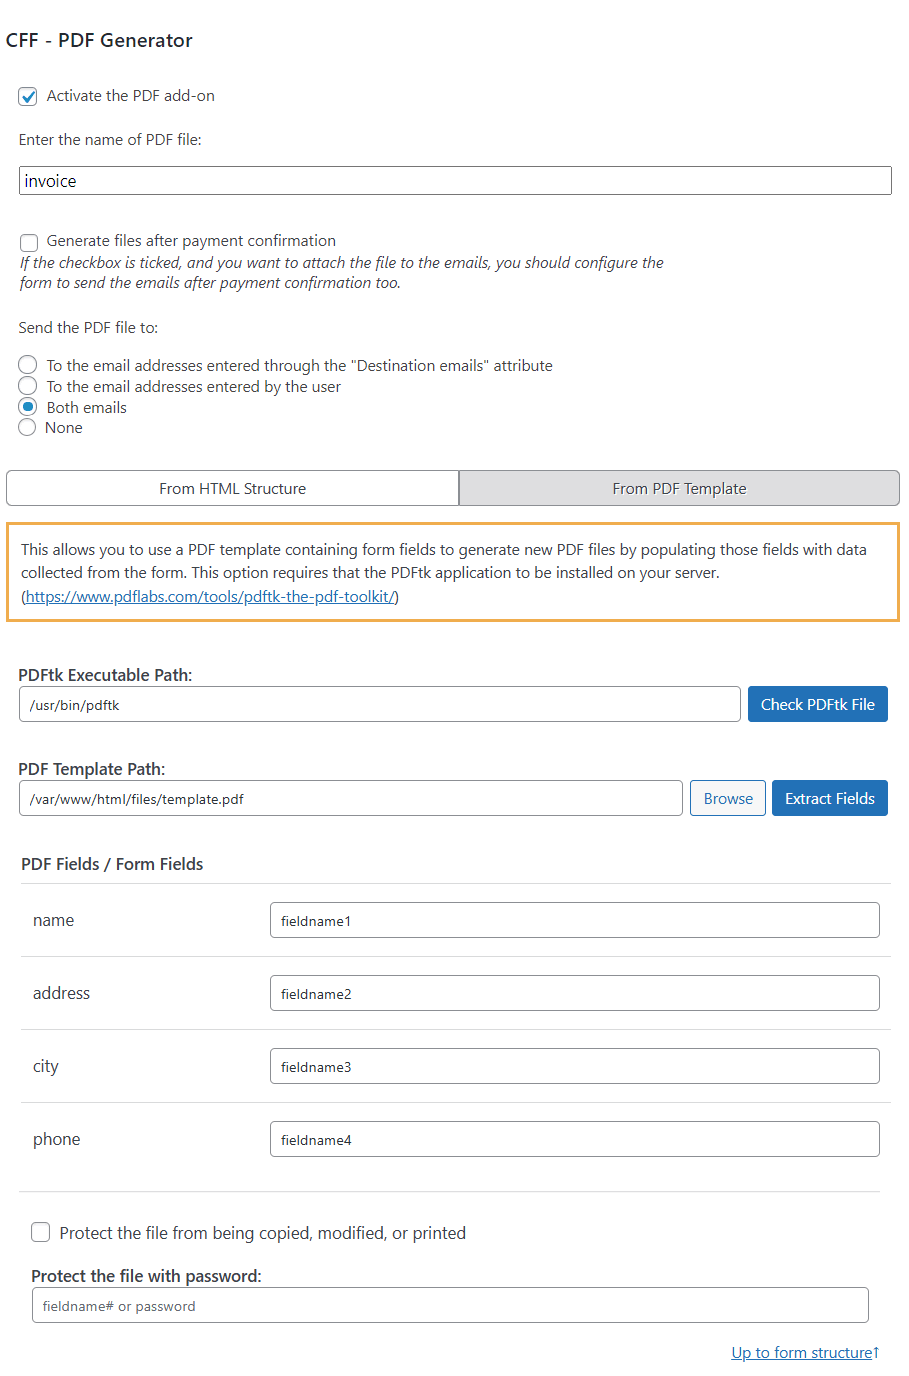
The add-on attaches the PDF files to the notification emails. However, it is possible to include the tag: <%pdf_generator_url%> into the notification emails and thank you pages. The tag would be replaced with the URL to the PDF file.
Related Information....
Developer Version Platinum Version
The developer version of the plugin includes the WooCommerce add-on, to integrate the forms created by the "Calculated Fields Form" with the WooCommerce products. The add-on inserts an additional metabox in the WooCommerce products, with multiple settings fields:
Note: If you want calculate the price of products through the form, will be required that you select the field of the price in the attribute: "Request cost" in the form's settings.
Note 2: The fields for weight, length, width, and height, can be required to calculate the shipping cost by the "WooCommerce Table Rate Shipping" plugin.
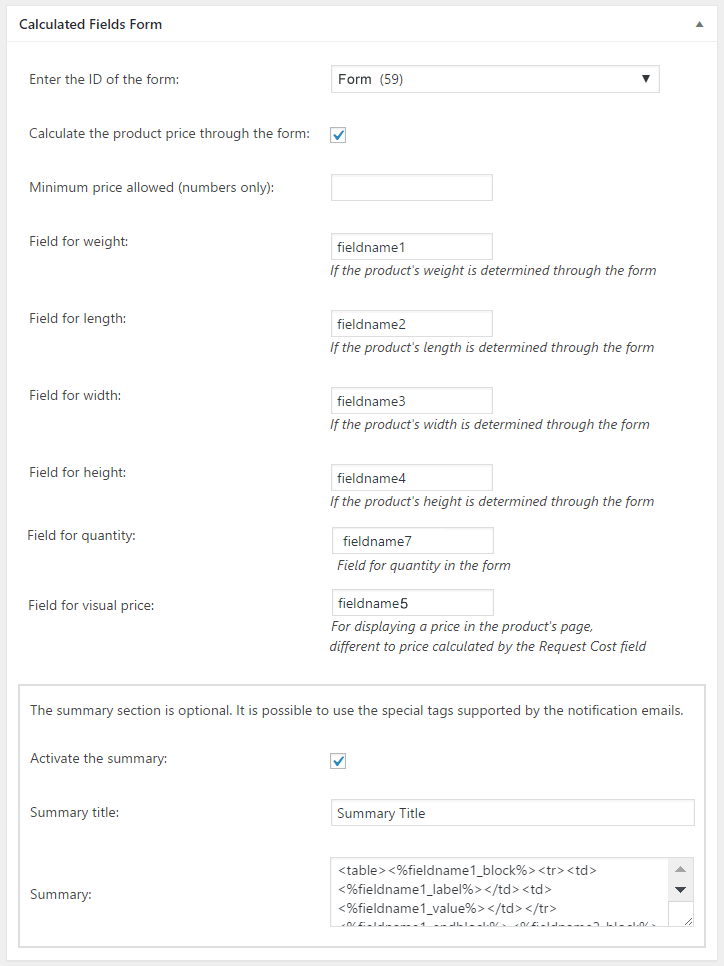
The add-on generates two global variables, for the id and price of the product where the form is inserted, called: woocommerce_cpcff_product and woocommerce_cpcff_product_price respectively.
For example, to duplicate the regular price of the product, insert a calculated field in the form with the following code as its equation:
woocommerce_cpcff_product_price*2
The "CFF - WooCommerce" add-on implements the GET_PRODUCT_PRICE_WITH_TAX operation to get the calculated price with tax. The operation accepts three parameters, price and product ID are required, and the quantity. If the quantity parameter is missed, the plugin uses 1 by default. To get the previous equation result with tax, edit as follows:
GET_PRODUCT_PRICE_WITH_TAX(woocommerce_cpcff_product_price*2, woocommerce_cpcff_product)
Other global variables generated by the add-on include:
woocommerce_cpcff_currency_symbol — the store's active currency symbol (e.g. $)
woocommerce_cpcff_currency_name — the currency code or name (e.g. USD)
woocommerce_cpcff_product_weight — the product's weight
woocommerce_cpcff_product_length — the product's length
woocommerce_cpcff_product_width — the product's width
woocommerce_cpcff_product_height — the product's height
Related Information....
Platinum Version
The Platinum version of the plugin includes the Easy Digital Downloads add-on, to integrate the forms created by the "Calculated Fields Form" with the Easy Digital Downloads products. The add-on inserts an additional metabox in the EDD products, with multiple settings fields:
Note: If you want calculate the price of products through the form, will be required that you select the field of the price in the attribute: "Request cost" in the form's settings.
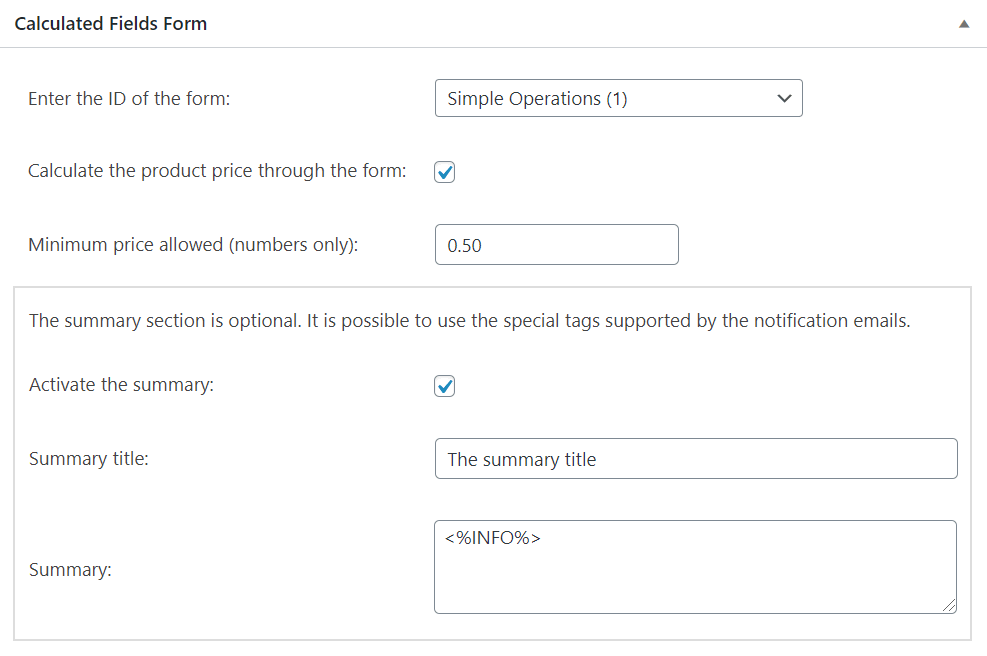
Some considerations:
Related Information....
Platinum Version
![]()
The platinum version of the plugin includes the "The Events Calendar" add-on. It allows to create new events, venues, event categories, tags, and organizers with the information collected by the form.
After activating the add-on from the menu option "Calculated Fields Form > Addons":

The add-on displays a new metabox in the form's settings, to create the relationship between the form's fields and the events attributes:
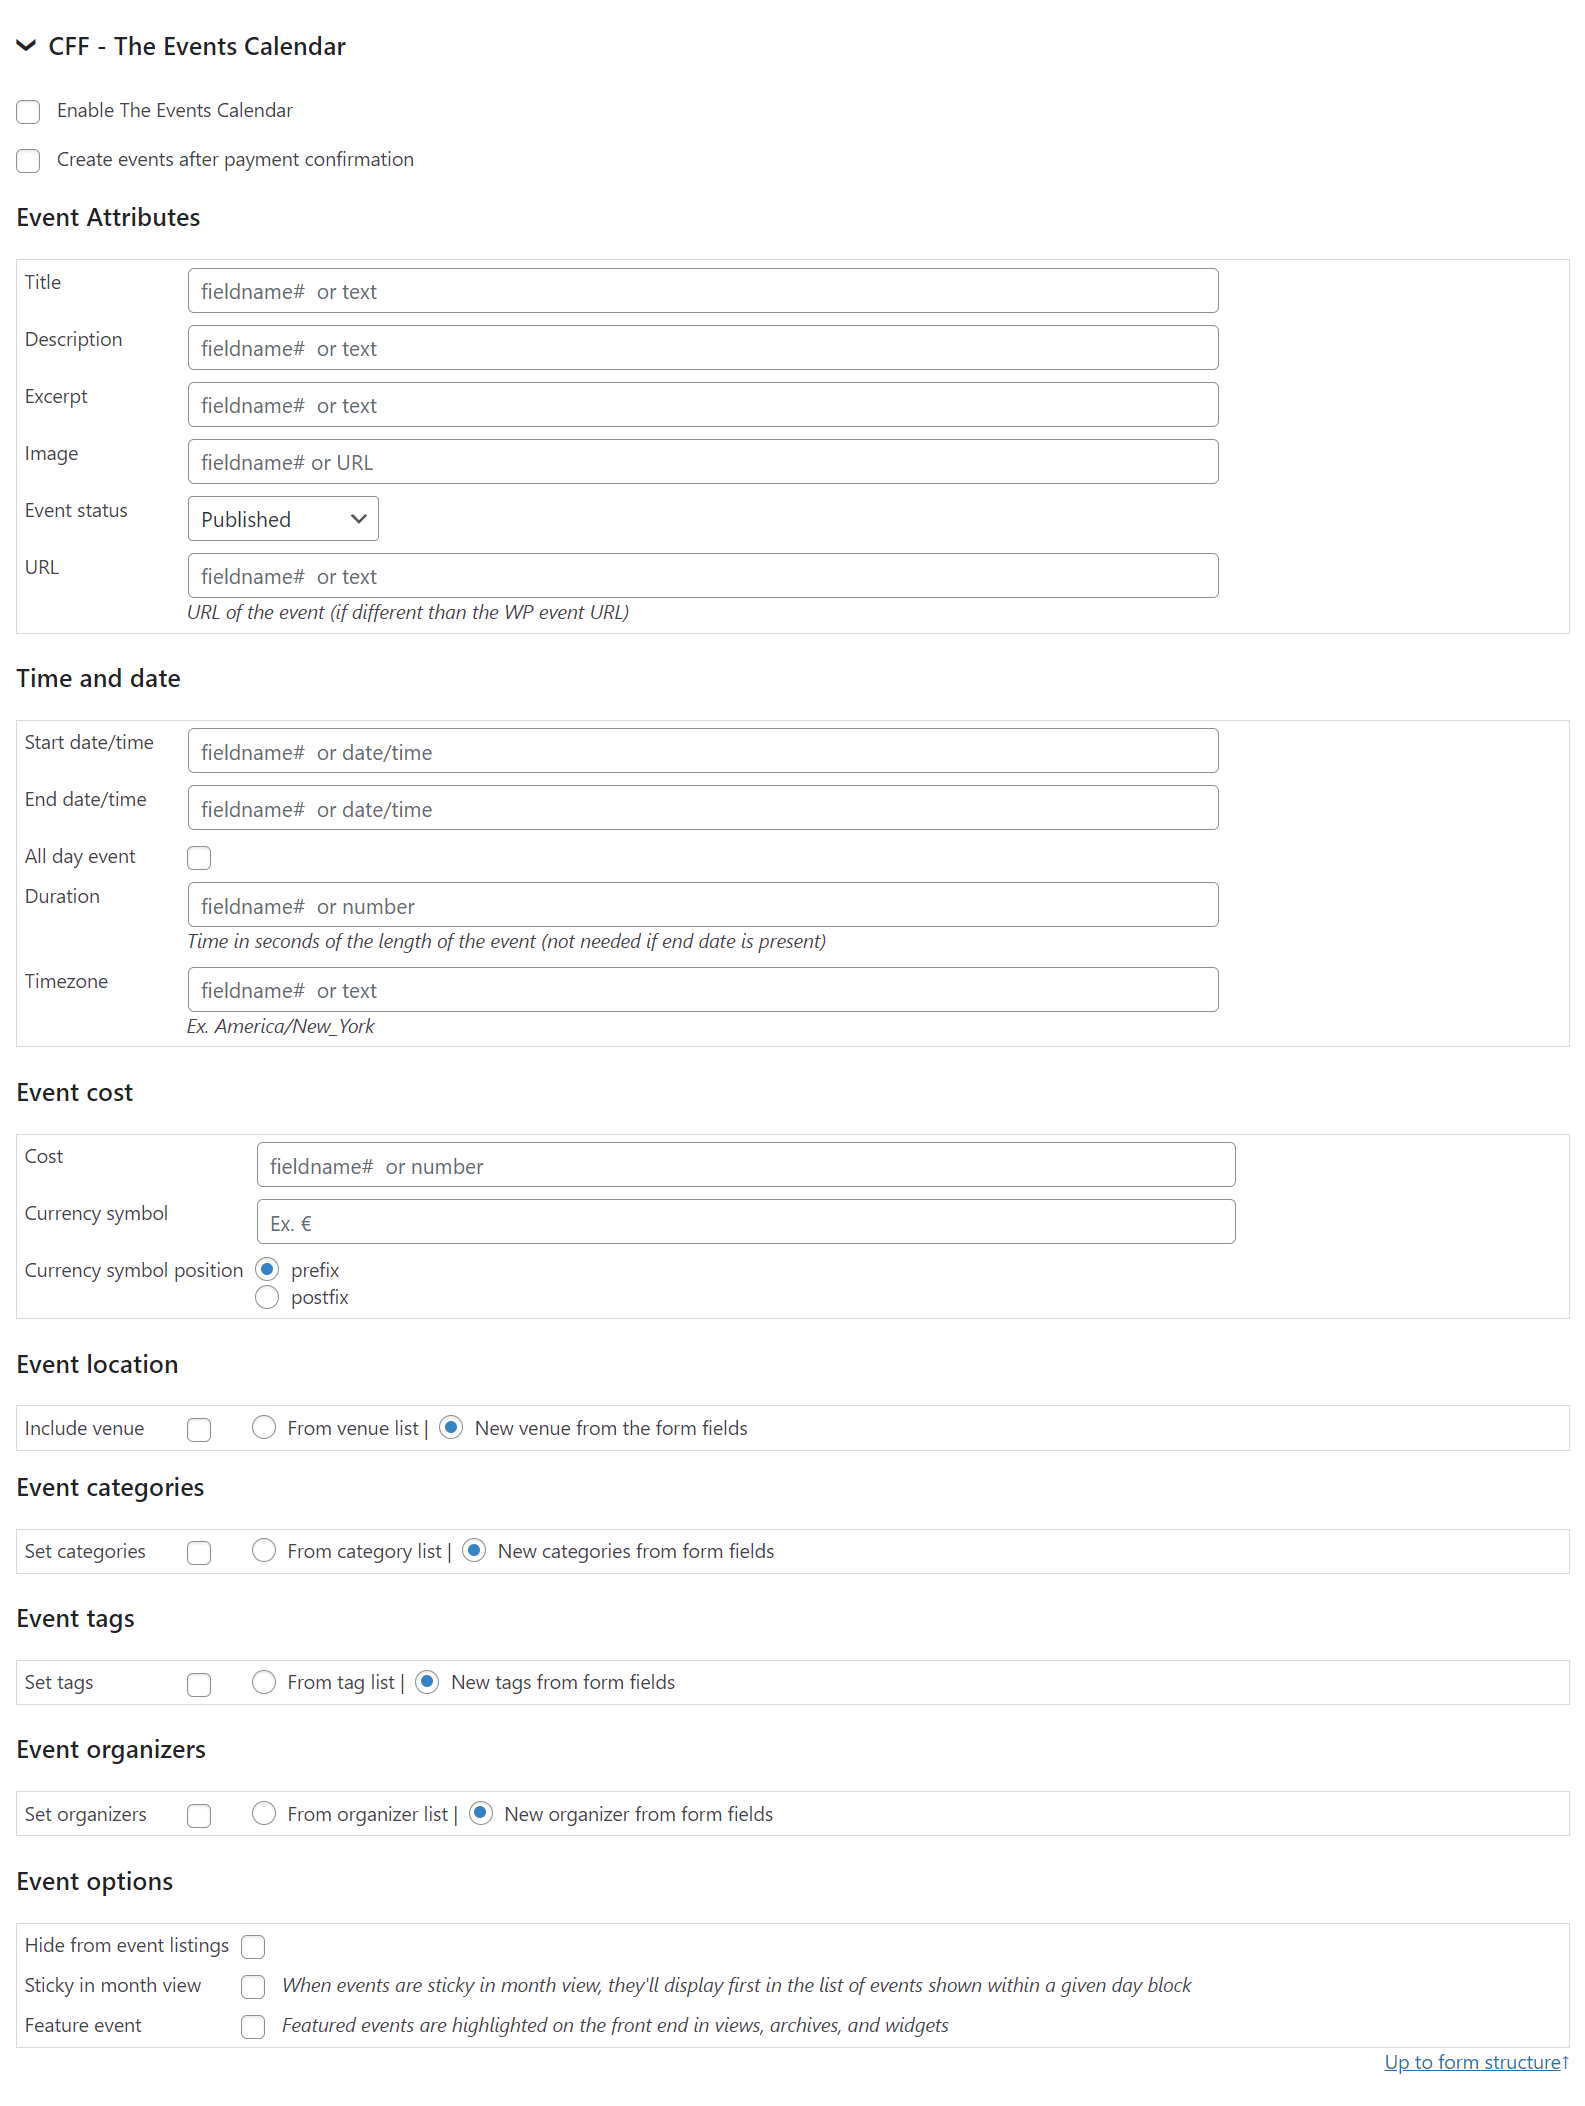
The events attributes accept fields' names (E.g. fieldname1) or its values directly.
Date/Time related attributes, like Start date/time, End date/time, All day event, Duration, and Timezone.
Event cost attributes, like Cost, Currency symbol, and Currency symbol position.
It is possible to associate event location, event category, tags, and organizer to the event or not. Also, you can associate existing venues, categories, tags, and organizer, or create new ones.
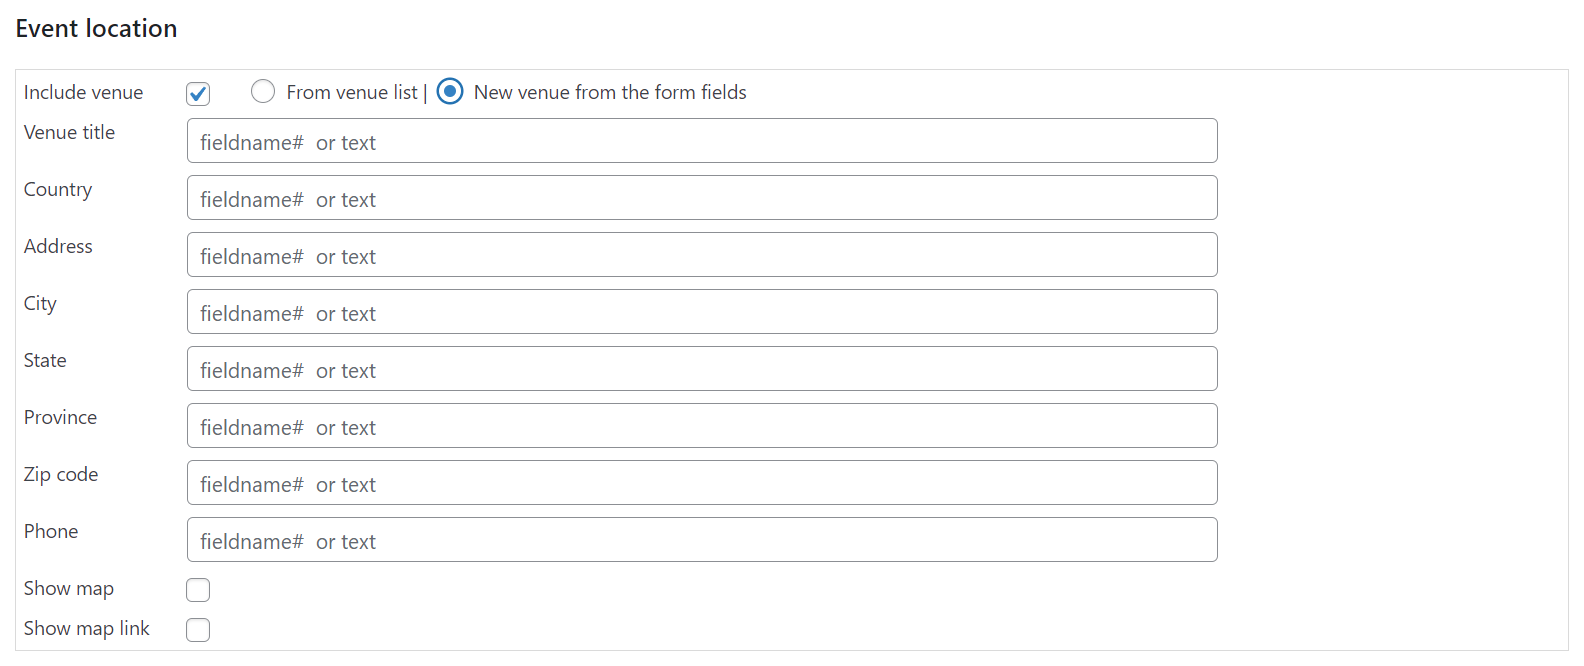


Platinum Version
![]()
The platinum version of the plugin includes the "MailPoet" add-on. It allows to add new subscribers to the MailPoet Mailing Lists (MailPoet Version 2 and MailPoet Version 3) with the information collected by the forms. The add-on adds a new metabox in the form's settings, to create the relationship between the form's fields and the data required by MailPoet:

Platinum Version
![]()
The platinum version of the plugin includes the "AffiliateWP" add-on. AffiliateWP is a WordPress plugin that gives the affiliate marketing tool needed to grow a business and make more money.
The add-on is enabled through the settings page of the plugin, ticking the "CFF - Affiliate WP" checkbox and pressing the "Activate/Deactivate addons" button.
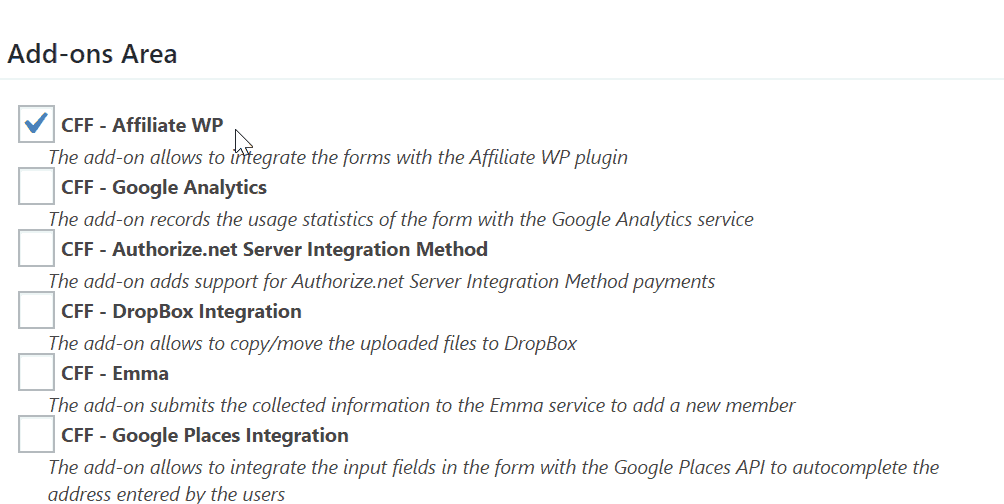
The add-on allows to integrate the forms with the AffiliateWP plugin. It adds a new metabox in the form's settings, to activate the integration and to enter the description to use with referrals:
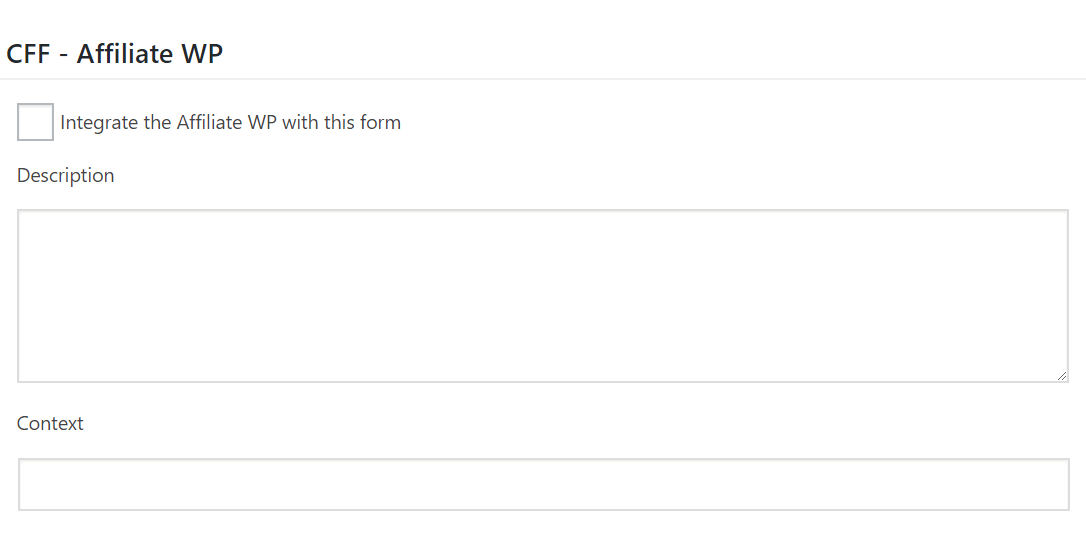
Platinum Version
![]()
* Google Analytics is a third party service not related to our company.
The platinum version of the plugin includes the "Google Analytics" add-on to generate the usage reports in "Google Analytics" about the interactions of users with the form. The add-on adds a new metabox in the forms settings, to configure the events and exceptions that are sent to "Google Analytics" and when:
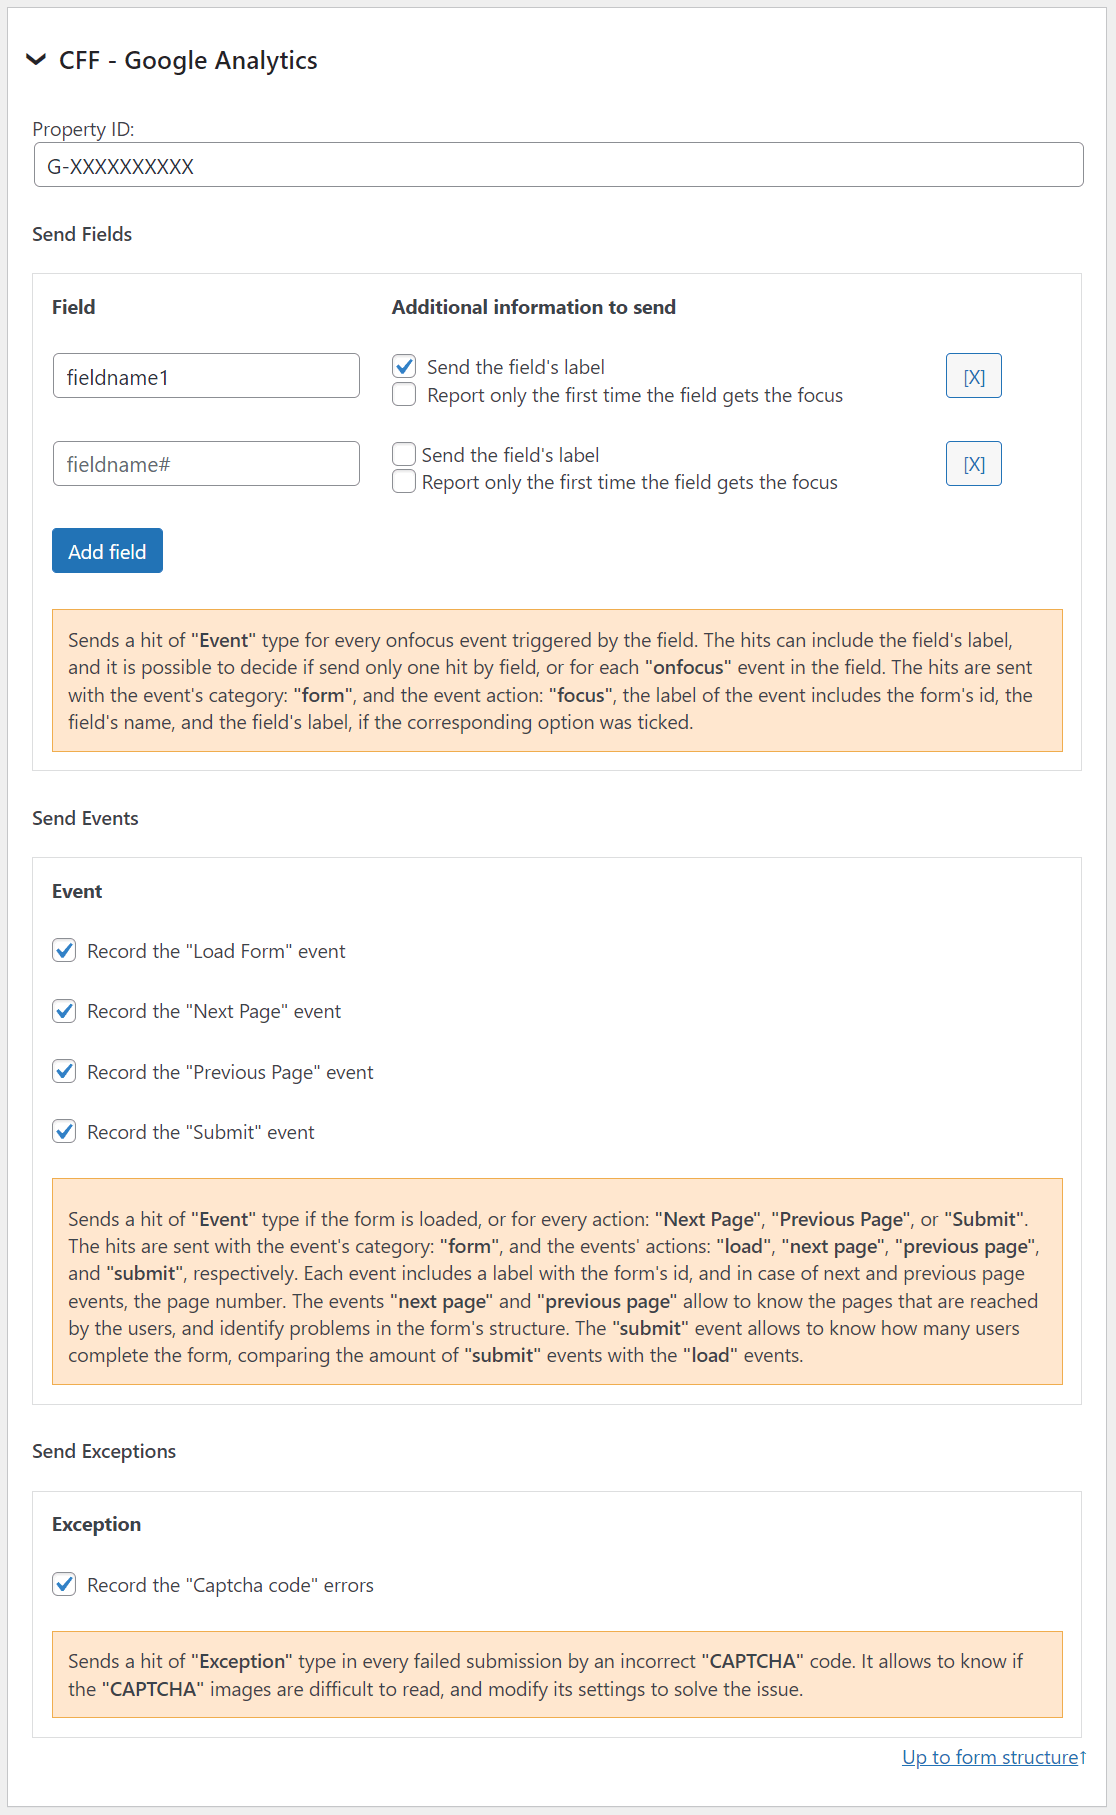
Sends a hit of "Event" type for every onfocus event triggered by the field. The hits can include the field's label, and it is possible to decide if send only one hit by field, or for each "onfocus" event in the field. The hits are sent with the event's category: "form", and the event action: "focus", the label of the event includes the form's id, the field's name, and the field's label, if the corresponding option was ticked.
Sends a hit of "Event" type if the form is loaded, or for every action: "Next Page", "Previous Page", or "Submit". The hits are sent with the event's category: "form", and the events' actions: "load", "next page", "previous page", and "submit", respectively. Each event includes a label with the form's id, and in case of next and previous page events, the page number. The events "next page" and "previous page" allow to know the pages that are reached by the users, and identify problems in the form's structure. The "submit" event allows to know how many users complete the form, comparing the amount of "submit" events with the "load" events.
Sends a hit of "Exception" type in every failed submission by an incorrect "CAPTCHA" code. It allows to know if the "CAPTCHA" images are difficult to read, and modify its settings to solve the issue.
Platinum Version
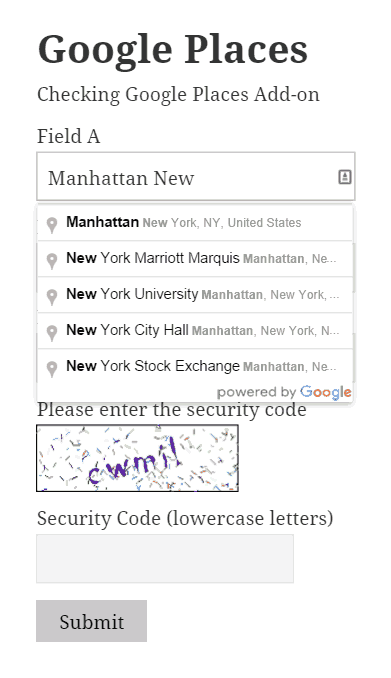
The add-on integrates the input fields in the form with the Google Places API to autocomplete the address entered by the users. The user only need to start typing the address, and the add-on displays a list of addresses matching with the typed text.
* Google Places is a third party service not related to our company. Google Places may charge for their service.
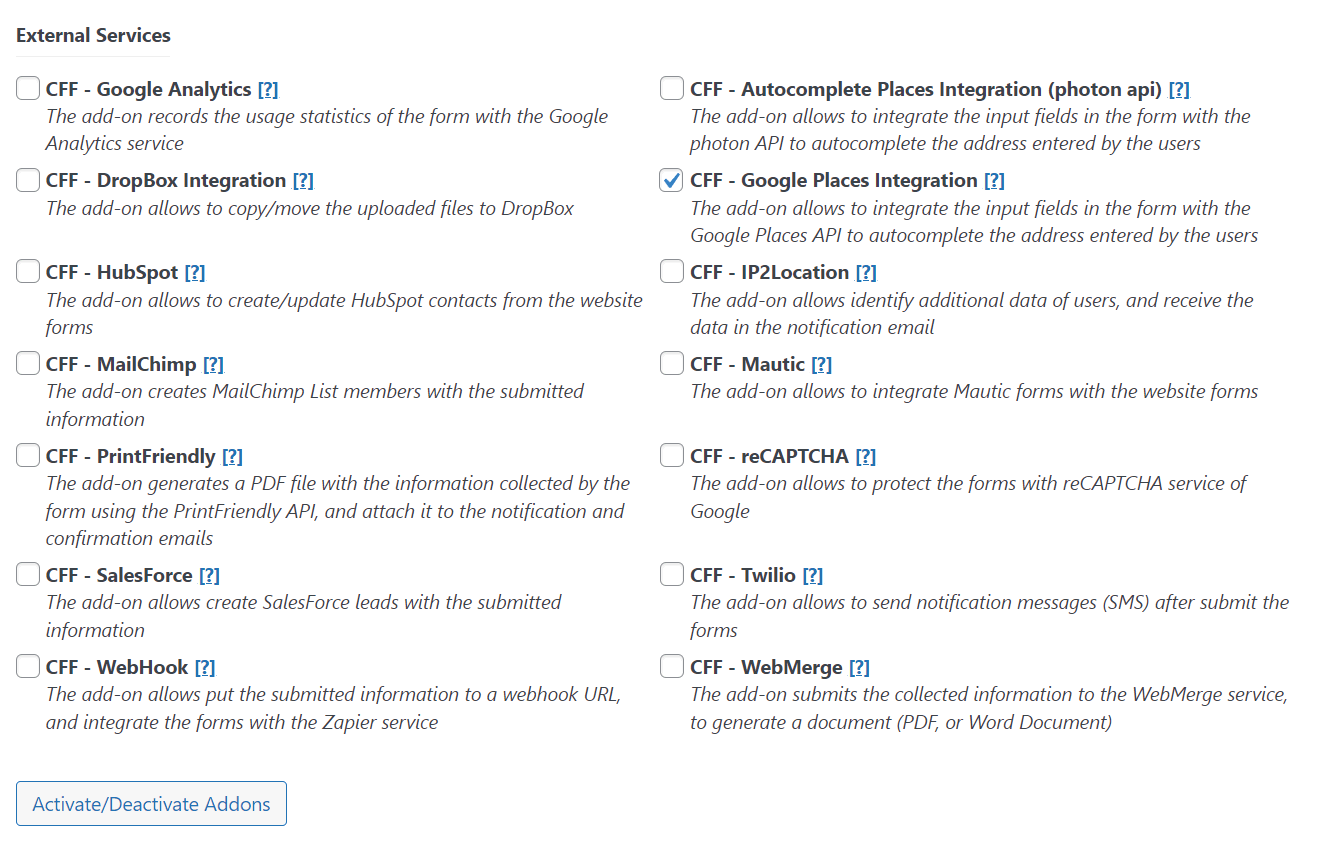
To activate the add-on, simply visit the plugin page through the menu option: "Calculated Fields Form > Addons", tick the checkbox: "CFF-Google Places", and press the Activate/Deactivate Addons" button...
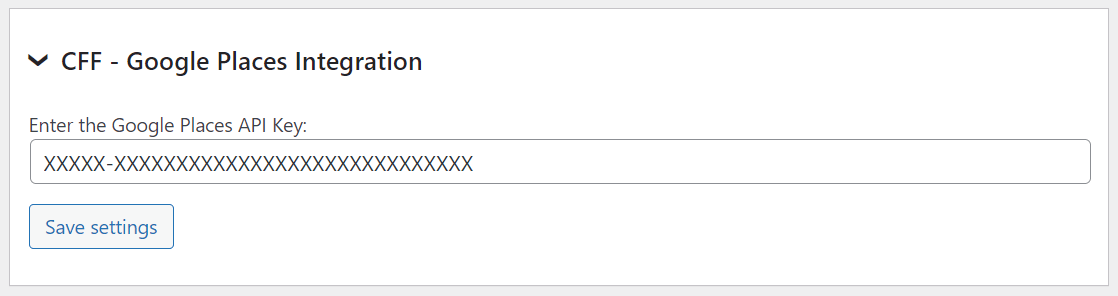
...the plugin displays a new dialog for entering the Google API Key.
Note that the add-on settings now include additional attributes for selecting the new Google Places API and widgets. It handles the autocomplete component differently, opening a pop-up window where users can select the address to assign to the field.

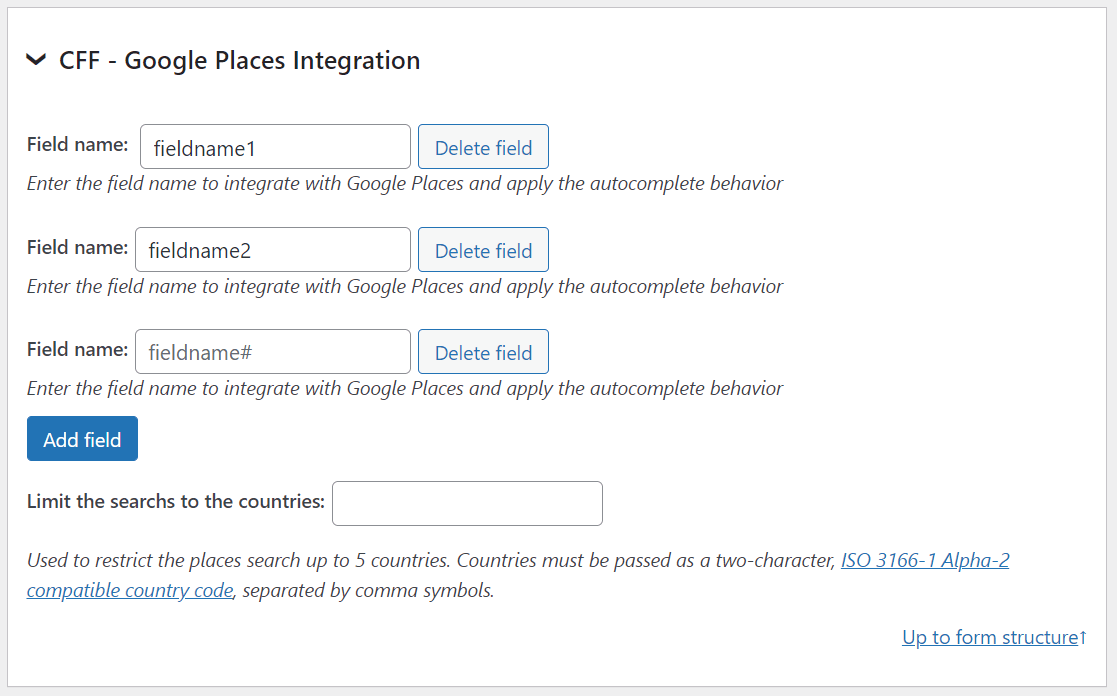
From the form's settings, selects the fields to associate with the Google Places API. It is possible apply the Google Places API to multiple fields in the form.
If you populate the address component attributes, selecting an address will cause the plugin to parse and map each address component into the corresponding form fields.
Furthermore it is possible restrict the search to one or multiple countries (maximum 5). The countries must be passed as as a two-character code, separated by comma.
Related Information....
Platinum Version
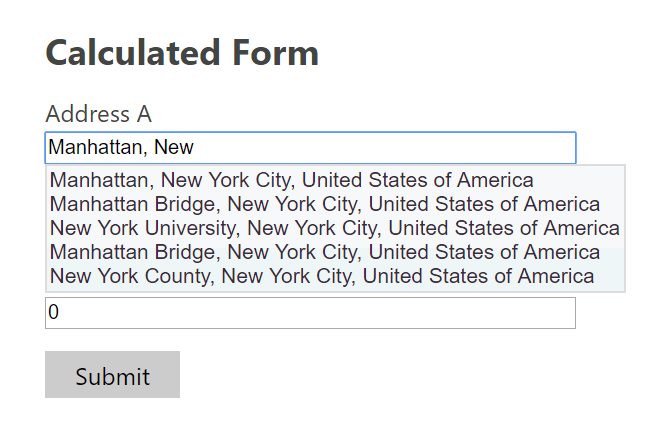
The add-on integrates the input fields in the form with the Photon API to autocomplete the address entered by the users. The user only need to start typing the address, and the add-on displays a list of addresses matching with the typed text.
* If you are using the default URL photon.komoot, it is a third party service not related to our company, and they decide the terms and conditions for the use of the API.

To activate the add-on, simply visit the plugin page through the menu option: "Calculated Fields Form > Addons", tick the checkbox: "CFF-Autocomplete Places Integration", and press the "Activate/Deactivate Addons" button...

...the plugin uses by default the photon.komoot api, however if you prefer to use your own photon installation, enter its URL in this section.
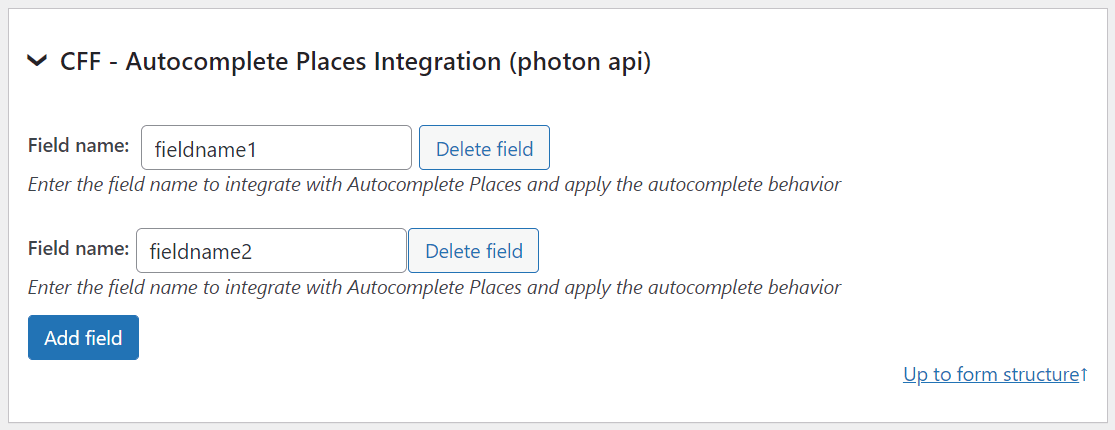
From the form's settings, selects the fields to associate with the Autocomplete Places. It is possible apply the Autocomplete Places to multiple fields in the form.
Related Information....
Developer Version Platinum Version
The add-on allows to protect the forms using the Google reCAPTCHA instead of the captcha distributed with the plugin. reCAPTCHA is more visual and intuitive than the traditional captcha, with just a single click the users confirm they are not a robot.
reCAPTCHA (its official name is No CAPTCHA reCAPTCHA) as they define themselves:
reCAPTCHA is a free service that protects your website from spam and abuse. reCAPTCHA uses an advanced risk analysis engine and adaptive CAPTCHAs to keep automated software from engaging in abusive activities on your site. It does this while letting your valid users pass through with ease.
reCAPTCHA offers more than just spam protection. Every time our CAPTCHAs are solved, that human effort helps digitize text, annotate images, and build machine learning datasets. This in turn helps preserve books, improve maps, and solve hard AI problems.
To use reCAPTCHA in your forms, activate the add-on in the the settings page of the plugin, through the menu option: "Calculated Fields Form > Addons", tick the checkbox: "CFF - reCAPTCHA", and press the "Update" button.
* Google reCaptcha is a third party service not related to our company.
The activation of reCAPTCHA displays a new section for entering the site key, and the secret key, two keys provided by Google reCAPTCHA to protect the website, and validate the forms submissions respectively.
If the site key and secret key were generated for an invisible reCAPTCHA, it si possible to tick the "Is it a key for invisible reCAPTCHA?" checkbox in the add-on settings to insert reCAPTCHA as invisible.
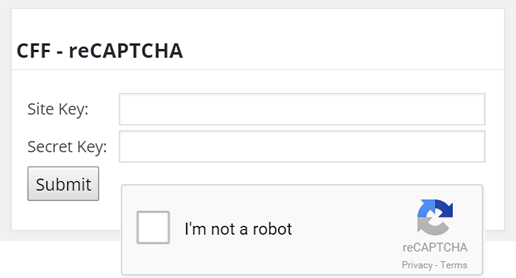
...through the form's settings it is possible to select the language to apply (English by default).
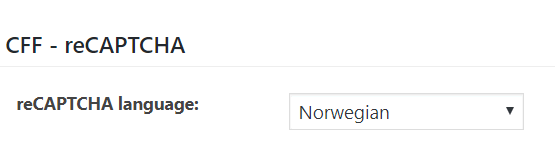
Related Information....
Developer Version Platinum Version
The add-on allows create new leads in the SalesForce account with the data submitted by the forms (https://www.salesforce.com).
* SalesForce is a third party service not related to our company. SalesForce may charge for their service.
To create new leads in SalesForce with the data submitted by a form, be sure that the SalesForce account has enabled the Web-to-lead option, and then go to the form's settings:
Note: The Add-on includes the list of predefined attributes of Leads, but it is possible to enter custom attributes too.
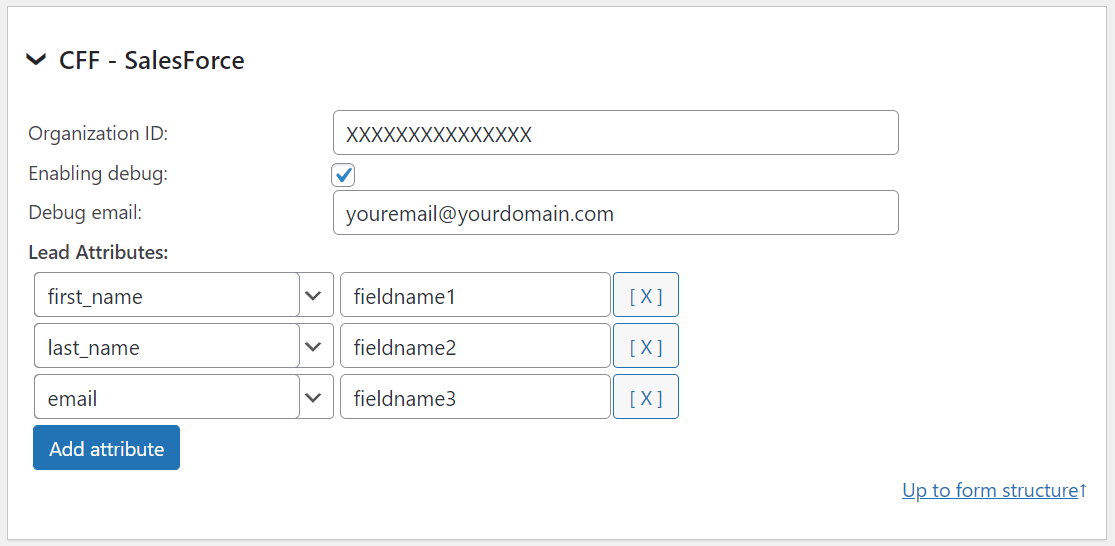
Related Information....
Developer Version Platinum Version
The WebHook add-on sends form submissions to one or more WebHook URLs, enabling integration of plugin-created forms with automation platforms such as n8n, Zapier apps, Microsoft Flow, and IFTTT. Those intermediary services can then forward form data to popular apps and services — for example: Zoho CRM, Dropbox, Mailchimp, Evernote, Google Drive, Facebook, Twitter, and hundreds more.
Use this add-on is as simple as entering the WebHooks URLs, through the CFF-WebHook section in the forms settings, configuring the authentication mechanism required by the webhook, and tick the checkbox for sending to the webhook all fields submitted by the form (For this option, you can choose whether to submit the field names or, if available, their short labels), or only some of fields. To associate multiple WebHooks to the form, simply press the "Add new url" button, and enter the data for the new webhooks.
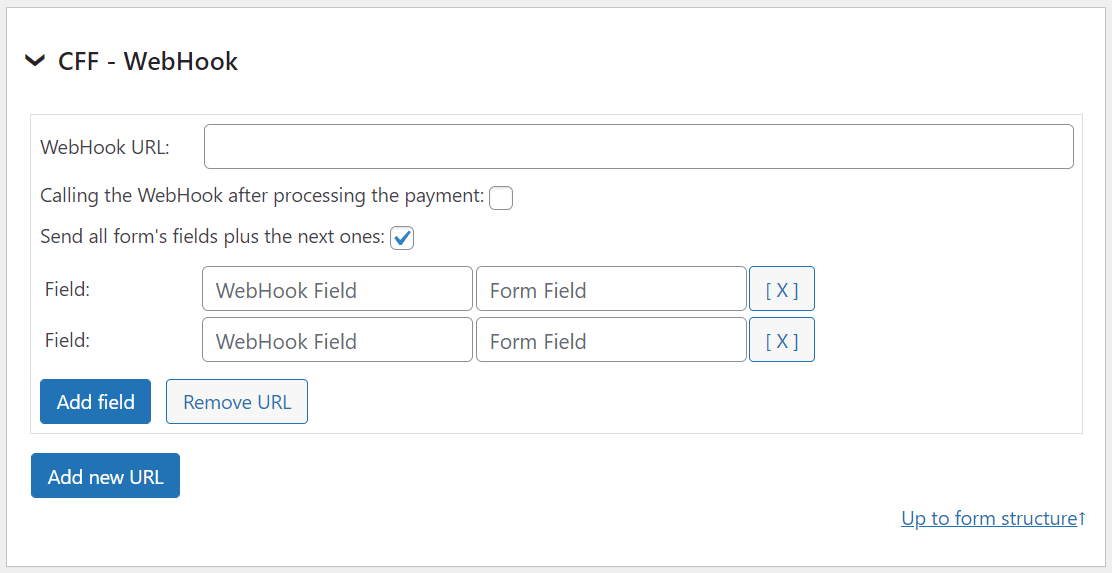
Note: Concerning to Zapier service, select Webhook as the Trigger app, and "Catch Hook" as the trigger for this app. For Microsoft Flow, select Request

* n8n can be installed on your server, or can be used as a service. It is a third party service not related to our company.
* Zapier is a third party service not related to our company. Zapier may charge for their services.
* Microsoft Flow is a third party service not related to our company. Microsoft Flow may charge for their services.
* IFTTT is a third party service not related to our company. IFTTT may charge for their services.
Learn how to transform your WordPress forms into powerful automation triggers and streamline your processes with ease.
Once the add-on sends data to the WebHook URL, it triggers the cpcff_webhook_response action.
The associated callback function should accept the following four parameters:
Related Information....
Platinum Version
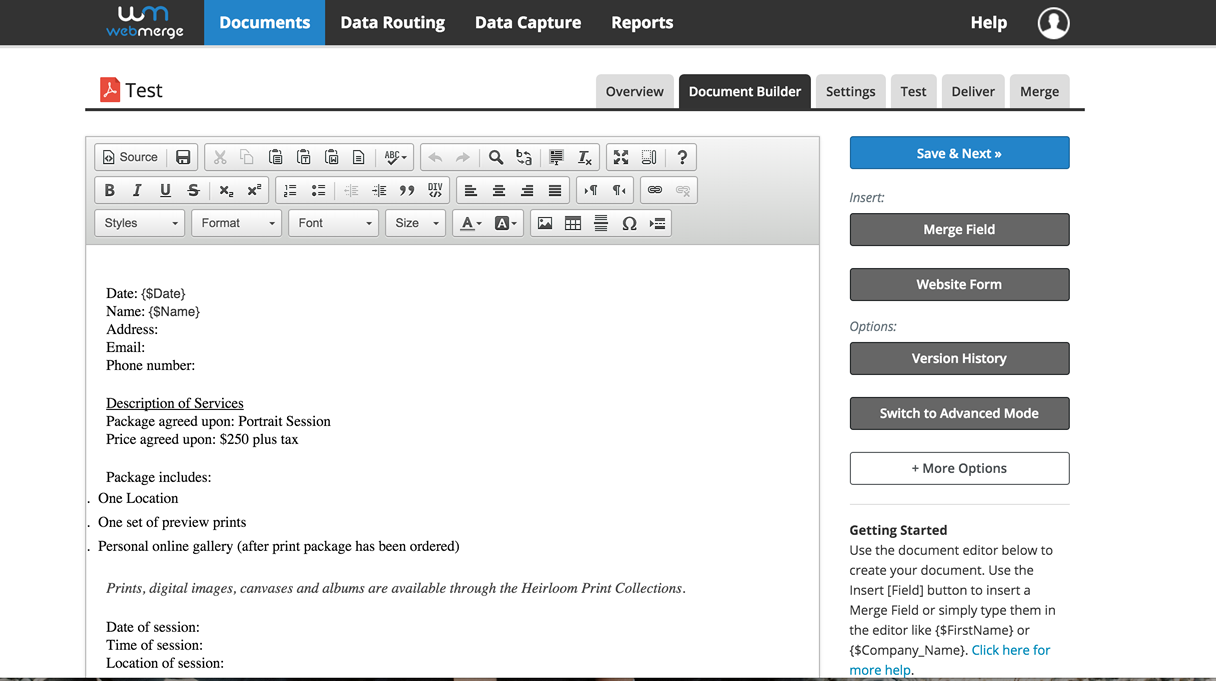
The add-on sends the information collected by the form to the FormStack documents service (formerly WebMerge) to generate a PDF file or Office document at runtime. Furthermore the generated document can be send to the user (https://www.webmerge.me/)
* FormStack documents is a third party service not related to our company. FormStack documents may charge for their service.

To activate the add-on, simply visit the plugin page through the menu option: "Calculated Fields Form > Addons", tick the checkbox: "CFF-WebMerge", and press the Activate/Deactivate Addons" button...
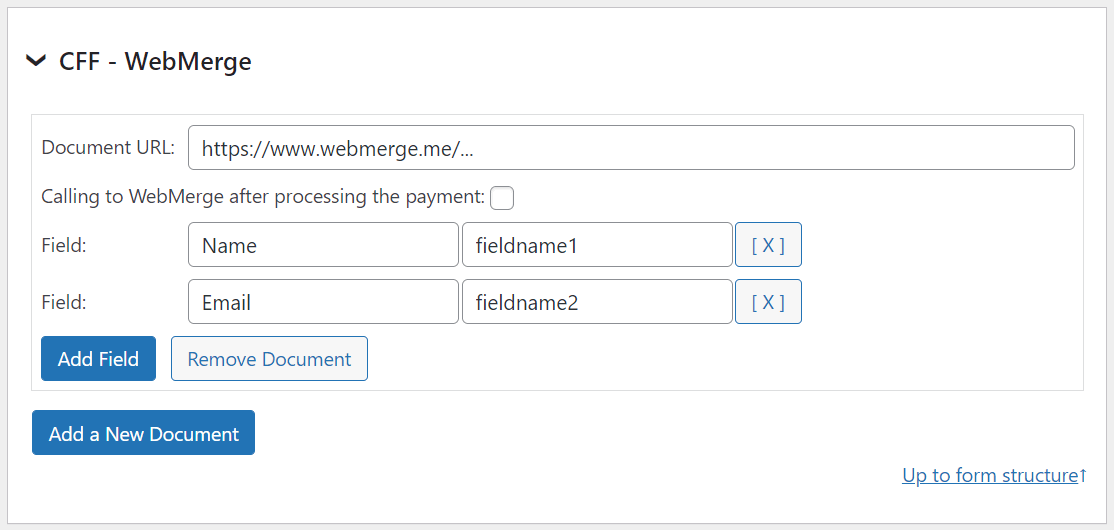
After activate the WebMerge add on, the form settings will include a new section for entering the URL to the FormStack document, and the correspondence between the variables in the document, and fields in the form.
Pressing the "Add a New Document" button it is possible to associate multiple documents to a same form, and pressing the "Add Field" button it is possible associate multiple variables and form fields to a document.
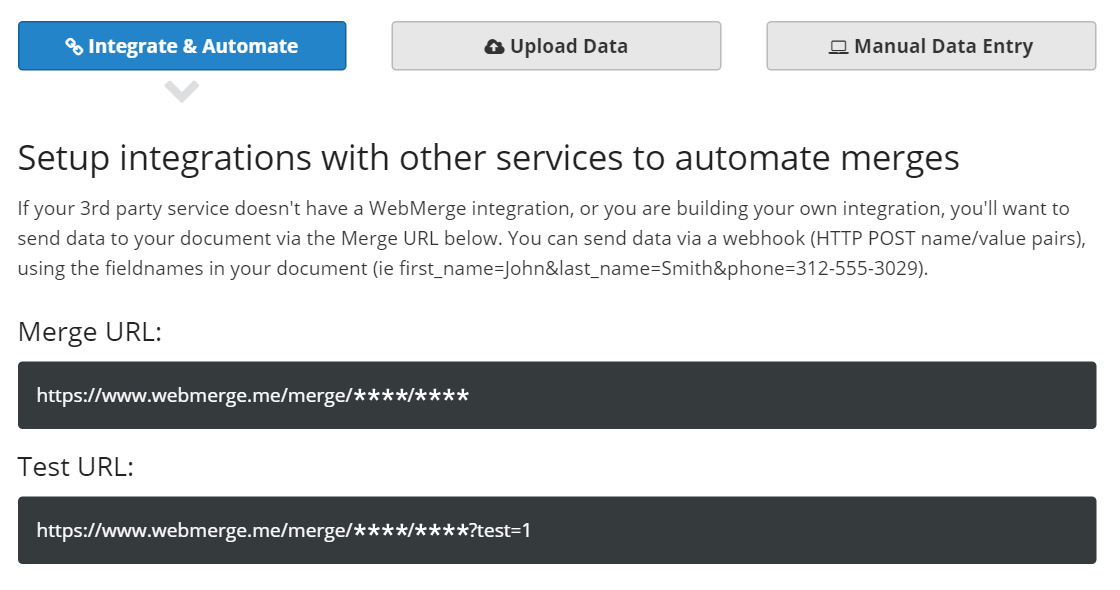
Each document in FormStack has its own URL with the corresponding ID and Key code.
Additional details reading a case of use in the following blog post: Generating PDF files at runtime with the information collected by the form
In Silverpop (SP), build and publish a landing page form with all fields you want to use.
From the web form properties, find the block of code labeled "External form post"

If the form tag has a structure similar to:
<form method="post" action="http://mycompany.mkt9999.com/subgroup/myform" pageId="12345678" siteId="123456" parentPageId="12345678">
Enter as the WebMerge (FormStack) document the URL (or the WebHook URL in the case of WebHook add-on): http://mycompany.mkt9999.com/myform?pageId=12345678&siteId=123456&parentPageId=12345678
Copy the "name" attributes of every field in the form, including the "hide" fields, to create the correspondence between the fields in the Silverpop form, and the name of fields in the form created with our plugin.
For example, in the tag:
<input type="text" name="Last Name" id="control_COLUMN4" class="textInput defaultText" style="margin: 0 3px 5px 3px; height: 20px; width: 294px;">
the field's name would be: Las Name


Related Information....
Platinum Version

Brevo is a SaaS solution for relationship marketing that offers a cloud-based marketing communication software suite with email marketing, transactional email, marketing automation, customer-relationship management, landing pages, Facebook ads, retargeting ads, SMS marketing, and more.
The add-on adds/updates Brevo contacts with the information collected by the form.
* Brevo is a third party service not related to our company. Brevo may charge for their service.
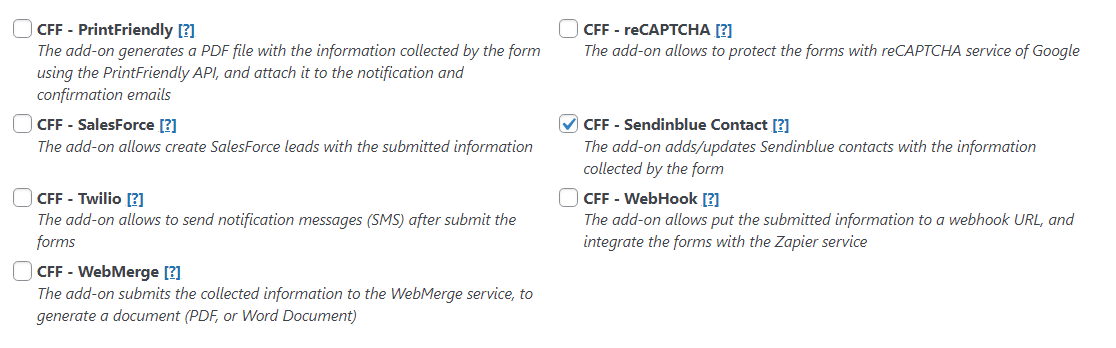
To activate the add-on, simply visit the plugin page through the menu option: "Calculated Fields Form/Addons", tick the checkbox: "CFF-Brevo Contact", and press the "Activate/Deactivate Addons" button...
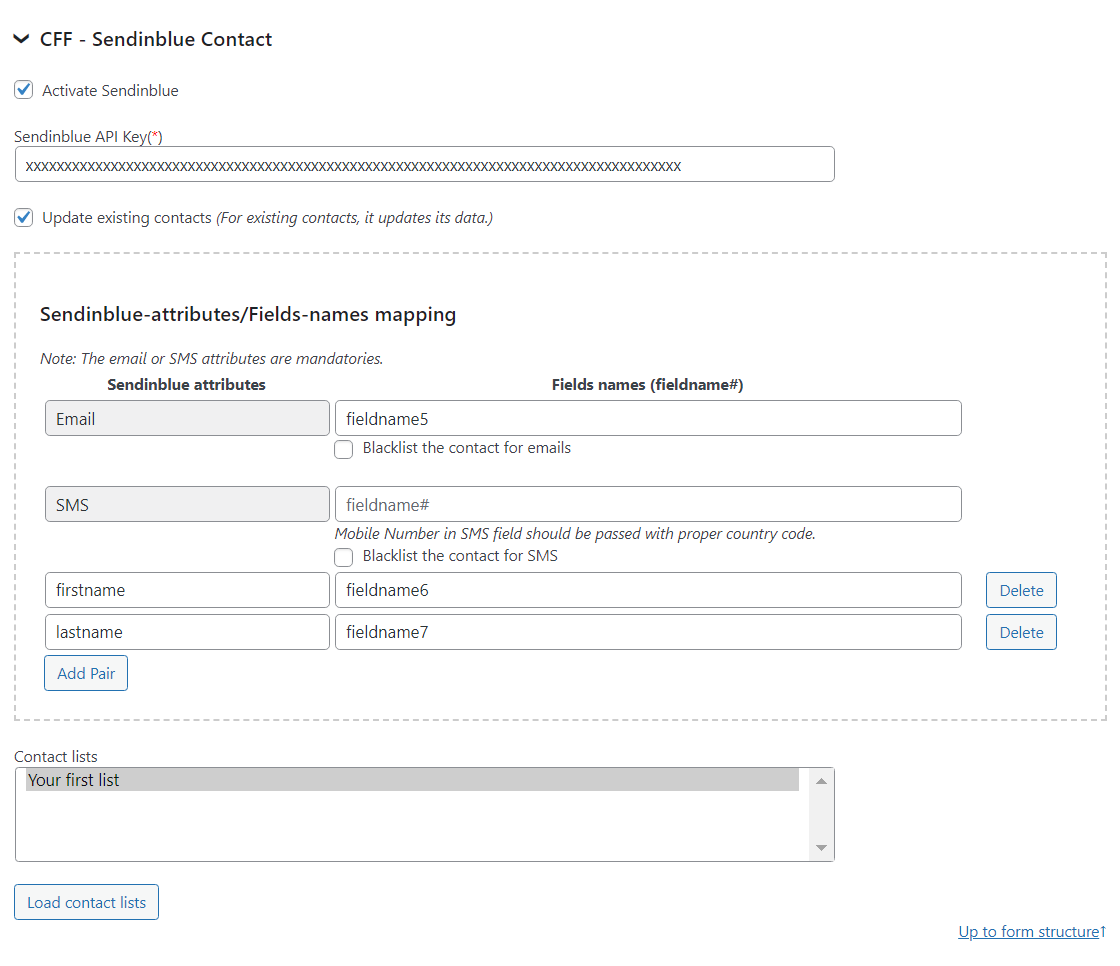
After activate the Brevo add on, the form settings will include a new section for entering the Brevo API Key and mapping the Brevo attributes and form fields.
Platinum Version

The add-on integrates the form with the PrintFriendly API to generate a PDF file after the form be submitted, and attach the resulting file to the notification emails (https://www.printfriendly.com/)
* PrintFriendly is a third party service not related to our company. PrintFriendly may charge for their service.
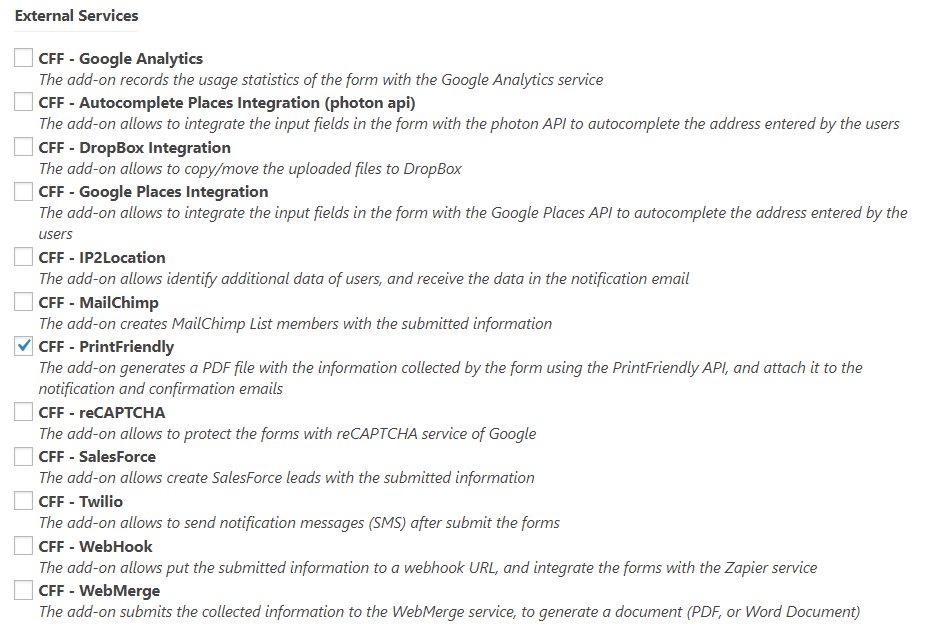
To activate the add-on, simply visit the plugin page through the menu option: "Calculated Fields Form > Addons", tick the checkbox: "CFF-PrintFriendly", and press the "Activate/Deactivate Addons" button...
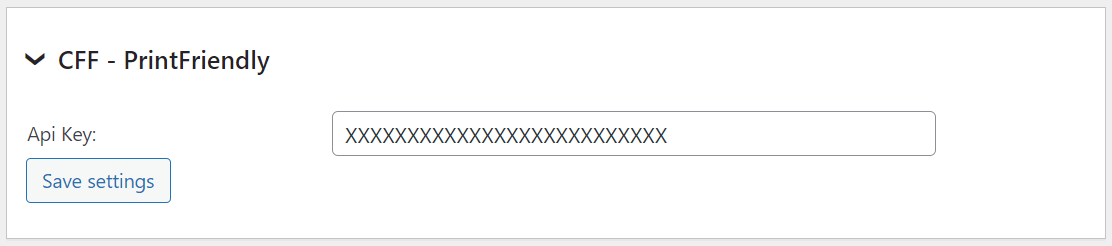
After activate the add-on will be shown a new section in the settings page of the plugin for entering the PrintFriendly API Key.
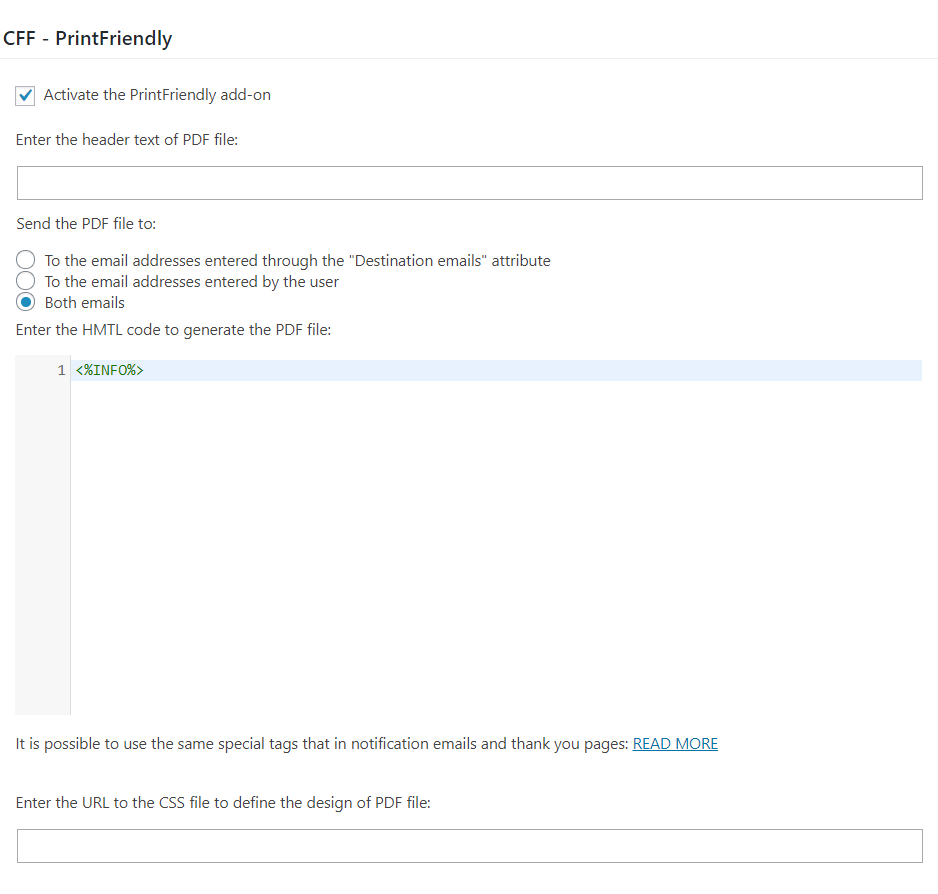
The PrintFriendly add on shown a new section in the form's settings for entering the HTML code with the file's structure, and input box for entering the text to display as header, and another input box for entering the URL to the CSS file to customize the file's design.
Note: into the file's structure you can use the same special tags supported by the thank you pages and notification emails.
Related Information....
Platinum Version
The "DropBox Integration" add-on allows to copy or move the uploaded files through the forms to a DropBox.
* DropBox is a third party service not related to our company.
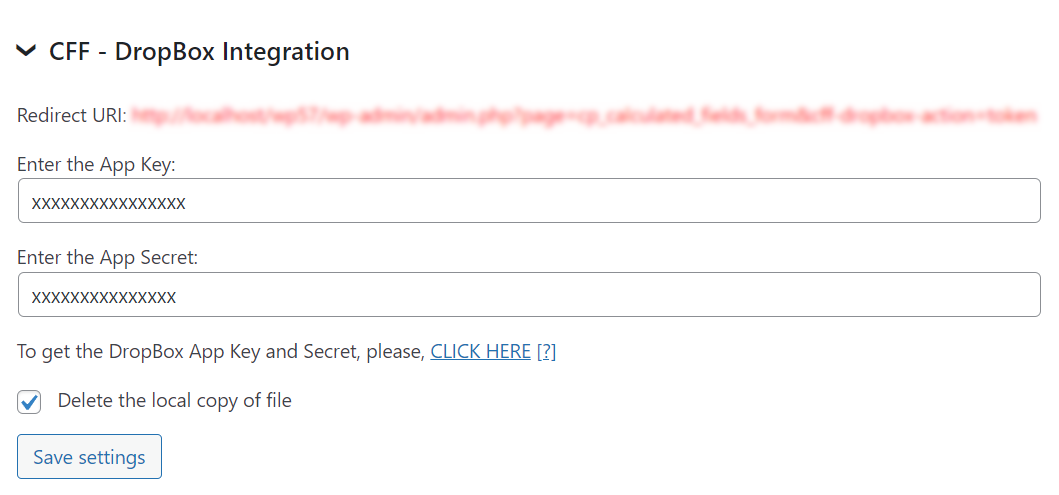
Enter the App Key and App Secret of your DropBox App.
To remove the copies of files from the WordPress website, tick the checkbox: "Delete the local copy of file".
Note: To copy the files to the DropBox account is required create a DropBox App, and generate a token access.
Access your account, to the reserved area where configure an App: https://www.dropbox.com/developers/apps/create
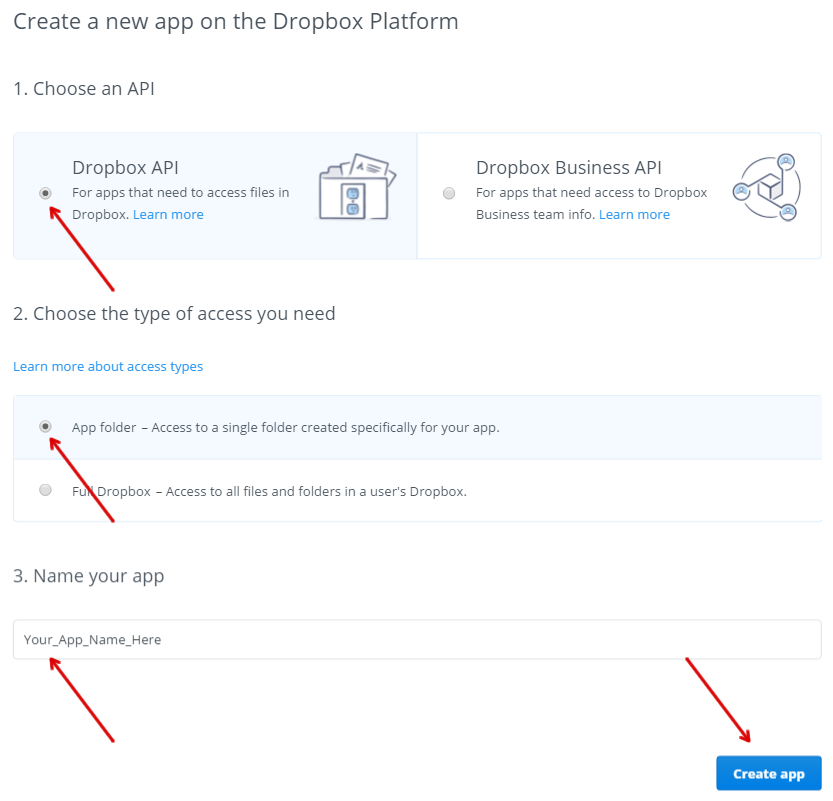
In the next screen enter the Redirect URI
And copy the App Key and Secret and enter them in the add-on attributes.
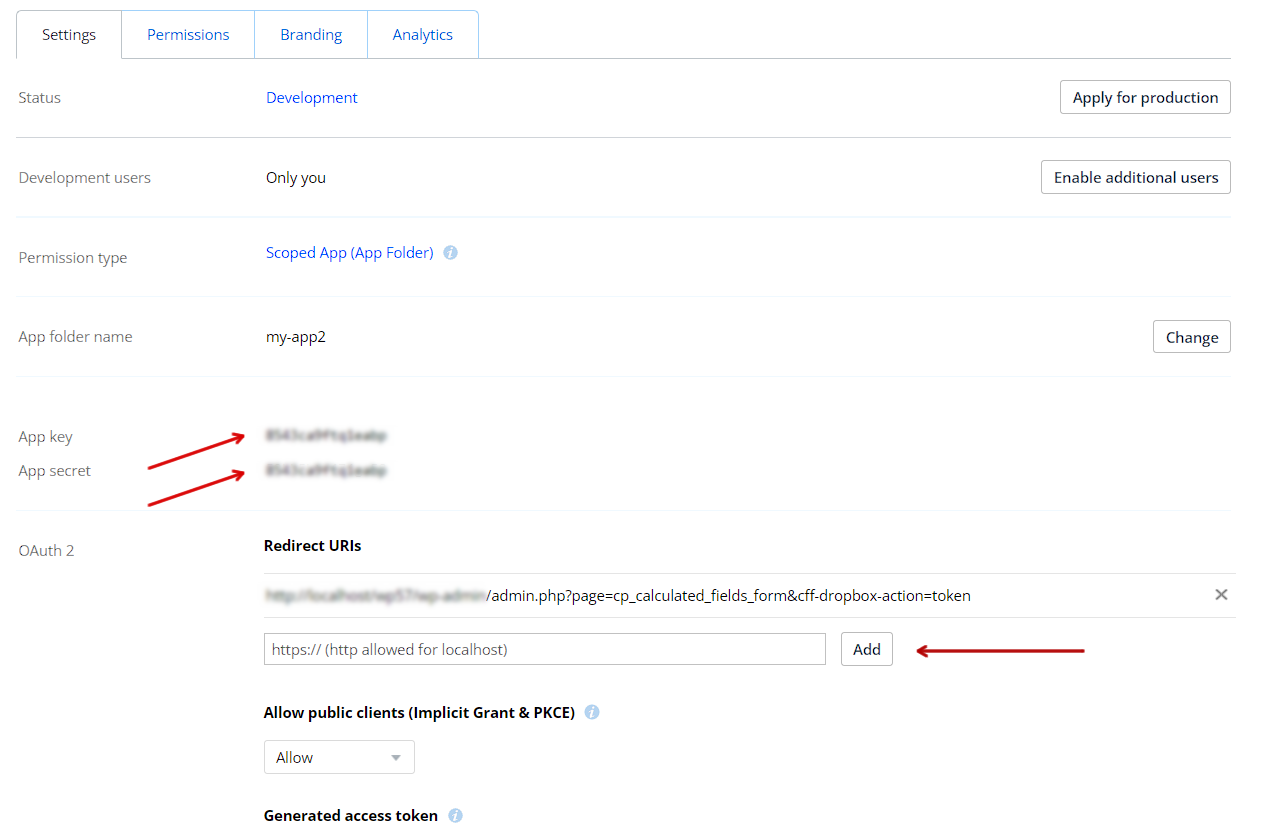
Finally, select the required persmissions from the permissions tab.
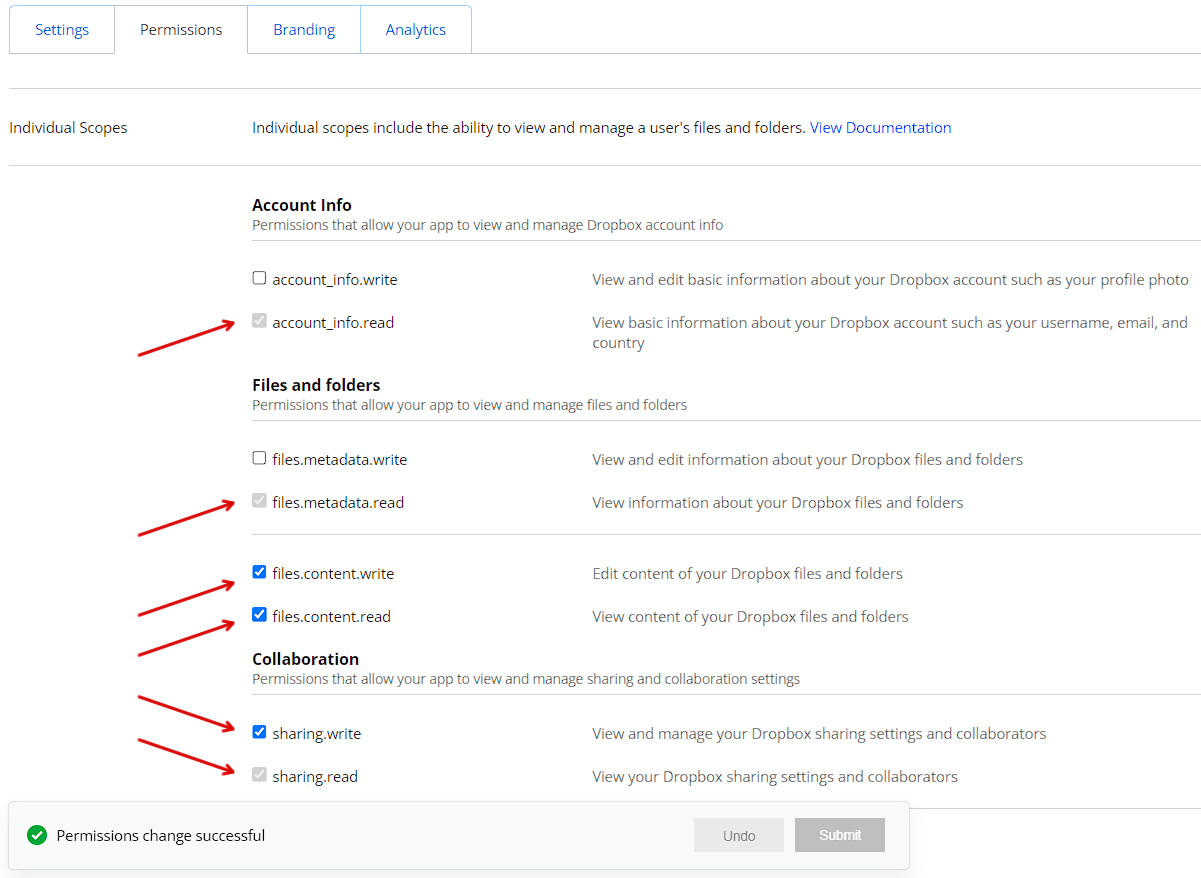
Platinum Version
The add on integrates the Calculated Fields Form with the ip2location databases to identify additional information of users based on their IP, as: Country, City Name, Coordinates, Weather Station, Time Zone, ZIP Code, etc...
* ip2location is a third party service not related to our company. ip2location may charge for their databases.
Note: Requires PHP 5.3 and over.
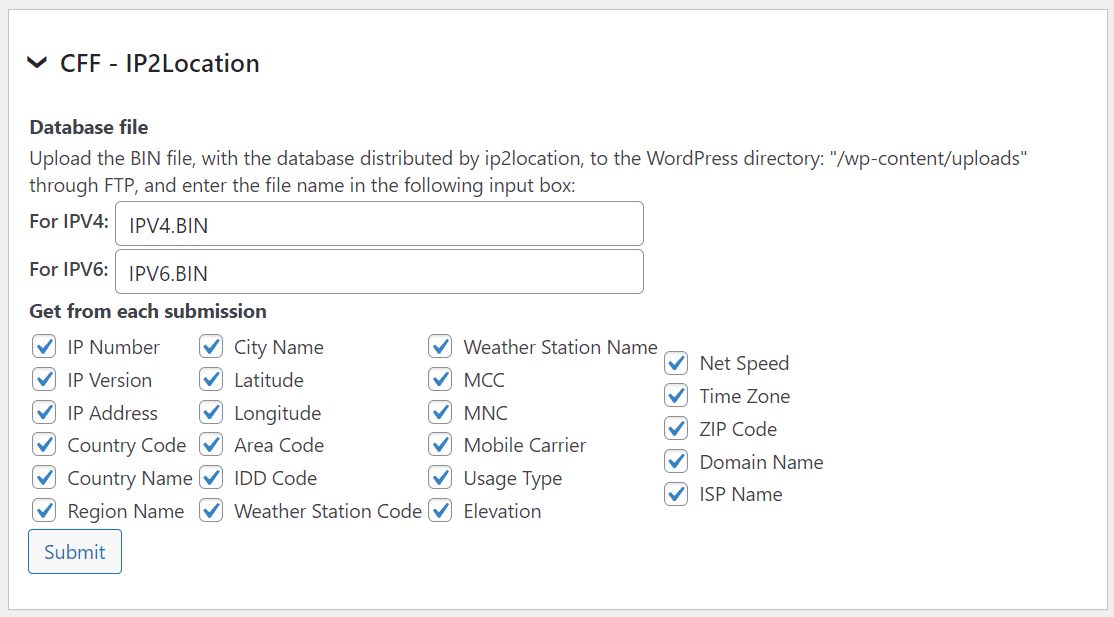
Uplods the ip2location database's files to the correct location in the webserver (/wp-content/uploads/), and then, enters the files' names in the add on settings
Tick the checkboxes of the information you want get of users.
If has been selected the option to include the users information in the notification emails, and the add-on is enabled, the notification email will include all extracted data.
Platinum Version
![]()
The add-on creates new members in the MailChimp service with the information collected by the forms in the website: www.mailchimp.com.
MailChimp is an online email marketing solution to manage subscribers, send emails, and track results.
* MailChimp is a third party service not related to our company. MailChimp may charge for their service.
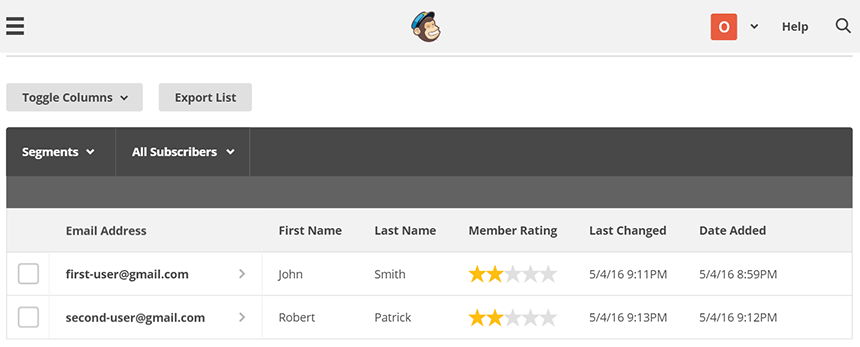
To activate the add-on, simply visit the plugin page through the menu option: "Calculated Fields Form > Addons", tick the checkbox: "CFF-MailChimp", and press the Activate/Deactivate Addons" button...
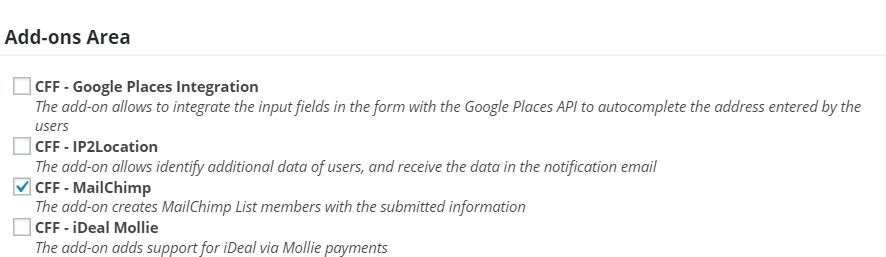
After activate the MailChimp add-on, the form settings will include a new section to create the correspondence between the signup form associated to a list in MailChimp, and the form fields in the form created with the "Calculated Fields Form" plugin.
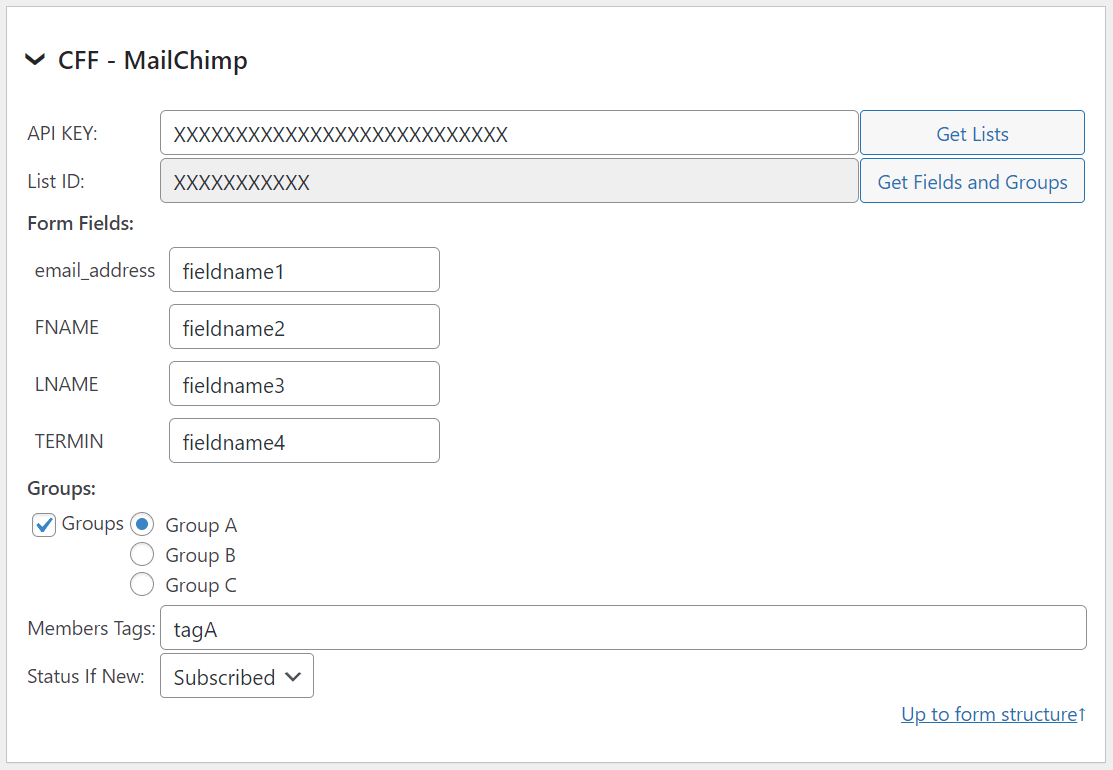
Related Information....
Platinum Version

The add-on creates new contacts (or update the existent ones) in the Mautic website with the information collected by the forms in the website.
Mautic offers the first open marketing cloud, enabling companies to connect all their digital properties and channels into a seamless customer experience.
* Mautic is a third party service not related to our company. Mautic may charge for their service.
To activate the add-on, simply visit the plugin page through the menu option: "Calculated Fields Form > Addons", tick the checkbox: "CFF-Mautic", and press the "Activate/Deactivate addons" button...

After activate the Mautic add-on, the form settings will include a new section to create the relationship between the fields in the Mautic form and the fields in the form created with the "Calculated Fields Form" plugin.
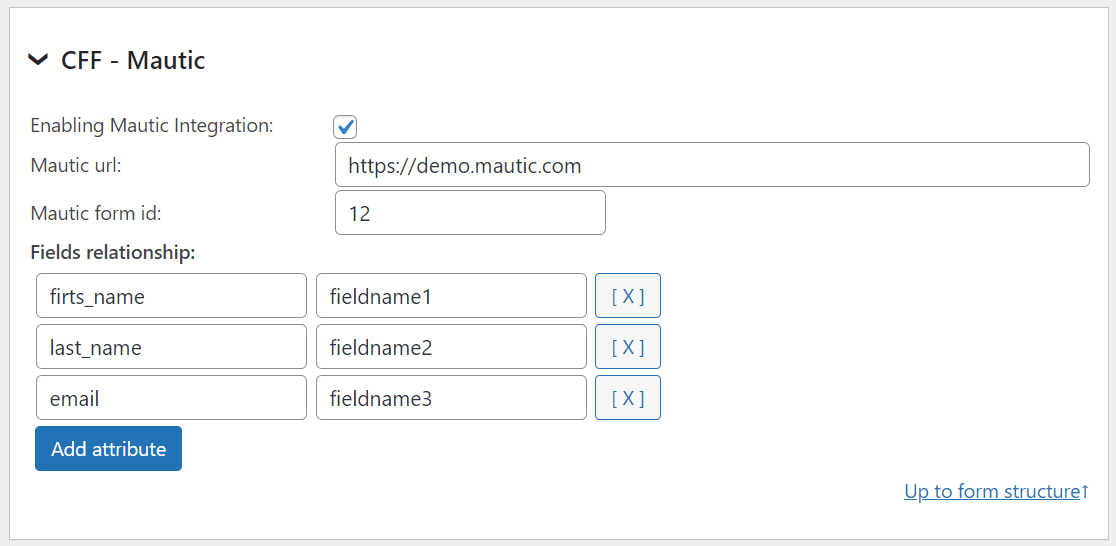
Platinum Version

The add-on creates and updates contacts, as well as generates new tickets with notes linked to those contacts, using information gathered from website forms on HubSpot.
HubSpot is a developer and marketer of software products for inbound marketing and sales.
* HubSpot is a third party service not related to our company. HubSpot may charge for their service.
To activate the add-on, simply visit the plugin page through the menu option: "Calculated Fields Form > Addons", tick the checkbox: "CFF-HubSpot", and press the "Activate/Deactivate addons" button...

After activate the HubSpot add-on, the form settings will include a new section to create the relationship between the HubSpot properties (for contacts, tickets, and notes) and the fields in the form created with the "Calculated Fields Form" plugin.
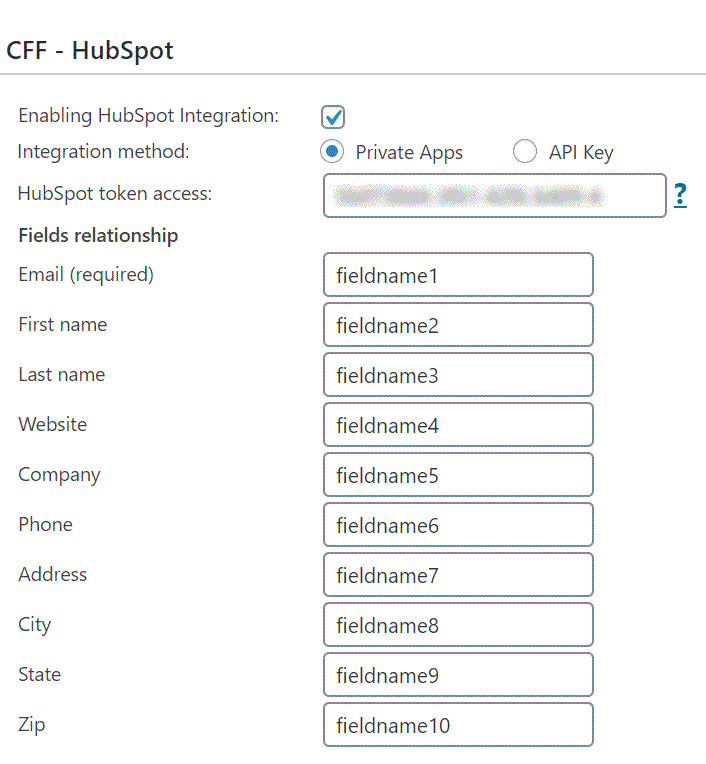
In the HubSpot properties/form fields relationship, you can enter the field names directly (e.g., fieldname1) or the fields and informative tags supported by notification emails (e.g., <%fieldname1_value%>).
Related Information....
Platinum Version
Emma's digital marketing platform makes it easy to create beautifully designed emails that drive results. It helps to plan, execute, and optimize campaigns to hit the business goals faster.The add-on adds new members to the Emma's digital marketing platform with the information collected by the forms in the website.

* Emma is a third party service not related to our company. Emma may charge for their service.
To activate the add-on, simply visit the plugin page through the menu option: "Calculated Fields Form > Addons", tick the checkbox: "CFF-Emma", and press the Activate/Deactivate Addons" button...
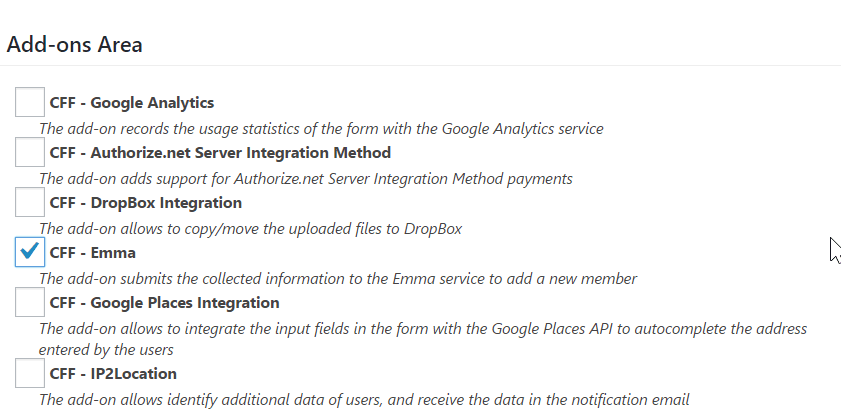
After activate the Emma add-on, would be available a new section for entering the "Account ID", "Public API Key", and "Private API Key" associated to the Emma account.
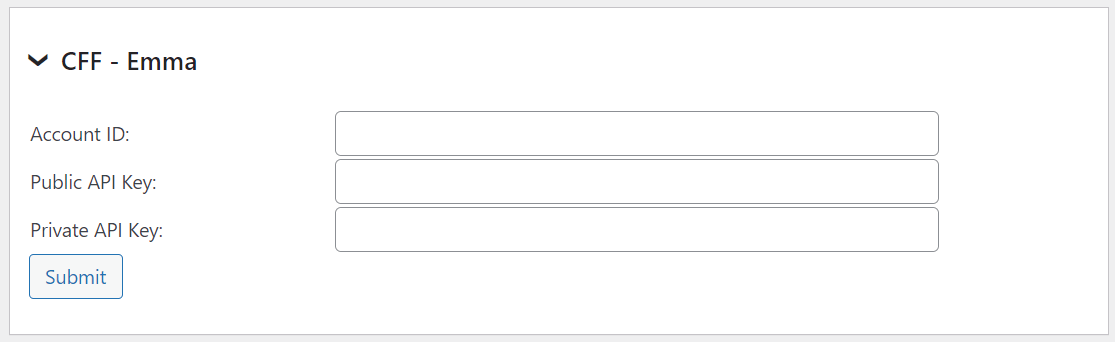
The Emma add-on includes a new section in the form's settings to create the relationship between the Emma fields and form's fields (press the "Get Fields" button to get the complete fields list), and select the Emma groups where to add the new members (press the "Get Groups" button to get the complete list of groups).
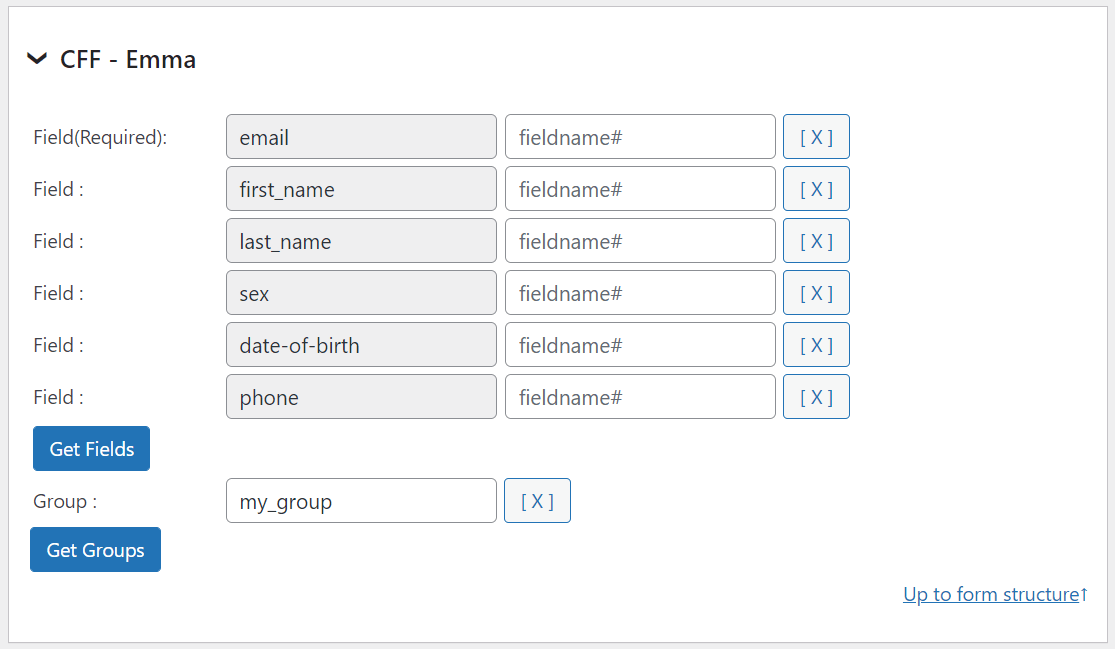
Platinum Version
The Twilio service allows sending messages (SMS) to mobile phones around the world.The add-on integrates the forms with the Twilio service for sending notification messages (SMS) after submit the forms.

* Twilio is a third party service not related to our company. Twilio may charge for their service.
To activate the add-on, simply visit the plugin page through the menu option: "Calculated Fields Form > Addons", tick the checkbox: "CFF-Twilio", and press the "Activate/Deactivate addons" button...

After activate the Twilio add-on, would be available a new section section in the form's settings for entering the required data.
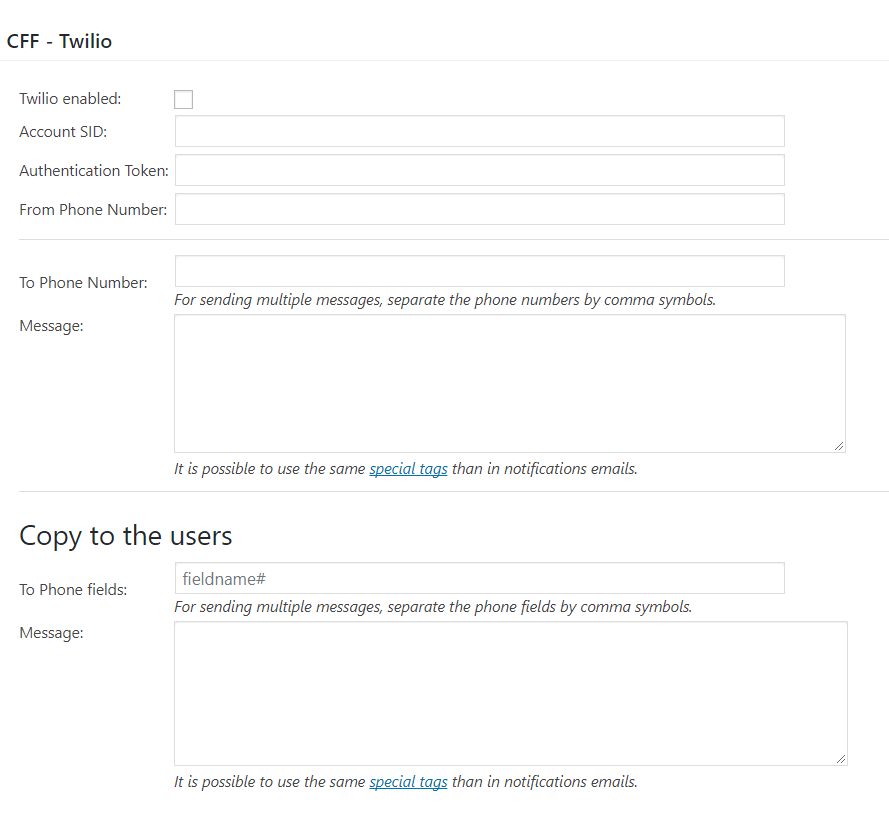
The add-on settings are:
Twilio enabled: for enabling/disabling the integration with the form.
Account SID: enter the Account SID provided by Twilio.
Authentication Token: enter the Authentication Token provided by Twilio.
From Phone Number: enter the phone number used as the "Origin" of SMS (enter a valid phone number including the country code).
To Phone Number: enter the phone numbers (separated by comma symbols) where to send the SMS (enter a valid phone number including the country code).
Message: enter SMS content (it is possible to use the same special tags than in the notification emails).
To Phone fields: enter the names of phone fields inserted in the form (fieldname#, separated by comma symbols).
Message: enter SMS content (it is possible to use the same special tags than in the notification emails).
Platinum Version
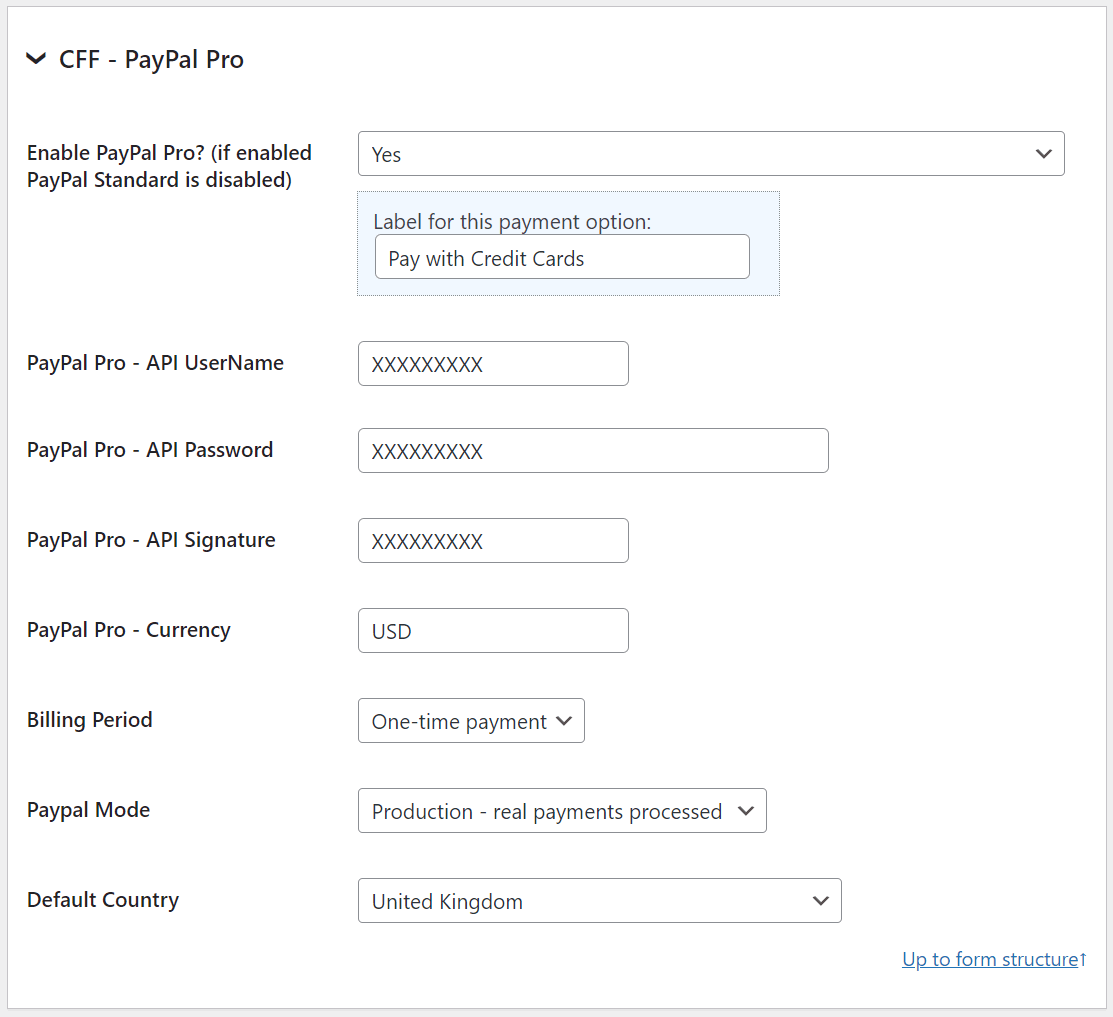
With Payment Form for PayPal Pro you can insert a form into a WordPress website and use it to process credit card payments directly into your website without navigating to an external payment page.
You can check the differences betwen PayPal Pro and PayPal Standard at https://www.paypal.com/webapps/mpp/compare-business-products
For integrating PayPal Pro you must have a PayPal Pro account. In addition to that a SSL connection is also needed, the SSL connection isn't a technical requirement since the plugin can work without it but anyway it is strongly recommended for accepting credit cards into your website, otherwise the transactions won't be secure.
In the settings area the following information is needed to activate and link the PayPal Pro account to the form:
When enabled, the form on the public website will display an additional set of fields to request the data needed to process the payment, like for example the billing address, credit card details. This info is only for the payment processing, as mentioned it won't be stored into the website for security reasons.
After the submission Once the payment is processed and the posted data (excluding the credit card related information) is saved into the WordPress database.
Platinum Version
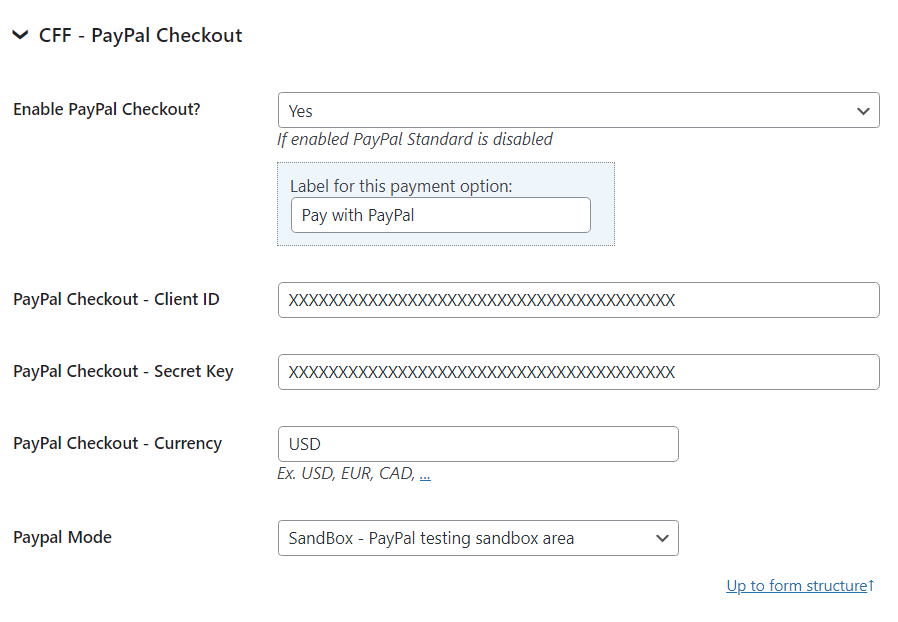
PayPal Checkout is a more versatile payment gateway integration than PayPal Standard. It supports additional payment methods and allows users to complete the payment process before submitting the form.
For integrating PayPal Checkout you need a PayPal Client ID and Secret Key. To get these credentials:
To activate PayPal Checkout in your form, go to the menu option "Calculated Fields Form > Addons", tick the "CFF - PayPal Checkout" checkbox, and press the "Activate/Deactivate Addons" button.
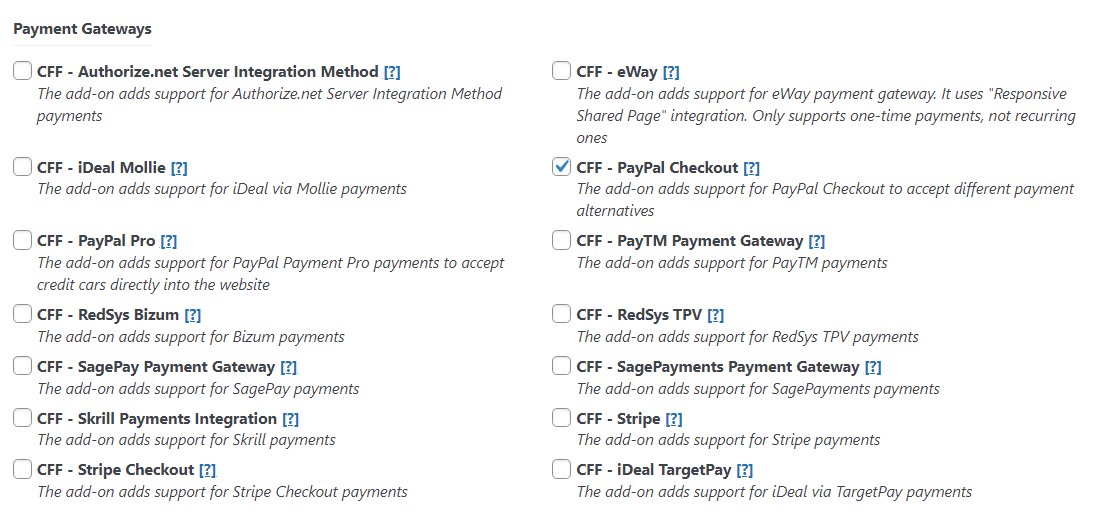
After activating the add-on, a new section will be displayed in the form settings for integration with PayPal Checkout. Go to the plugin settings and fill in the following attributes:
Please note that you must have selected the field containing the price through the "Request cost" attribute in the payment configuration section.
The form on the public website will display an additional set of buttons with the available payment methods. They may vary from user to user depending on their country or the device used to fill in the form.
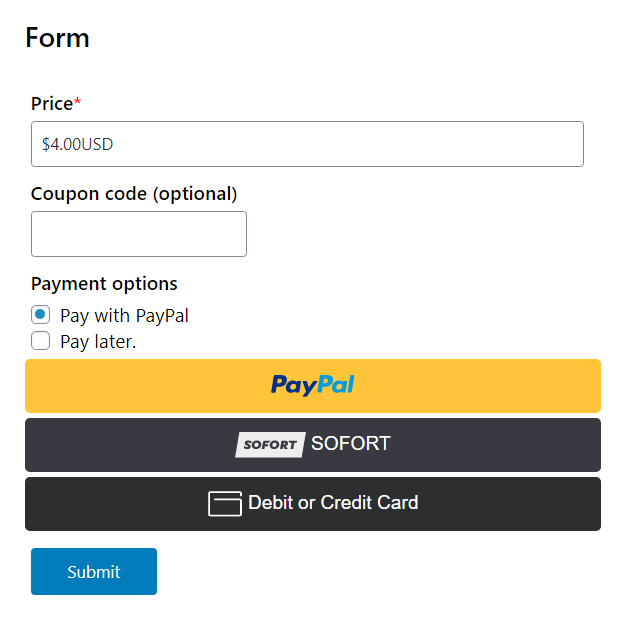
Platinum Version

Revolut's payment integration allows businesses to accept payments through various methods, including card payments and bank transfers, facilitating seamless transactions for customers globally.
The Revolut add-on allows website owners to charge the calculated price generated by a web form created with the Calculated Fields Form plugin using Revolut. It enables users to complete payments securely with all major payment methods supported by Revolut, ensuring a smooth and convenient checkout experience. Learn more about Revolut
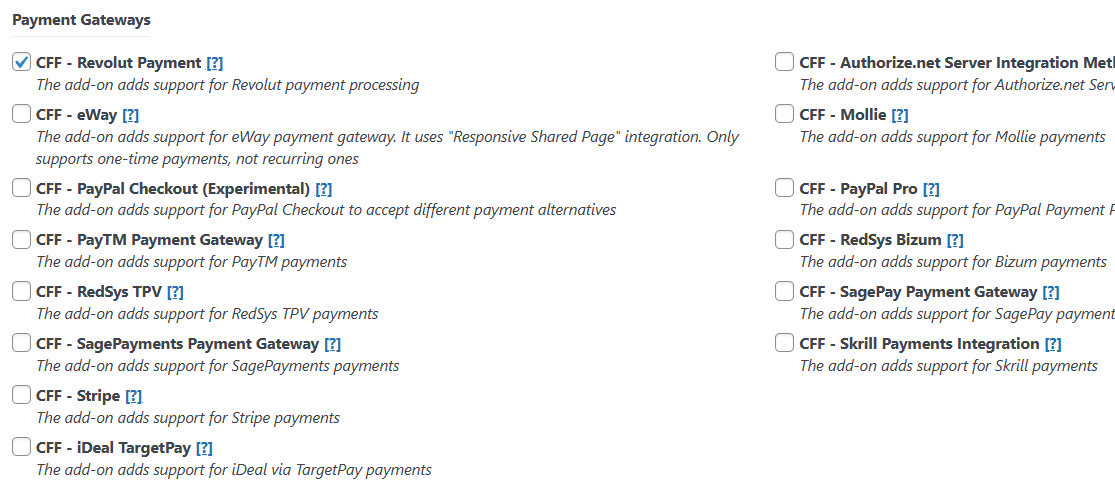
To activate the add-on, simply visit the plugin page through the menu option: "Calculated Fields Form > Addons", tick the checkbox: "Revolut Payment", and press the "Activate/Deactivate Addons" button.

In the settings area the following information is needed to activate and link the Revolut Payment alternative to the form:
Enable Authorize.net SIM?: Select "Yes" to enable the Authorize.net Server Integration Method payment.
Label box: Enter the text that will appear in the form when multiple payment alternatives are enabled.
Payment Mode?: Choose "Production" to accept real payments or "Sandbox" for testing purposes.
Secret Key: Depending on the payment mode selected, enter the production or sandbox secret keys.
Once the Revolut payment method has been enabled, customers will be redirected to the Revolut checkout page after submitting the form to complete their payment.
Platinum Version

The Authorize.net Server Server Integration Method (Authorize.net SIM) is a hosted payment processing solution that handles all of the steps in processing a transaction, including:
Authorize.net SIM is an ideal integration solution because merchants are not required to collect, transmit, or store sensitive cardholder information to process transactions. Additionally, Authorize.net SIM does not require merchants to purchase and install a SSL or TLS digital certificate, reducing the complexity of securely handling and storing cardholder information, simplifying compliance with the Payment Card Industry (PCI) Data Security Standard. For more information go to www.authorize.net
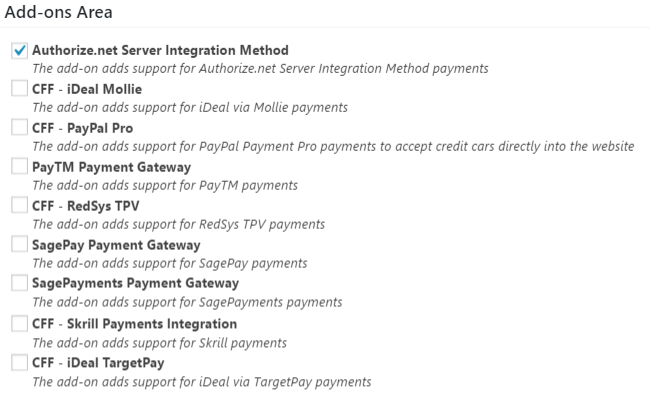
To activate the add-on, simply visit the plugin page through the menu option: "Calculated Fields Form > Addons", tick the checkbox: "CFF-Authorize.net Server Integration Method", and press the "Activate/Deactivate addons" button
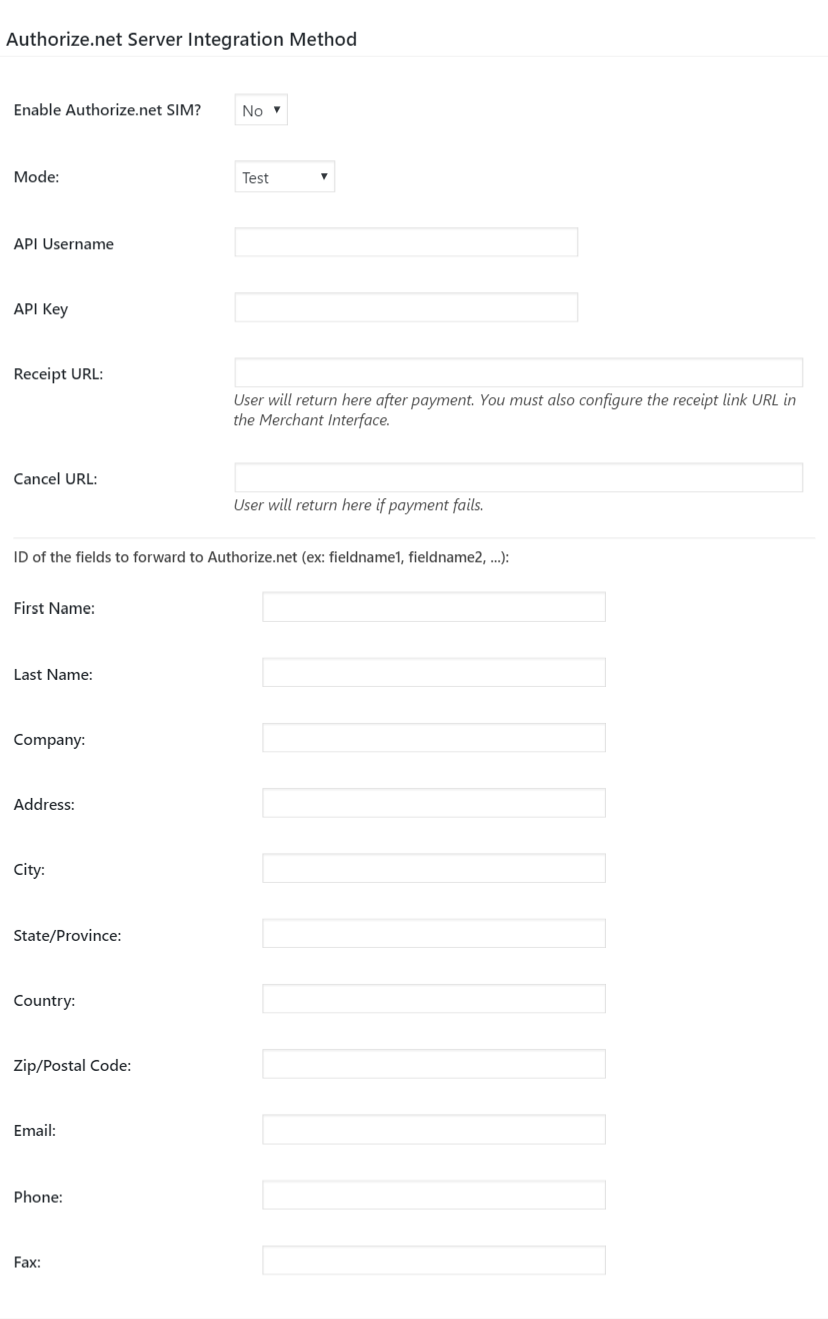
In the settings area the following information is needed to activate and link the Authorize.net Server Integration Method account to the form:
Enable Authorize.net SIM?: Select "Yes" to enable the Authorize.net Server Integration Method payment.
Mode: Change the mode between "test" for testing purposes and "production" for accepting real payments.
API Username: Change this value with API Username received from Authorize.net.
API Key: Change this value with API Key received from Authorize.net.
Receipt URL: User will return here after a successfull payment.
Cancel URL: User will return here if payment fails.
In addition to the above required setting fields there are other fields to link the form fields to the Authorize.net payment form, like for example the client name, address, phone, email, ... These fields are optional. To link the fields you can indicate the ID of the field on the form that contains the related info. Sample values: fieldname1, fieldname2, ..
When enabled, customers are redirected to Authorize.net after form submission to complete their payment.
Platinum Version
![]()
The Stripe Payments addon provides a way to accept all major cards from customers around the world on web. This addon requires SSL on your website to be able to carry the transaction in a secure way. Credit card data is entered directly in the website without navigating to an external page.
To activate the add-on, simply visit the plugin page through the menu option: "Calculated Fields Form > Addons", tick the checkbox: "CFF-Stripe Payment Integration", and press the "Activate/Deactivate add-ons" button...
In the settings area the following information is needed to activate and link the stripe account to the form:

When enabled, after clicking the Calculated Fields Form submit button, a Stripe floating panel will be displayed to ask for the credit card data and process the transaction and after that the form submission will continue as usual keeping the customer all the time into your website.
Professional Version Developer Version Platinum Version
![]()
The Stripe Payments addon provides a way to accept all major cards from customers around the world on web. The Stripe checkout accepts every payment method enabled in your Stripe account.
To activate the add-on, simply visit the plugin page through the menu option: "Calculated Fields Form > Addons", tick the "CFF-Stripe Checkout" checkbox, and press the "Activate/Deactivate add-ons" button...
The add-on includes a new section in the form settings to configure the Stripe Checkout integration:
When enabled, after clicking the Calculated Fields Form submit button, the plugin opens the Stripe Checkout page to complete the payment.
Platinum Version

The Skrill Payments addon provides a secure interface for accepting payments through a secure page. You can accept cards, more than 20 local payment methods and over 80 direct bank transfer connections with a single integration. Form more information go to https://www.skrill.com/en/merchants/
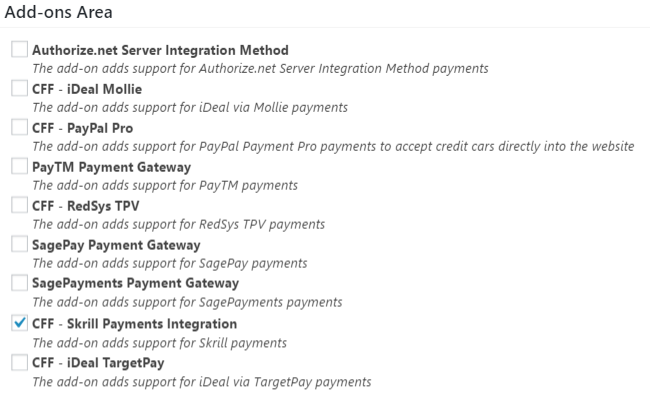
To activate the add-on, simply visit the plugin page through the menu option: "Calculated Fields Form > Addons", tick the checkbox: "CFF-Skrill Payment Integration", and press the "Activate/Deactivate addons" button.
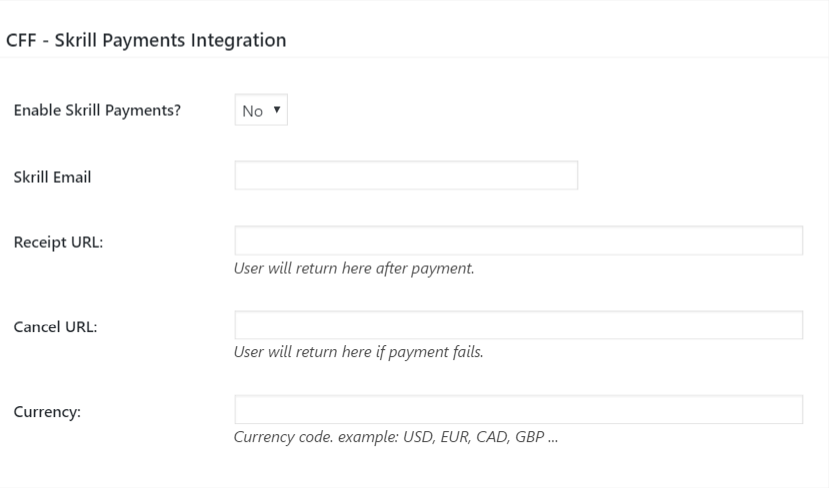
In the settings area the following information is needed to activate and link the Skrill account to the form:
Enable Skrill Payments?: Select "Yes" to enable the Skrill Payments Integration.
Skrill Email?: Emai linked to the Skrill merchant account, this will be the account that will receive the payments.
Receipt URL: User will return here after a successfull payment.
Cancel URL: User will return here if payment fails.
Currency: Currency code for the received payment. E.g. USD, EUR, CAD, GBP ....
When enabled, customers are redirected to Skrill after form submission to complete their payment.
Platinum Version

The TargetPay addon provides integration with iDeal, the most popular Dutch payment method. The integration is made via TargetPay: https://www.targetpay.com/info/ideal?setlang=en
With TargetPay you can set up iDEAL payments for your website easily. Acting as a "Payment Service Provider" it aggregates payments for a large number of webstores. The iDEAL platform combines the online banking systems of 10 of the largest Dutch banks (ABN AMRO, ASN Bank, Bunq, ING, Knab, Rabobank, RegioBank, SNS Bank, Triodos Bank and van Lanschot) into one payment method.
After the consumer selects the iDEAL payment method the consumer's bank is selected. The actual payment then takes place in the bank's trusted online banking environment for which security is guaranteed by the bank. Through iDEAL buyer and seller are guaranteed a transparent transaction without hidden fees or other unpleasant surprises.
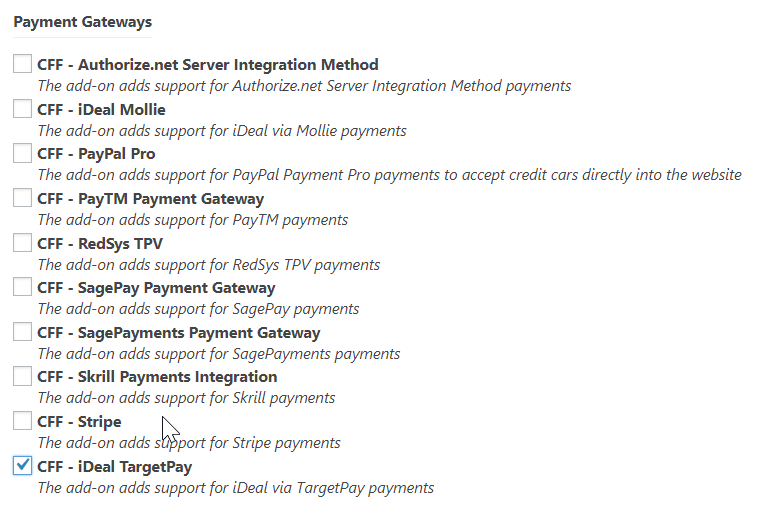
To activate the add-on, simply visit the plugin page through the menu option: "Calculated Fields Form > Addons", tick the checkbox: "CFF-iDeal TargetPay", and press the "Activate/Deactivate Addons" button.
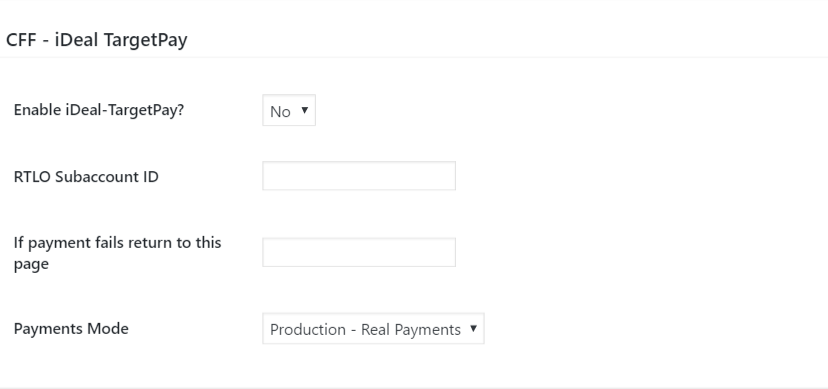
In the settings area the following information is needed to activate and link the iDeal-TargetPay account to the form:
Enable iDeal-TargetPay?: Select "Yes" to enable the iDeal-TargetPay payment option for the form.
RTLO Subaccount ID: Change this value with the account ID received from iDeal-TargetPay.
If payment fails return to this page: Return page if the payment fails or is cancelled before completing it.
Payments Mode: Change the mode between "test" for testing purposes and "production" for accepting real payments.
When enabled, customers are redirected to iDeal/TargetPay after form submission to complete their payment.
Platinum Version
![]()
The Mollie addon provides integration with iDeal, the most popular Dutch payment method. The integration is made via Mollie: www.mollie.com.
You're easily connected to iDEAL through Mollie without the dreaded technical and administrative hassle. The iDEAL platform combines the online banking systems of 10 of the largest Dutch banks (ABN AMRO, ASN Bank, Bunq, ING, Knab, Rabobank, RegioBank, SNS Bank, Triodos Bank and van Lanschot) into one payment method.
After the consumer selects the iDEAL payment method the consumer's bank is selected. The actual payment then takes place in the bank's trusted online banking environment for which security is guaranteed by the bank. Through iDEAL buyer and seller are guaranteed a transparent transaction without hidden fees or other unpleasant surprises.

To activate the add-on, simply visit the plugin page through the menu option: "Calculated Fields Form > Addons", tick the checkbox: "CFF-iDeal Mollie", and press the Activate/Deactivate Addons" button...
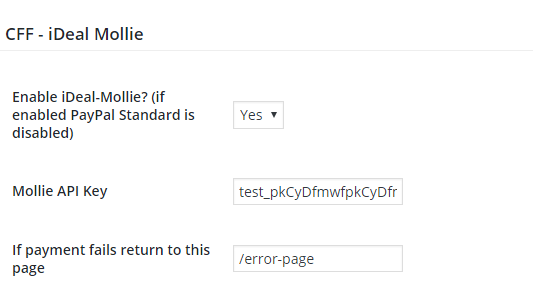
In the settings area the following information is needed to activate and link the Mollie - iDeal account to the form:
Enable iDeal-Mollie?: Select "Yes" to enable the Mollie - iDeal addon.
Mollie API Key: The API Username provided by Mollie for your account, it may be the test key or the production key.
If payment fails return to this page: If the payment fails the customer is redirected to the page indicated in this field.
When enabled, customers are redirected to Mollie - iDeal after form submission to complete their payment.
Platinum Version
![]()
The RedSys / Servired / Sermepa addon provides a secure interface for accepting credit card payments through most banks in Spain (Sabadell, Banco Popular, BBVA, Santander, Bankia, Caixa, Bankinter, etc...). You can read more about RedSys at www.redsys.es.
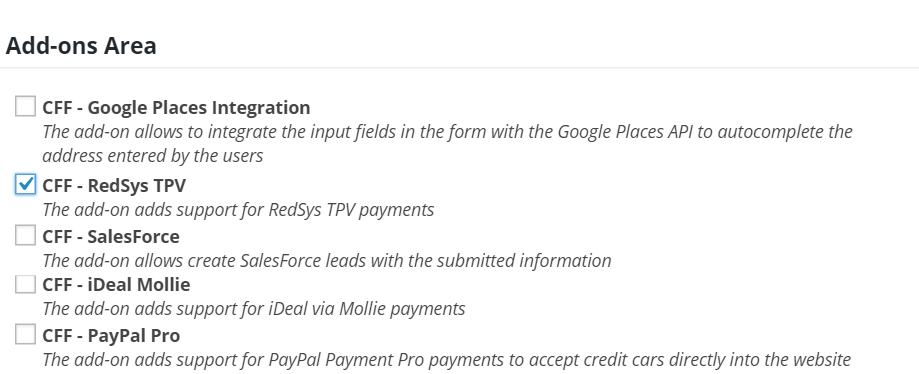
To activate the add-on, simply visit the plugin page through the menu option: "Calculated Fields Form > Addons", tick the checkbox: "CFF-RedSys TPV", and press the Activate/Deactivate Addons" button...
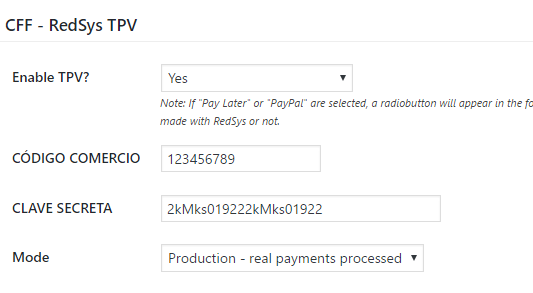
In the settings area the following information is needed to activate and link the RedSys account to the form:
Enable TPV: Select "Yes" to enable the RedSys TPV.
CÓDIGO COMERCIO: The API Username provided by RedSys or your bank.
CLAVE SECRETA: The API Password provided by RedSys or your bank.
Mode: Select "Sandbox" for testing purposes and "Production" for charging real payments.
When enabled, customers are redirected to RedSys after form submission to complete their payment.
Platinum Version
![]()
With Bizum you can send and receive money in less than 5 seconds. Securely, using only your phone number. You can read more about Bizum at bizum.es
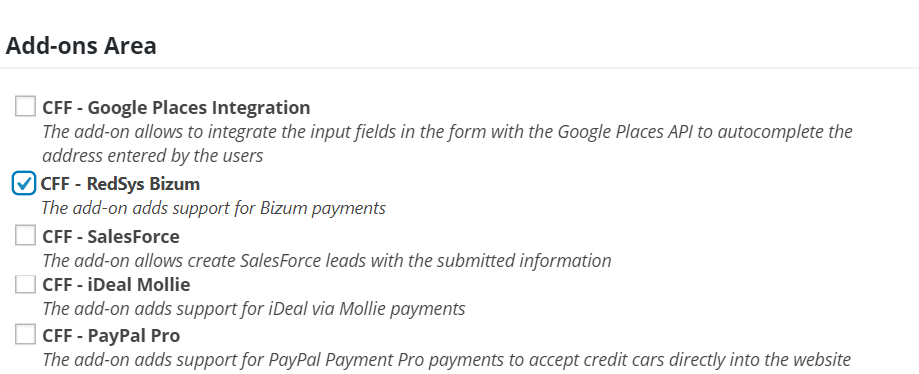
To activate the add-on, simply visit the plugin page through the menu option: "Calculated Fields Form > Addons", tick the checkbox: "CFF-RedSys Bizum", and press the "Activate/Deactivate Addons" button...
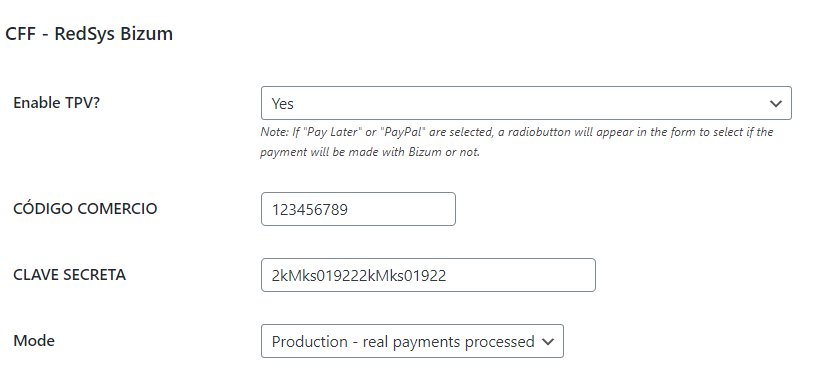
In the settings area the following information is needed to activate and link the RedSys account to the form:
Enable TPV: Select "Yes" to enable the RedSys Bizum.
CÓDIGO COMERCIO: The API Username provided by RedSys Bizum or your bank.
CLAVE SECRETA: The API Password provided by RedSys Bizum or your bank.
Mode: Select "Sandbox" for testing purposes and "Production" for charging real payments.
Platinum Version

PAYCOMET is a European payment service provider and gateway owned by Banco Sabadell that enables businesses to accept and manage online and in-store payments securely. It supports multiple payment methods—such as cards, Bizum, Apple Pay, and Google Pay—and offers tools for recurring billing and fraud prevention.

To activate the add-on, simply visit the plugin page through the menu option: "Calculated Fields Form > Addons", tick the checkbox: "CFF-Paycomet", and press the Activate/Deactivate Addons" button...
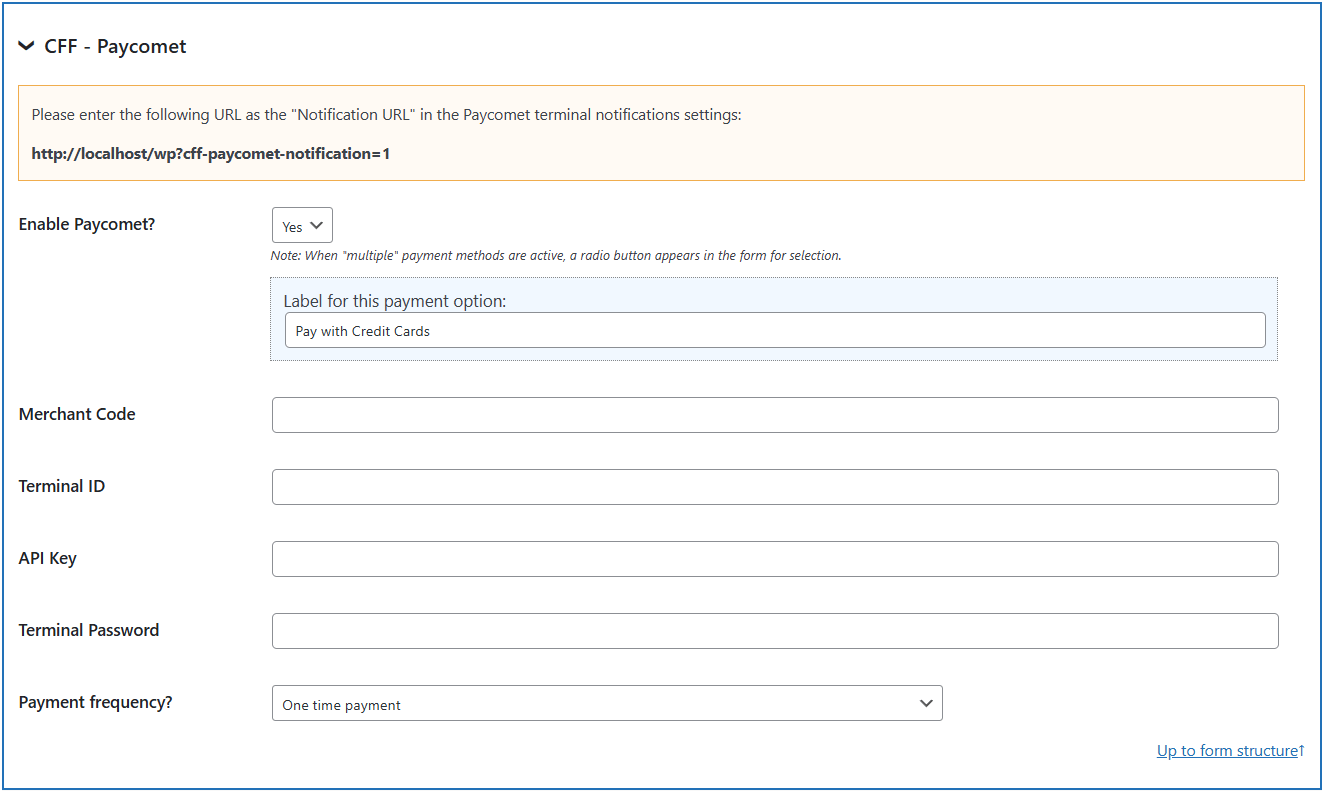
In the settings area the following information is needed to activate and link the Paycomet account to the form:
Enable Paycomet: Select "Yes" to enable the Paycomet payment gateway.
Merchant Code: Your business identifier in Paycomet.
Terminal ID: Identifies the specific payment terminal or channel on Paycomet.
API Key: Secret key used to authenticate requests from your website to Paycomet.
Terminal Password: Password linked to the Terminal ID, used for secure communication.
Payment frequency: Defines how often a recurring payment is charged (e.g., monthly, yearly).
When enabled, customers are redirected to Paycoment after form submission to complete their payment.
Platinum Version

The Opayo (formerly SagePay) addon provides a secure interface for accepting payments through Opayo (formerly SagePay).
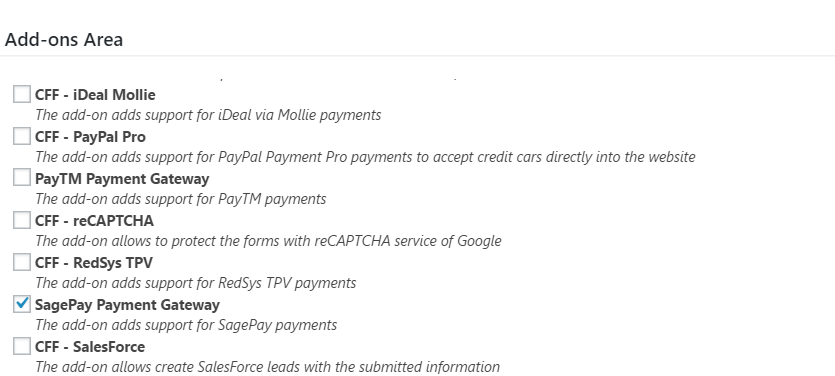
To activate the add-on, simply visit the plugin page through the menu option: "Calculated Fields Form > Addons", tick the checkbox: "CFF-SagePay", and press the Activate/Deactivate Addons" button...
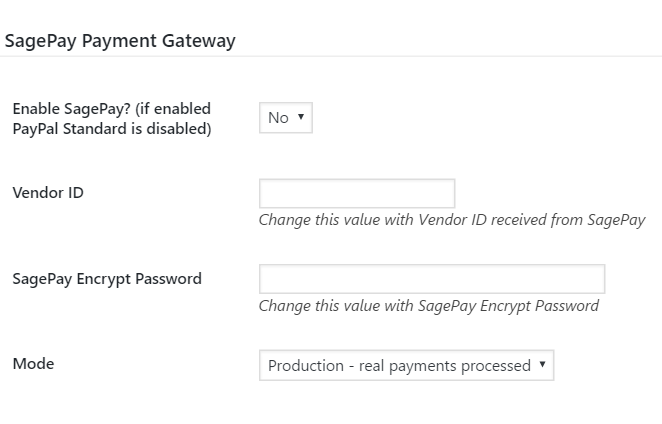
In the settings area the following information is needed to activate and link the Opayo (formerly SagePay) account to the form:
Enable SagePay?: Select "Yes" to enable the Opayo (formerly SagePay) payment gateway.
Vendor ID: The Vendor ID provided by SagePay.
SagePay Encrypt Password: The Opayo (formerly SagePay) Encrypt Password provided by PayTM.
Mode: Select "Sandbox" for testing purposes and "Production" for charging real payments.
When enabled, customers are redirected to Opayo (formerly SagePay) after form submission to complete their payment.
Platinum Version

The SagePayments addon provides a secure interface for accepting payments through a secure SSL checkout system for both bankcard and virtual check transactions. All authorized and approved transactions will be delivered into your current bankcard and/or virtual check batches viewable within the Virtual Terminal for order processing and settlement. You can read more about Sage Payment Solutions at http://www.sage.com/us/sage-payment-solutions/accept-payments. The integration implemented in this addon is for Sage Payment Solutions >> Shopping ExpressPay
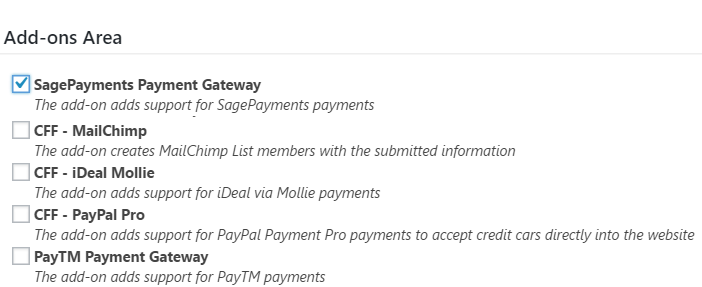
To activate the add-on, simply visit the plugin page through the menu option: "Calculated Fields Form > Addons", "CFF-SagePayments Payment Gateway", and press the "Update" button.
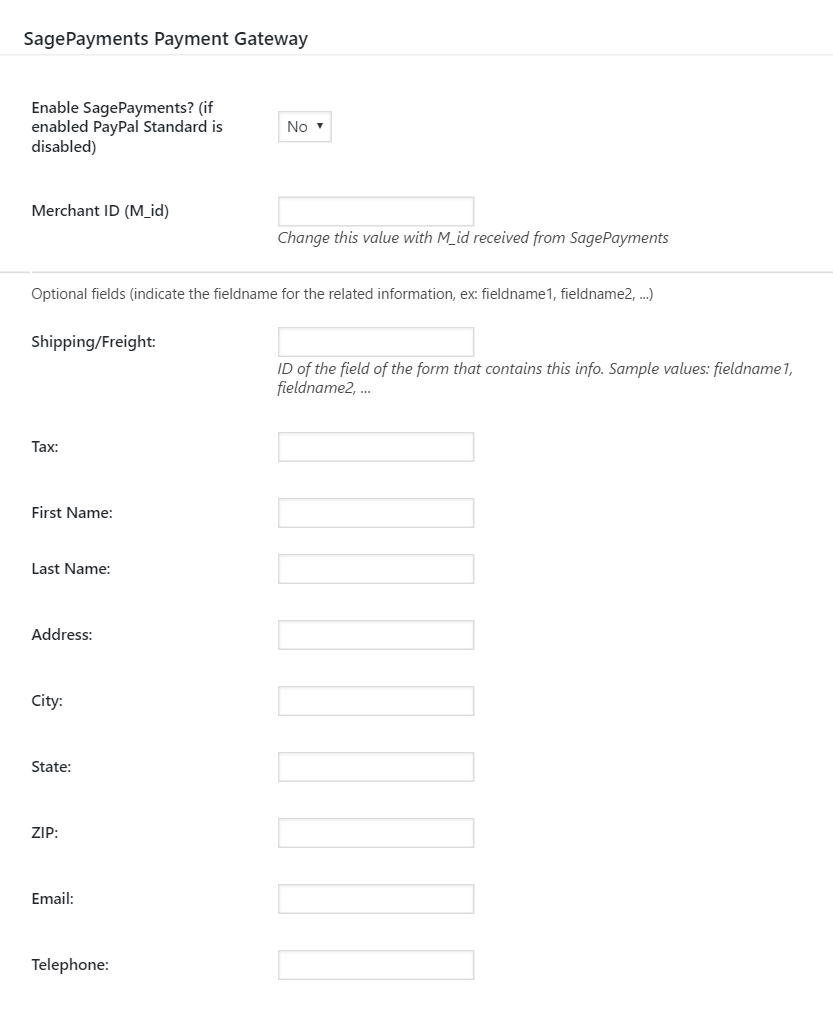
In the settings area the following information is needed to activate and link the Sage Payment Solutions >> Shopping ExpressPay account to the form:
Enable SagePayments?: Select "Yes" to enable the SagePayments TPV.
Merchant ID (M_id): Change this value with M_id received from SagePayments.
In addition to the mentioned two required setting field there are other fields to link the form fields to the Sage Payment Solutions payment form, like for example the client name, address, phone, email, tax and shipping cost. These fields are optionals and to link the fields you can indicate the ID of the field on the form that contains the related info. Sample values: fieldname1, fieldname2, ...
When enabled, customers are redirected to the Sage Payment Solutions after form submission to complete their payment.
Platinum Version

The PayTM addon provides a secure interface for accepting payments through credit card, debir cards, net banking, wallet and EMI. With over 100mn Paytm users in India, your customers will love the option to pay with their trusted Paytm Wallet. You can read more about PayTM at paywithpaytm.com.
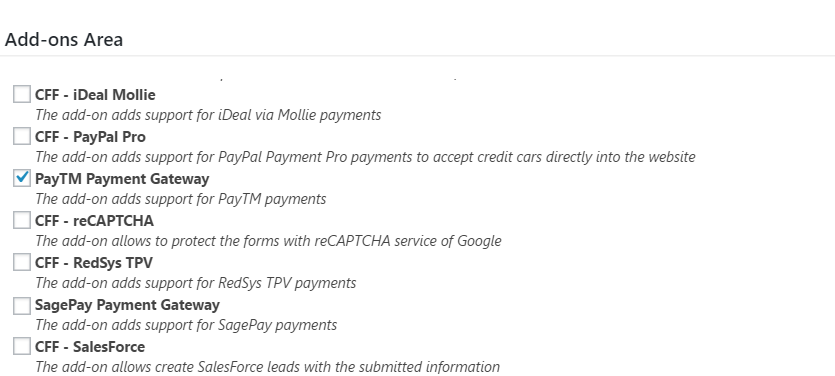
To activate the add-on, simply visit the plugin page through the menu option: "Calculated Fields Form > Addons", tick the checkbox: "CFF-PayTM", and press the Activate/Deactivate Addons" button...

In the settings area the following information is needed to activate and link the PayTM account to the form:
Enable PayTM?: Select "Yes" to enable the PayTM payment gateway.
Merchant ID: The Merchant ID provided by PayTM.
Merchant Key: The Merchant Key provided by PayTM.
Website Name: The Website Name provided by PayTM.
Industry Type ID: The Industry Type ID provided by PayTM.
Mode: Select "Sandbox" for testing purposes and "Production" for charging real payments.
When enabled, customers are redirected to PayTM after form submission to complete their payment.
Platinum Version

The eWay addon provides secure payments with eWay payment gateway. eWay is popular payment gateways in countries like Australia, New Zealand, Singapore, Hong Kong, and Macau. The eWay add-on implements the integration with the "eWay Responsive Shared Page" for accepting credit card payments, even Paypal and digital wallets via eWay.
Note: the current version of the add-on only supports one-time payments and not recurring payments.
To activate the add-on, simply visit the plugin page through the menu option: "Calculated Fields Form", tick the checkbox: "CFF-eWay", and press the "Activate/Deactivate Addons" button...
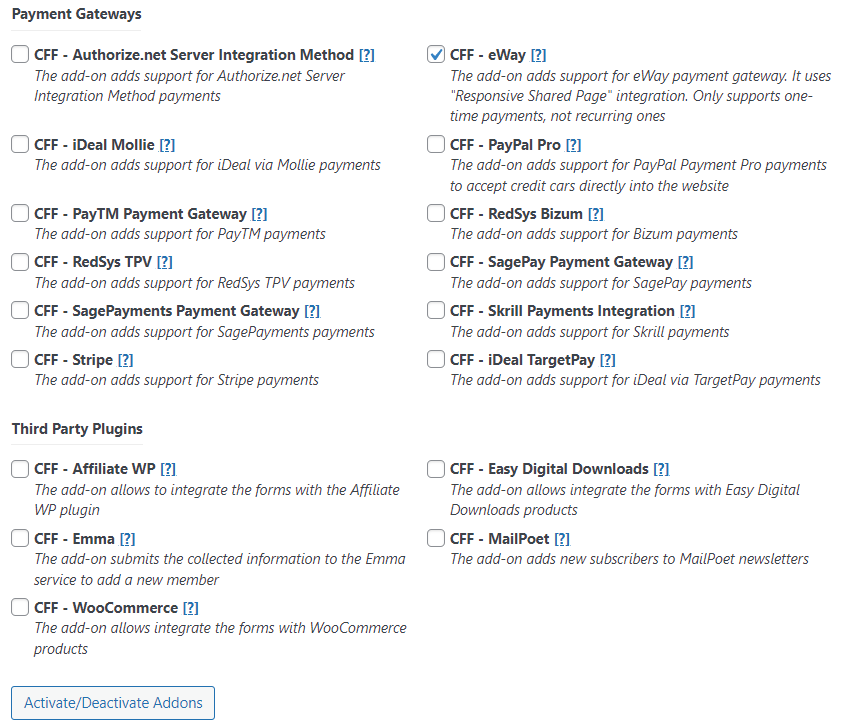
After activating the add-on, it will appear a new section in the form's settings to integrate the eWay payment gateway with the form.
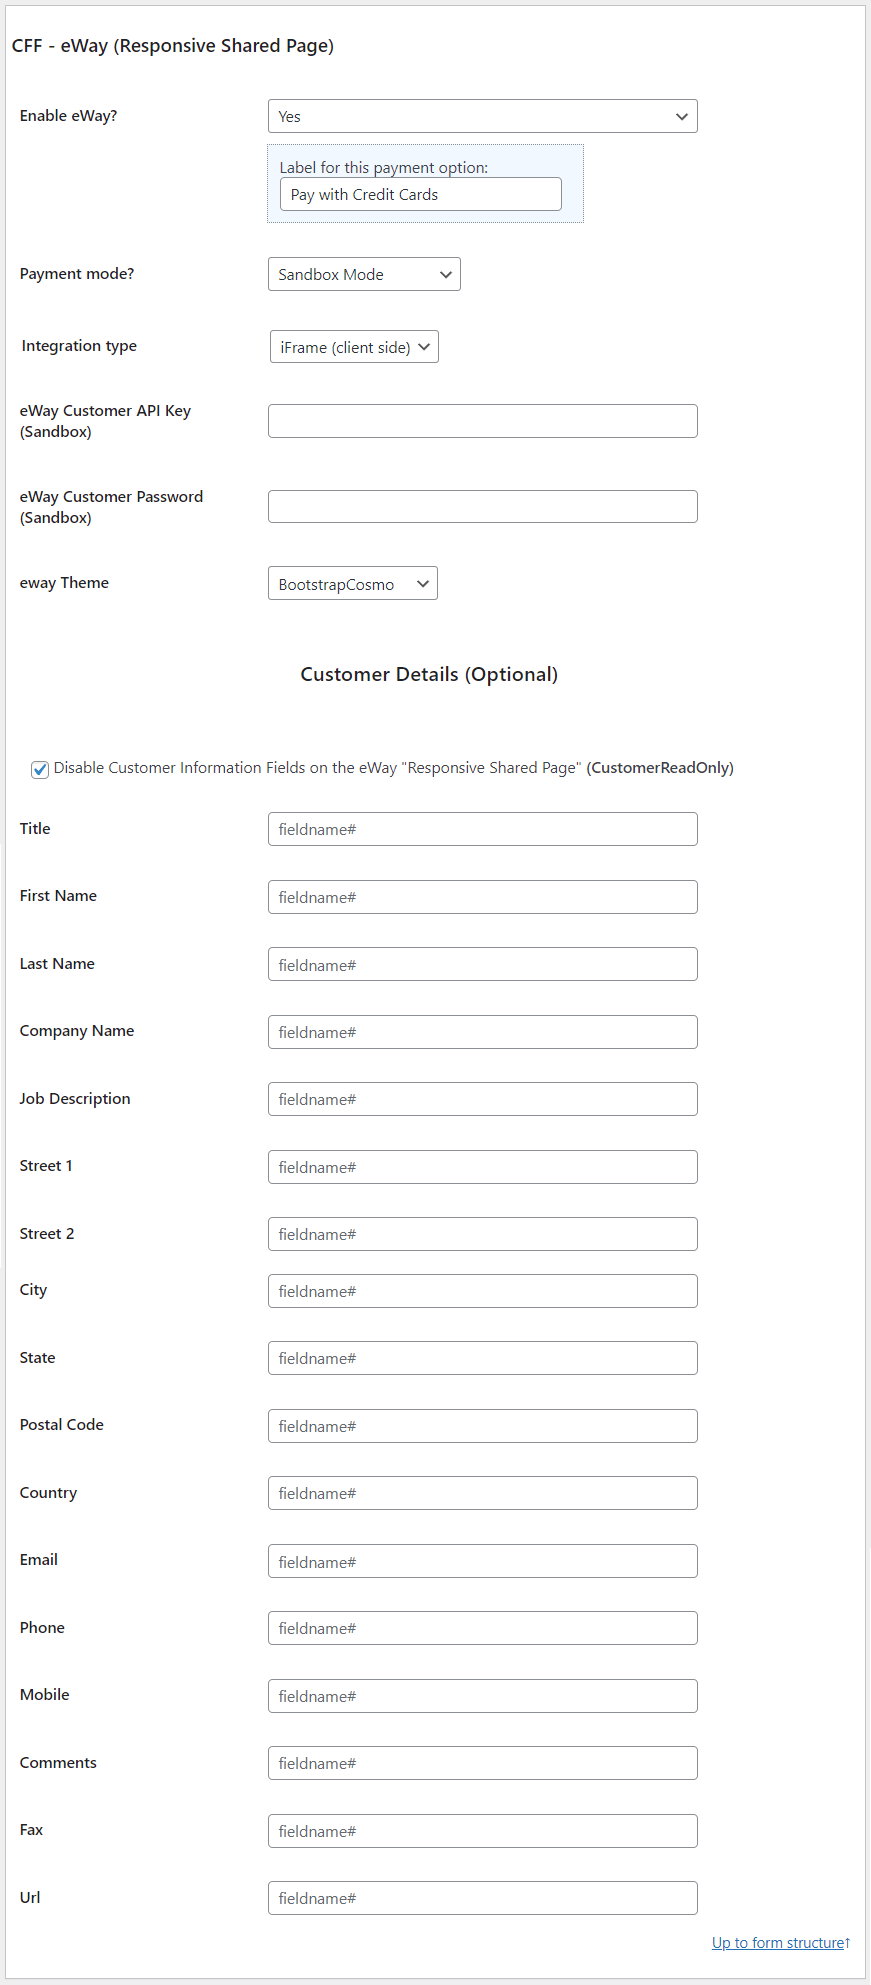
The settings area includes the following attributes list:
Enable eWay?: Select "Yes" to enable the eWay payment gateway. The attribute includes other options to activate multiple payment gateways in the form or pay later alternative.
Payment Mode: Select between the production eWay account or the sandbox one for testing the integration.
Integration Type: Possible values "iFrame", "Shared Page". The "Shared Page" option redirects the user to eWay to complete the payment after submitting the form. The "iFrame" option allows completing the payment on the website.
eWay Customer API Key: API Key provided by eWay.
eWay Customer Password: eWay integration password.
To get your account API keys and API Password Goto My Account --> API Key. A form that you can get API key and Password for payment acquirer.If you not able to see your password generate a new one with 'Generate Password' Button.

eWay Theme: Select the theme to apply the eWay Responsive Shared Page.
The list of customer data and the corresponding fields in the form. This section is optional, the customer attributes are:
Title
First Name
Last Name
Company Name
Job Description
Street 1
Street 2
City
State
Postal Code
Country
Email
Phone
Mobile
Comments
Fax
Url
It is possible to disable the customer details section on the eWay Shared Page by ticking the "Disable Customer Information Fields on the eWay Responsive Shared Page" checkbox.
The equations allowed by the plugin "Calculated Fields Form" are really powerful tools.
You can reference form fields directly in your equations simply by including their names:
fieldname1 + fieldname2By default, the plugin:
1. Raw Value Modifier ("|r")
Sometimes you need the field's raw value-without any preprocessing. In these cases, append the |r modifier to the field name:
fieldname1|rExample
If fieldname1 contains the string "USD 100.00", using fieldname1 yields 100, while fieldname1|r yields the full string "USD 100.00".
2. Submitted Value/Text Modifier ("|v")
For dropdowns, radio buttons, and checkboxes, you can choose whether to submit the value or the display text. Use the |v modifier to retrieve exactly the data that will be submitted:
fieldname1|vExample
If you have a dropdown with:
Label: "Gold" (text)
Underlying value: 10
Then:
fieldname1 → 10fieldname1|v → "Gold"3. Quantity Modifier for Checkboxes ("|q")
When quantity is enabled on a checkbox field, append |q to retrieve an array of quantities for each checked choice:
fieldname1|qExample
A checkbox field with choices:
"Warranty" (qty: 1) "Installation" (qty: 2)
Checking both yields:
fieldname1|q → [1, 2]4. Name Modifier ("|n")
By default, every time a field name appears in an equation, the plugin replaces it with that field's value. Use the |n modifier when you need the literal field name (for example, to build dynamic function calls):
getField(fieldname1|n).choices({ texts: ['A','B'], values: [1,2] });Example
Suppose you want to dynamically fetch the choice list for fieldname1:
getField(fieldname1|n)
  .choices({
    texts:  ['Small', 'Medium', 'Large'],
    values: [10, 20, 30]
  });
Quick Reference
| MODIFIER | PURPOSE |
|---|---|
| |r | Return the raw (unprocessed) field value |
| |v | Return the submitted value |
| |q | Return quantities array (for checkbox fields with quantity) |
| |n | Return the field's name (not its value) |

It is possible create simple equations like follow:
All Versions of the Plugin
fieldname1+fieldname2
fieldname1*fieldname2
fieldname1/fieldname2
fieldname1-fieldname2
or mathematical equations with multiple fields and fields grouping included.
fieldname1*(fieldname2+fieldname3)
some of them available as buttons in the plugin's interface, the other operations should be typed manually in the equation's editor:
sum(x,y,z,....)
Returns the sum of values passed by parameter
sum(3,10,11) returns 24
If the last parameter is a function, calls the function with each of the numbers, and sums the results.
Sum of squares:
sum(1,2,3,4, function(x){return POW(x,2)}) returns 30
Sum even numbers:
sum(1,2,3,4, function(x){if(x%2 == 0) return x;}) returns 6
sumif(x,y,z,...,callback)
The sumif function takes a series of numeric values followed by a single callback function that returns true or false, then returns the sum of only those values for which the callback returns true. Internally, it iterates over each supplied operand, invokes the callback with that value, and, if the callback yields true, adds the value to a running total (skipping it otherwise).
Calculate the sum of the odd numbers.
sumif(3,10,11,function(x){return REMAINDER(x,2);})
returns 14
Modern approach.
sumif(3,10,11,(x)=>REMAINDER(x,2))
returns 14
sigma(n,m,callback)
Applies the summation from x=n to m, passing x to the callback function.
sigma(1, 4, function(x){return 2*x+1;}) returns 24
sigma(1, 3, function(x){return x*(x+1);}) returns 20
concatenate(x,y,z,....)
Returns a text with all parameters concatenated
concatenate(1, 2, 3) returns 123
average(x,y,z,....)
Returns the average of values passed by parameter
average(3,10,11) returns 8
The average operation accepts arrays of numbers: average([3,10],11) = 8
factorial(x)
Returns the factorial of x, or null if x is not an integer greater than 0
factorial(4) returns 24
remainder(x,y)
The remainder is the integer left over after dividing one integer by another to produce an integer quotient (integer division)
remainder(7,2) returns 1
tobase(number,from_base,to_base)
Converts a number from a base to another
tobase(5, 10, 2) returns 101
tobase('AF', 16, 10) returns 175
abs(x)
Returns the absolute value of x
If the value of fieldname1 is -7.25, the result of: abs(fieldname1) would be 7.25
acos(x)
Returns the arccosine of x, in radians
If the value of fieldname1 is 0.5, the result of: acos(fieldname1) would be 1.0471975511965979
asin(x)
Returns the arcsine of x, in radians
If the value of fieldname1 is 0.5, the result of: asin(fieldname1) would be 0.5235987755982989
atan(x)
Returns the arctangent of x as a numeric value between -PI/2 and PI/2 radians
If the value of fieldname1 is 2, the result of: atan(fieldname1) would be 1.1071487177940904
atan2(x,y)
Returns the arctangent of the quotient of its arguments
If the value of fieldname1 is 8 and fieldname2 is 4, the result of: atan2(fieldname1,fieldname2) would be 1.1071487177940904
ceil(x)
Returns x, rounded upwards to the nearest integer.
The ceil operation accepts a second parameter, that is optional, for rounding upwards the main number to the nearest multiple of this parameter.
If the value of fieldname1 is 1.4, the result of: ceil(fieldname1) would be 2
ceil(2.3, 0.5) = 2.5
cos(x)
Returns the cosine of x (x is in radians)
If the value of fieldname1 is 3, the result of: cos(fieldname1) would be -0.9899924966004454
radians(x)
Converts an angle in degrees to radians (x is in degrees)
If the value of fieldname1 is 90, the result of: radians(fieldname1) would be 1.5707963267948966
degrees(x)
Converts an angle in radians to degrees (x is in radians)
If the value of fieldname1 is 1.5707963267948966, the result of: degrees(fieldname1) would be 90
exp(x)
Returns the value of E^x
If the value of fieldname1 is 1, the result of: exp(fieldname1) would be 2.718281828459045
scientifictodecimal(x)
Returns the decimal representation of x
scientifictodecimal(3.5e4) = 35000
decimaltoscientific(x)
Returns the exponential representation of x
decimaltoscientific(35000) = 3.5e+4
fractiontodecimal(x)
Returns the decimal representation of x
fractiontodecimal("2/5") = 0.4
decimaltofraction(x)
Returns the fraction representation of x
decimaltofraction(0.4) = "2/5"
isfraction(x)
Returns true if x has fraction format.
isfraction(4) = false
isfraction("2/5") = true
simplifyfraction(x)
Simplifies fractional number passed by parameter, returning the result as an interger or fractional number.
simplifyfraction("2/4") = "1/2"
Also accepts two integers for the numerator and denominator.
simplifyfraction(2,4) = "1/2"
fractionsum(x,y)
Sums fractional numbers passed by parameter, returning the result also as fractional number
fractionsum("2/4","2/6") = "5/6"
fractionsub(x,y)
Subtracts fractional numbers passed by parameter, returning the result also as fractional number
fractionsub("2/4","2/6") = "1/6"
fractionmult(x,y)
Multiplies fractional numbers passed by parameter, returning the result also as fractional number
fractionmult("2/4","2/6") = "1/6"
fractiondiv(x,y)
Divides fractional numbers passed by parameter, returning the result also as fractional number
fractiondiv("2/4","2/6") = "3/2"
floor(x)
Returns x, rounded downwards to the nearest integer.
The floor operation accepts a second parameter, that is optional, for rounding downwards the main number to the nearest multiple of this parameter.
If the value of fieldname1 is 1.6, the result of: floor(fieldname1) would be 1
floor(2.6, 0.5) = 2.5
log(x)
Returns the natural logarithm (base E) of x
If the value of fieldname1 is 2, the result of: log(fieldname1) would be 0.6931471805599453
logab(x,y)
Returns the logarithm of x base y
If the value of fieldname1 is 2, and the value of fieldname2 is 10, the result of: logab(fieldname1,fieldname2) would be 0.30102999566398114
max(x,y,z,...,n)
Returns the number with the highest value
If the value of fieldname1 is 5 and fieldname2 is 10, the result of: max(fieldname1, fieldname2) would be 10
min(x,y,z,...,n)
Returns the number with the lowest value
If the value of fieldname1 is 5 and fieldname2 is 10, the result of: min(fieldname1, fieldname2) would be 5
FORMAT(n, config)
Formats the number passed as the first parameters, based on the configuration object passed as second parameter.
The configuration object accepts the attributes:
prefix: information to include at the beginning of the number. E.g. $
suffix: information to include at the end of the number. E.g. usd
decimalsymbol: symbol to use for decimals. E.g. the dot (.)
groupingsymbol: symbol to use for grouping thousands. E.g. the comma (,)
currency: boolean that indicates the number represents a currency value. E.g. true
FORMAT(-1234.56, {prefix:"$", suffix:" usd", groupingsymbol:",", decimalsymbol:".", currency:true}) = "-$1,234.56 usd"
pow(x,y)
Returns the value of x to the power of y
If the value of fieldname1 is 4 and fieldname2 is 3, the result of: pow(fieldname1, fieldname2) would be 64
random()
Returns a random number between 0 and 1
round(x)
Rounds x to the nearest integer.
The round operation accepts a second parameter, that is optional, for rounding the main number to the nearest multiple of this parameter.
If the value of fieldname1 is 2.5, the result of: round(fieldname1) would be 3
round(2.3, 0.5) = 2.5
sin(x)
Returns the sine of x (x is in radians)
If the value of fieldname1 is 3, the result of: sin(fieldname1) would be 0.1411200080598672
sqrt(x)
Returns the square root of x
If the value of fieldname1 is 9, the result of: sqrt(fieldname1) would be 3
nthroot(x,y)
Returns the y root of x
nthroot(27,3) = 3
tan(x)
Returns the tangent of an angle
If the value of fieldname1 is 90, the result of: tan(fieldname1) would be -1.995200412208242
gcd(x,y)
Returns the greatest common divisor between x and y
If the value of fieldname1 is 16, and the value of the fieldname2 is 12 the result of: gcd(fieldname1,fieldname2) would be 4
lcm(x,y)
Returns the least common multiple between two numbers
If the value of fieldname1 is 3, and the value of the fieldname2 is 5 the result of: lcm(fieldname1,fieldname2) would be 15
Pay special attention to the next two operations. The first of them, very extended its use in equations for calculations the cost of products and services, and the other one to obtain a date.
Return the x number with y decimal digits
If the value of fieldname1 is 10.33323, the result of: prec(fieldname1,2) would be 10.33
If the value of fieldname1 is 10.3365, the result of: prec(fieldname1,2) would be 10.34
If the value of fieldname1 is 10, the result of: prec(fieldname1,2) would be 10.00
The prec operation supports a third parameter to return the first parameter without decimal places if it is an integer number:
PREC(3,2)=3.00
PREC(3,2,true)=3
cdate(x, format)
Returns the number x formatted like a Date, the second parameter determines the format of the output date ('mm/dd/yyyy', 'dd/mm/yyyy'). The number represents the number of days from Jan 1, 1970
If fieldname1 is a date field, and its value is 3/11/2013: cdate(fieldname1+10) would be 13/11/2013
To calculate the monthly payment in a lease calculator:
The fields implied are:
Load amount: fieldname1
Residual value: fieldname2
Interest rate %: fieldname3
Number of months: fieldname4
The corresponding equation for monthly payment is:
prec((fieldname1*fieldname3/1200*pow(1+fieldname3/1200,fieldname4)-fieldname2*fieldname3/1200)/(pow(1+fieldname3/1200,fieldname8)-1),2)
There is a huge number of equations that can't be recreated with simple mathematical operators, or the operations listed above.
Pay attention to the following sample:
In your form there are four fields: fieldname1, fieldname2, fieldname3 and the calculated field: fieldname4, but the value of fieldname4 is dependent of fieldname3 value, that is:
The value of fieldname4 will be: fieldname1+fieldname2, if the value of fieldname3 is greater than 100, or will be: fieldname1*fieldname2, if the value of fieldname3 is less than or equal to 100. Neither of previous operations, by itself, can calculate the value of fieldname4.
To solve complex cases like this, the "Calculated Fields Form" plugin allows entering javascript code directly in the equation editor, like the following sample:
(function(){
if(fieldname3 > 100) return fieldname1+fieldname2;
if(fieldname3 <= 100) return fieldname1*fieldname2;
})();
For complex equations where are necessary blocks of javascript code, you must use the function structure:
(function(){
//Your code here
})();
and the return the value of that function will be the value assigned to the calculated field:
return fieldname1+fieldname2;
Pay attention, the plugin removes the changes of lines from the equations at runtime. So, if the equation is implemented with "function" format:
(function(){
//Your code here
})();
You must include semicolon symbols (;) at the end of the lines of code. Furthermore, if the equation is really complex, and you want to include comments for future references, use the multiple lines comments format: /* comment here */, but never the format for single line of comments: // comment here
Related Information....
All Versions of the Plugin
The logical module includes the following operations:
IF(condition, value if true, value if false)
Checks whether a condition is met, and returns one value if true, and another if false.IF(logical_test, value_if_true, value_if_false)
If the value of fieldname1 is 10 and the value of fieldname2 is 20, the result of:
IF(fieldname1 < fieldname2, fieldname1, fieldname2)
would be 10
AND(x,y,z,....)
Checks whether all arguments are true, and return true if all values are true, and false in another way. AND(logical1,logical2,...)
Suppose there are three fields, fieldname1, fieldname2 and fieldname3, with values: 10, 20 and 30 respectively, so:
AND( fieldname1<100, fieldname2<100, fieldname3<100)
would be true
but
AND( fieldname1<100, fieldname2<100, fieldname3<25)
is
false, because the fieldname3 is bigger than 25
OR(x,y,z,....)
Checks whether any of arguments is true, and return true if any of values is true, and false if all values are false. OR(logical1,logical2,...)
Suppose there are three fields, fieldname1, fieldname2 and fieldname3, with values: 10, 20 and 30 respectively, so:
OR( fieldname1<100, fieldname2<100, fieldname3<25)
is true, because at least the two initial conditions are true, inclusive if the third condition fails.
but
OR( fieldname1<5, fieldname2<5, fieldname3<25)
is false, because the three conditions fail
NOT(x)
Changes false to true, or true to false.NOT(logical)
NOT(true)
return false
NOT(false)
return true
IN(x,[x,y,z,....])
Checks whether the term is included in the second argument, the second argument may be a string or strings array. IN(term, string/array)
IN(10,[10,20,30,40])
Return true
IN('world', 'hello world')
Return true
Developer Version Platinum Version
The module includes a pack of functions to improve the implementation of financial equations. Distributed with the Developer or Platinum versions of the plugin.
CALCULATEPAYMENT(x,y,z)
Calculates the Financed Payment Amount
Three parameters: amount, months, interest rate (percent)
E.g. CALCULATEPAYMENT(25000, 60, 5.25)
Result: 474.65
CALCULATEAMOUNT(x,y,z)
Calculates the Financed Amount
Three parameters: months, interest rate (percent), payment
E.g. CALCULATEAMOUNT(60, 5.25, 474.65)
Result: 25000.02
CALCULATEMONTHS(x,y,z)
Calculates the Months Financed
Three parameters: amount, interest rate (percent), payment
E.g. CALCULATEMONTHS(25000, 5.25, 474.65)
Result: 60
CALCULATEINTEREST(x,y,z)
Calculates the Financed Interest Rate
Three parameters: amount, months, payment
E.g. CALCULATEINTEREST(25000, 60, 474.65)
Result: 5.25
CALCULATEACCRUEDINTEREST(x,y,z)
Calculates the Accrued Interest
If your money is in a bank account accruing interest, how much does it earn over x months? Three parameters: principle amount, months, interest rate (percent)
E.g. CALCULATEACCRUEDINTEREST(25000, 60, 5.25)
Result: 7485.806648756854
CALCULATEAMORTIZATION(x,y,z,date,output)
Creates an amortization Schedule
Create an amortization schedule. The result should be an array whose length in the number of months. Each entry is an object. Four parameters: principle amount, months, interest rate (percent), start date (optional Date object), output (optional object with pairs of property names: columns names if you want the operation returns an HTML table)
E.g. CALCULATEAMORTIZATION(25000, 60, 5.25, new Date(2011,11,20) )
It excludes the fifth parameter to get the array of records.
Result:
[
{
principal: 24634.725
interest: 109.375
payment: 474.65
paymentOfPrincipal: 365.275
paymentOfInterest: 109.375
date: Tue Dec 20 2011 00:00:00 GMT+0100 (Romance Daylight Time)
},
{
principal: 24267.851921874997
interest: 217.151921875
payment: 474.65
paymentOfPrincipal: 366.873078125
paymentOfInterest: 107.776921875
date: Fri Jan 20 2012 00:00:00 GMT+0100 (Romance Daylight Time)
},
...
]
E.g. CALCULATEAMORTIZATION(25000, 60, 5.25, new Date(2011,11,20), {"date": "Date", "payment": "Payment", "interest": "Interest", "paymentOfInterest": "Payment of Interes", "paymentOfPrincipal": "Payment of Principal", "principal": "Principal"})
It pass the fifth parameter, with the columns names and labels to get HTML table.
Result:
<table class="cff-amortization-table">
<thead>
<tr>
<th>Date</th>
<th>Payment</th>
<th>Interest</th>
<th>Payment of Interest</th>
<th>Payment of Principal</th>
<th>Principal</th>
</tr>
</thead>
<tbody>
<tr>
<td>2011-12-20</td>
<td>€474.65</td>
<td>€109.38</td>
<td>€109.38</td>
<td>€365.27</td>
<td>€24,634.73</td>
</tr>
<tr>
<td>2012-01-20</td>
<td>€474.65</td>
<td>€217.15</td>
<td>€107.78</td>
<td>€366.87</td>
<td>€24,267.85</td>
</tr>
...
</tbody>
</table>
The CALCULATEAMORTIZATION is the operation with most complexity in the "Calculated Fields Form" and requires its own section.
If the output parameter is ignored the CALCULATEAMORTIZATION operation returns a list of objects. For example:
CALCULATEAMORTIZATION(25000, 60, 5.25, new Date(2011,11,20) )

	Result:
		[
			{
				principal: 24634.725
				interest: 109.375
				payment: 474.65
				paymentOfPrincipal: 365.275
				paymentOfInterest: 109.375
				date: Tue Dec 20 2011 00:00:00 GMT+0100 (Romance Daylight Time)
			},
			{
				principal: 24267.851921874997
				interest: 217.151921875
				payment: 474.65
				paymentOfPrincipal: 366.873078125
				paymentOfInterest: 107.776921875
				date: Fri Jan 20 2012 00:00:00 GMT+0100 (Romance Daylight Time)
			},
			...
		]
Remember the CALCULATEAMORTIZATION operation can generate the HTML table itself:
CALCULATEAMORTIZATION(fieldname1,fieldname3,fieldname2, {date: "Date", interest: "Interest", payment: "Payment", paymentOfInterest: "Payment of Interest", paymentOfPrincipal: "Payment to Principal", principal: "Principal"});
In the following example, we explain the use of the CALCULATEAMORTIZATION operation: the fieldname1 represents the principle amount, fieldname3 the number of months, and the fieldname2 the interest rate.
So, the value returned by CALCULATEAMORTIZATION(fieldname1,fieldname3,fieldname2) cannot by assigned directly to the calculated field, or will be displayed a text like: [object],[object],...... Therefore, we'll need to create a formatted string, with HTML tags, to display the CALCULATEAMORTIZATION results in an understandable format.
(function(){
var r = CALCULATEAMORTIZATION(fieldname1,fieldname3,fieldname2),
str = '';
if(r.length)
{
str = '<table cellpadding=" 10" >';
str += '<tr>';
str += '<td>Date</td>';
str += '<td>Interest</td>';
str += '<td>Payment</td>';
str += '<td>Payment of Interest</td>';
str += '<td>Payment to Principal</td>';
str += '<td>Principal</td>';
str += '</tr>';
for(var i = 0, h = r.length; i < h; i++)
{
str += '<tr>';
str += '<td>'+GETDATETIMESTRING( new Date(r[i]['date']), 'yyyy-mm-dd')+'</td>';
str += '<td>'+PREC(r[i]['interest'],2)+'</td>';
str += '<td>'+PREC(r[i]['payment'],2)+'</td>';
str += '<td>'+PREC(r[i]['paymentOfInterest'],2)+'</td>';
str += '<td>'+PREC(r[i]['paymentOfPrincipal'],2)+'</td>';
str += '<td>'+PREC(r[i]['principal'],2)+'</td>';
str += '</tr>';
}
str += '</table>';
}
return str;
})()
The first step will be store the list of objects returned by the CALCULATEAMORTIZATION operation, in a local variable, and create another variable to store the amortization data, but with an HTML format:
var r = CALCULATEAMORTIZATION(fieldname1,fieldname3,fieldname2), str = '';
The equation validates if the previous operation returns a value, because if the CALCULATEAMORTIZATION was called with wrong values can return an empty array:
if(r.length)
{
...
}
I've decided display the results of CALCULATEAMORTIZATION operation in a tabular format because is easier to understand. The first element in the result is the tag to open the table: <table>, and the row with the column names:
str = '<table cellpadding=" 10" >';
str += '<tr>';
str += '<td>Date</td>';
str += '<td>Interest</td>';
str += '<td>Payment</td>';
str += '<td>Payment to Interest</td>';
str += '<td>Payment to Principal</td>';
str += '<td>Principal</td>';
str += '</tr>';
Now, it is the moment to create each row of the table with the values of monthly amortization.
for(var i = 0, h = r.length; i < h; i++)
{
    str += '<tr>';
    str += '<td>'+GETDATETIMESTRING( new Date(r[i]['date']), 'yyyy-mm-dd')+'</td>';
    str += '<td>'+PREC(r[i]['interest'],2)+'</td>';
    str += '<td>'+PREC(r[i]['payment'],2)+'</td>';
    str += '<td>'+PREC(r[i]['paymentOfInterest'],2)+'</td>';
    str += '<td>'+PREC(r[i]['paymentOfPrincipal'],2)+'</td>';
    str += '<td>'+PREC(r[i]['principal'],2)+'</td>';
    str += '</tr>';
}
The previous code has its particularities. By default the dates returned by the CALCULATEAMORTIZATION operation have the complete format including hours and seconds, In this form the information about hours and seconds is not relevant, so, it is preferred to use a short date format: yyyy-mm-dd. The date string will be formatted with the GETDATETIMESTRING operation, included in the Date module of developers version of the plugin (the second parameter is the format to use):
str += '<td>'+GETDATETIMESTRING( new Date(r[i]['date']), 'yyyy-mm-dd')+'</td>';
Another particularity is the use of the PREC operation. By default the CALCULATEAMORTIZATION returns the numeric values with all its decimals digits, for example: 366.873078125, but for humans it is common to identify the money representation with two decimal digits. So, I've used the PREC operation with the number 2 as the second parameter.
str += '<td>'+PREC(r[i]['interest'],2)+'</td>';
After creating all table rows, it is time to close the table, and print the results:
str += '</table>';
If you display the result directly in the calculated field, you will see a weird text (or very hard to understand) because the input fields in HTML are not able to display tables, in this case I've preferred to show the result in an "HTML Content" field. Supposing the calculated field is the fieldname123, inserted an "HTML Content" field in the form, and entered a DIV tag as its content with the data-cff-field attribute indicating the name of the calculated field <div data-cff-field="fieldname123"></div>
The complete equation is:
(function(){
var r = CALCULATEAMORTIZATION(fieldname1,fieldname3,fieldname2),
str = '';
if(r.length)
{
str = '<table cellpadding=" 10" >';
str += '<tr>';
str += '<td>Date</td>';
str += '<td>Interest</td>';
str += '<td>Payment</td>';
str += '<td>Payment to Interest</td>';
str += '<td>Payment to Principal</td>';
str += '<td>Principal</td>';
str += '</tr>';
for(var i = 0, h = r.length; i < h; i++)
{
str += '<tr>';
str += '<td>'+GETDATETIMESTRING( new Date(r[i]['date']), 'yyyy-mm-dd')+'</td>';
str += '<td>'+PREC(r[i]['interest'],2)+'</td>';
str += '<td>'+PREC(r[i]['payment'],2)+'</td>';
str += '<td>'+PREC(r[i]['paymentOfInterest'],2)+'</td>';
str += '<td>'+PREC(r[i]['paymentOfPrincipal'],2)+'</td>';
str += '<td>'+PREC(r[i]['principal'],2)+'</td>';
str += '</tr>';
}
str += '</table>';
}
jQuery('.result-here').html( str );
})()
CALCULATEAMORTIZATIONITALIAN(x,y,z,date,output)
Creates an amortization Schedule using the Italian method
Create an amortization schedule. The result should be an array whose length in the number of months. Each entry is an object. Four parameters: principle amount, months, interest rate (percent), start date (optional Date object), output (optional object with pairs of property names: columns names if you want the operation returns an HTML table)
E.g. CALCULATEAMORTIZATIONITALIAN(25000, 60, 5.25, new Date(2011,11,20) )
E.g. CALCULATEAMORTIZATIONITALIAN(25000, 60, 5.25, new Date(2011,11,20), {"date": "Date", "payment": "Payment", "interest": "Interest", "paymentOfInterest": "Payment of Interes", "paymentOfPrincipal": "Payment of Principal", "principal": "Principal"})
It pass the fifth parameter, with the columns names and labels to get HTML table.
For additional details, please read the CALCULATEAMORTIZATION section.
PRESENTVALUE(x,y,z)
Returns the present value of an investment
The present value is the total amount that a series of future payments is worth now. It requires three parameters: The interest rate per period, the total number of payment periods, the payment made each period and cannot change over the life of the annuity, and two optional parameters: The future value of the loan or investment and the due parameter (0 - the payment is due at the end of the period; 1 - the payment is due at the beginning of the period.)
E.g. PRESENTVALUE(0.08,5,100)
Result: 399.27
FUTUREVALUE(v,w,x,y,z)
Returns an investment based on an interest rate and a constant payment schedule. Five parameters: The interest rate for the investment, the number of payments for the annuity, the amount of the payment made each period, the present value of the payments (if this parameter is omitted, it assumes to be 0), parameter that indicates when the payments are due (if this parameter is omitted, it assumes to be 0. The possible values are: 0 - Payments are due at the end of the period, 1 - Payments are due at the beginning of the period)
E.g. FUTUREVALUE(7.5/12,24,-250,-5000,1)
NPER(RATE,PMT,PV,FV,TYPE)
Returns the number of periods for an investment based on periodic, constant payments and a constant interest rate
Rate is the periodic interest rate (%).
PMT, the payment made each period; it cannot change over the life of the annuity. Typically, pmt contains principal and interest but no other fees or taxes.
PV, the present value, or the lump-sum amount that a series of future payments is worth right now.
FV (optional), the future value, or a cash balance you want to attain after the last payment is made. If fv is omitted, it is assumed to be 0 (the future value of a loan, for example, is 0).
Type (optional), the number 0 or 1 and indicates when payments are due.
E.g. NPER(12/12, -100, -1000, 10000, 1)
Result: 59.67386567429457
PMT(Rate,NPer,PV,FV,TYPE)
Returns the periodic payment for an annuity with constant interest rates
Rate is the periodic interest rate.
NPer is the number of periods in which annuity is paid.
PV is the present value (cash value) in a sequence of payments.
FV (optional) is the desired value (future value) to be reached at the end of the periodic payments.
Type (optional) is the due date for the periodic payments. Type=1 is payment at the beginning and Type=0 is payment at the end of each period.
E.g. PMT(1.99/12,36,25000)
Result: -715.96
IPMT(Rate,Period,NPer,PV,FV,TYPE)
Calculates the periodic amortizement for an investment with regular payments and a constant interest rate
Rate is the periodic interest rate (%).
Period is the period, for which the compound interest is calculated.
NPer is the number of periods in which annuity is paid.
PV is the present value (cash value) in a sequence of payments.
FV (optional) is the desired value (future value) to be reached at the end of the periods.
Type (optional) is the due date for the periodic payments. Type=1 is payment at the beginning and Type=0 is payment at the end of each period.
E.g. IPMT(5,5,7,15000)
Result: -352.9735
PPMT(Rate,Period,NPer,PV,FV,TYPE)
Returns for a given period the payment on the principal for an investment that is based on periodic and constant payments and a constant interest rate
Rate is the periodic interest rate (%).
Period is the amortizement period. P = 1 for the first and P = NPer for the last period.
NPer is the number of periods in which annuity is paid.
PV is the present value (cash value) in a sequence of payments.
FV (optional) is the desired value (future value) to be reached at the end of the periods.
Type (optional) is the due date for the periodic payments. Type=1 is payment at the beginning and Type=0 is payment at the end of each period.
E.g. PPMT(8.75/12,1,36,5000,8000,1)
Result: -350.99
PVIF(Rate,Periods)
Calculates the today value per currency received at a future date
Rate is interest rate per period (%).
Periods is the number of periods.
E.g. PVIF(5,10)
Result: 0.6139
FVIFA(Rate,Periods)
Calculates the future value interest factor of annuity
Rate is interest rate per period (%).
Periods is the number of periods.
E.g. FVIFA(5,17)
Result: 25.8404
NPV(Rate,Values)
Calculates the net present value of an investment based on a discount rate and a series of periodic cash flows.
Rate is the discount rate of the investment over one period (%).
Values is the array of values representing payments and income.
E.g. NPV(10,[-10000,3000,4200,6800])
Result: 1188.44
XNPV(Rate,Values,Dates)
Calculates the capital value (net present value) for a list of payments which take place on different dates
Rate is the internal rate of return for the payments (%).
Values and Dates refer to a series of payments and the series of associated date values. The first date represents the start of the payment plan. All other date values must be later, but need not be in any order. The series of values must contain at least one negative and one positive value (receipts and deposits).
E.g. XNPV(9,[-10000,2750,4250,3250,2750],['1/1/2008', '3/1/2008', '10/30/2008', '2/15/2009', '4/1/2009'])
Result: 2068.65
IRR(Values,Guess)
Internal Rate of Return (IRR)
The Internal Rate of Return (IRR) is a financial function that returns the internal rate of return (IRR) for a series of cash flows that occur at regular intervals.
Values is an array of cash values.
Guess (optional) is a guess that can be input for the internal rate of return (%). The default is 10.
E.g. IRR([-10000,2000,2500,5000,1000])
Result: 0.01996530806985132
XIRR(Values,Dates,Guess)
Calculates the internal rate of return for a list of payments which take place on different dates
The calculation is based on a 365 days per year basis, ignoring leap years.
Values and Dates refer to a series of payments and the series of associated date values. The first date represents the start of the payment plan. All other date values must be later, but need not be in any order. The series of values must contain at least one negative and one positive value (receipts and deposits).
Guess (optional) is a guess that can be input for the internal rate of return (%). The default is 10.
E.g. XIRR([-10000,2000,2500,5000,1000],['01/01/2001', '01/02/2001', '03/15/2001', '05/12/2001', '08/10/2001'],10)
Result: 0.1948184751
MIRR(Values,Dates,Guess)
Calculates the modified internal rate of return on an investment based on a series of periodic cash flows and the difference between the interest rate paid on financing versus the return received on reinvested income.
Values is the array of values containing the income or payments associated with the investment.
Financing Rate is the interest rate paid on funds invested (%).
Reinvestiment Return Rate is the return (as a percentage) earned on reinvestment of income received from the investment (%).
E.g. MIRR([-120000, 39000, 30000, 21000, 37000, 46000], 10, 12)
Result: 12.61
RATE(Periods,Payment,Present Value,Future Value,Type of payment,Guess)
RATE function calculates the interest rate per period of an annuity, given the number of periods, payment amount, present value, future value, type of payment (0 = end of period, 1 = beginning of period, optional, default is 0), and the initial guess for the interest rate (optional, default is 0.01).
E.g. RATE(3, -10, 900, 0)
Result: -0.7562659
Formats a Number
One parameters: number
E.g.NUMBERFORMAT(-2530023420269.123456)
Result: -2,530,023,420,269
E.g. NUMBERFORMAT(25000.123456, {precision:2})
Result: 25,000.12
Format Currency
Formats a number to a certain currency. Two parameters: number, settings (optional). If settings option is a string it is treated as a currency name. If it is an object it is used as currency settings.
E.g. NUMBERFORMAT(25000.123456, 'USD')
Result: $25,000.12
The settings of format can be overridden with the "options" parameter.
E.g. NUMBERFORMAT(-25000.123456, 'GBP', { negative: '()', precision: 3, thousand: '' })
Result: £(25000.123)
Format a Percent
Formats a number with a certain precision. Two parameters: number, settings ("percent" is a format)
E.g. NUMBERFORMAT(25000.123456, 'percent')
Result: 25,000%
Create a Currency
You may create a currency. The library comes with "USD", "GBP", and "EUR" currency formats and "number" and "percent" numeric formats. Two parameters: key, settings
E.g. ADDFORMAT('Dollars', { before: '', after: ' Dollars', precision: 0, thousand: ',', group: 3, decimal: '.', negative: '-' })
Result: true
E.g. NUMBERFORMAT(25000.123456, 'Dollars')
Result: 25,000 Dollars
REMOVEFORMAT(x)
Removes a Currency
To remove a currency. One parameter: key
E.g. REMOVEFORMAT('Dollars')
Result: true
Related Information....
All Versions of the Plugin
The Date Time module includes a group of operations to manage dates and times.
DATEOBJ(x,y)
Gets the date object from a string representation of date. DATEOBJ( date_string, format )
DATEOBJ('2013-05-21', 'yyyy-mm-dd')
Result: date object
LEADINGZERO(x)
Set leading zero to values between 0 and 9. LEADINGZERO( number )
LEADINGZERO(7)
Result: 07
YEAR(x,y)
Gets the year from an string representation of date. YEAR( date_string, format )
YEAR('2013-05-21', 'yyyy-mm-dd')
Result: 2013
MONTH(x,y,z)
Gets the month from a string representation of date. MONTH( date_string, format, leading zero )
MONTH('2013-05-21', 'yyyy-mm-dd')
Result: 5
MONTH('2013-05-21', 'yyyy-mm-dd', true)
Result: 05
MONTHNAME(date_string,format,locale)
Gets the month name from a string representation of date. MONTHNAME( date_string, format, locale )
The locale parameter is optional. The operation uses the client language by default.
Accepted locale values:
ar-SA Arabic (Saudi Arabia)
bn-BD Bangla (Bangladesh)
bn-IN Bangla (India)
cs-CZ Czech (Czech Republic)
da-DK Danish (Denmark)
de-AT Austrian German
de-CH "Swiss" German
de-DE Standard German (as spoken in Germany)
el-GR Modern Greek
en-AU Australian English
en-CA Canadian English
en-GB British English
en-IE Irish English
en-IN Indian English
en-NZ New Zealand English
en-US US English
en-ZA English (South Africa)
es-AR Argentine Spanish
es-CL Chilean Spanish
es-CO Colombian Spanish
es-ES Castilian Spanish (as spoken in Central-Northern Spain)
es-MX Mexican Spanish
es-US American Spanish
fi-FI Finnish (Finland)
fr-BE Belgian French
fr-CA Canadian French
fr-CH "Swiss" French
fr-FR Standard French (especially in France)
he-IL Hebrew (Israel)
hi-IN Hindi (India)
hu-HU Hungarian (Hungary)
id-ID Indonesian (Indonesia)
it-CH "Swiss" Italian
it-IT Standard Italian (as spoken in Italy)
ja-JP Japanese (Japan)
ko-KR Korean (Republic of Korea)
nl-BE Belgian Dutch
nl-NL Standard Dutch (as spoken in The Netherlands)
no-NO Norwegian (Norway)
pl-PL Polish (Poland)
pt-BR Brazilian Portuguese
pt-PT European Portuguese (as written and spoken in Portugal)
ro-RO Romanian (Romania)
ru-RU Russian (Russian Federation)
sk-SK Slovak (Slovakia)
sv-SE Swedish (Sweden)
ta-IN Indian Tamil
ta-LK Sri Lankan Tamil
th-TH Thai (Thailand)
tr-TR Turkish (Turkey)
zh-CN Mainland China, simplified characters
zh-HK Hong Kong, traditional characters
zh-TW Taiwan, traditional characters
MONTHNAME("2023-02-06", "yyyy-mm-dd")
Result: February
MONTHNAME("2023-02-06", "yyyy-mm-dd","de")
Result: Februar
DAY(x,y,z)
Gets the days from a string representation of date. DAY( date_string, format, leading zero )
DAY('2013-05-21', 'yyyy-mm-dd')
Result: 21
DAY('2013-05-1', 'yyyy-mm-dd', true)
Result: 01
WEEKDAY(x,y,z)
Gets the week day from a string representation of date. WEEKDAY( date_string, format, leading zero )
WEEKDAY('2013-10-27', 'yyyy-mm-dd')
Result: 1 Sunday is the day number one
WEEKDAY('2013-10-27', 'yyyy-mm-dd', true)
Result: 01
WEEKDAYNAME(date_string,format,locale)
Gets the week day name from a string representation of date. WEEKDAYNAME( date_string, format, locale )
The locale parameter is optional. The operation uses the client language by default.
Accepted locale values:
ar-SA Arabic (Saudi Arabia)
bn-BD Bangla (Bangladesh)
bn-IN Bangla (India)
cs-CZ Czech (Czech Republic)
da-DK Danish (Denmark)
de-AT Austrian German
de-CH "Swiss" German
de-DE Standard German (as spoken in Germany)
el-GR Modern Greek
en-AU Australian English
en-CA Canadian English
en-GB British English
en-IE Irish English
en-IN Indian English
en-NZ New Zealand English
en-US US English
en-ZA English (South Africa)
es-AR Argentine Spanish
es-CL Chilean Spanish
es-CO Colombian Spanish
es-ES Castilian Spanish (as spoken in Central-Northern Spain)
es-MX Mexican Spanish
es-US American Spanish
fi-FI Finnish (Finland)
fr-BE Belgian French
fr-CA Canadian French
fr-CH "Swiss" French
fr-FR Standard French (especially in France)
he-IL Hebrew (Israel)
hi-IN Hindi (India)
hu-HU Hungarian (Hungary)
id-ID Indonesian (Indonesia)
it-CH "Swiss" Italian
it-IT Standard Italian (as spoken in Italy)
ja-JP Japanese (Japan)
ko-KR Korean (Republic of Korea)
nl-BE Belgian Dutch
nl-NL Standard Dutch (as spoken in The Netherlands)
no-NO Norwegian (Norway)
pl-PL Polish (Poland)
pt-BR Brazilian Portuguese
pt-PT European Portuguese (as written and spoken in Portugal)
ro-RO Romanian (Romania)
ru-RU Russian (Russian Federation)
sk-SK Slovak (Slovakia)
sv-SE Swedish (Sweden)
ta-IN Indian Tamil
ta-LK Sri Lankan Tamil
th-TH Thai (Thailand)
tr-TR Turkish (Turkey)
zh-CN Mainland China, simplified characters
zh-HK Hong Kong, traditional characters
zh-TW Taiwan, traditional characters
WEEKDAYNAME("2023-02-06", "yyyy-mm-dd")
Result: Monday
WEEKDAYNAME("2023-02-06", "yyyy-mm-dd","de")
Result: Montag
WEEKNUM(x,y,z)
Gets the week number from a string representation of date, a year has 53 weeks.WEEKNUM( date_string, format, leading zero )
WEEKNUM('2025-01-06', 'yyyy-mm-dd')
Result: 1
WEEKNUM('2025-01-06', 'yyyy-mm-dd', true)
Result: 01
WEEKNUM2(x,y,z)
Get the week number from an string representation of date, a year has 52 weeks. It calculates a week as a 7-day interval starting from January 1st, considering the day of the week. So, if January 6th is a Monday, it will return 2. WEEKNUM2( date_string, format, leading zero )
WEEKNUM2('2025-01-06', 'yyyy-mm-dd')
Result: 2
WEEKNUM2('2025-01-06', 'yyyy-mm-dd', true)
Result: 02
HOURS(x,y,z)
Gets hours from a string representation of datetime. HOURS( datetime_string, format, leading zero )
HOURS('2013-10-27 01:21', 'yyyy-mm-dd hh:ii')
Result: 1
HOURS('2013-10-27 01:21', 'yyyy-mm-dd hh:ii', true)
Result: 01
MINUTES(x,y,z)
Gets minutes from a string representation of datetime. MINUTES( datetime_string, format, leading zero )
MINUTES('2013-10-27 01:22', 'yyyy-mm-dd hh:ii')
Result: 22
MINUTES('2013-10-27 01:09', 'yyyy-mm-dd hh:ii')
Result: 9
MINUTES('2013-10-27 01:09', 'yyyy-mm-dd hh:ii', true)
Result: 09
SECONDS(x,y,z)
Gets seconds from a string representation of datetime. SECONDS( datetime_string, format, leading zero )
SECONDS('2013-10-27 01:22:06', 'yyyy-mm-dd hh:ii:ss')
Result: 6
SECONDS('2013-10-27 01:22:06', 'yyyy-mm-dd hh:ii:ss', true)
Result: 06
NOW()
Gets a date object with the current day-time information. NOW()
NOW()
Result: 2013-10-27 01:42:19
TODAY()
Gets a date object with the current day information, without the time part.TODAY()
EOMONTH(date_obj, number)
Get the last day of the month. The number parameter is optional.
EOMONTH(DATEOBJ("2021-03-04"))
Result: Mar 31 2021
EOMONTH(DATEOBJ("2021-03-04"), 4)
Result: Jul 31 2021
EOMONTH(DATEOBJ("2021-03-04"), -3)
Result: Dec 31 2020
NETWORKDAYS(date_one, date_two, date_format, holidays, holidays_format)
Obtains the difference in days between two dates ignoring weekends (Saturdays and Sundays) and holidays.
NETWORKDAYS(date_one, date_two, date_format, holidays, holidays_format)
If holidays format is ignored, the plugin uses date_format.
NETWORKDAYS("10/1/2012", "3/1/2013", "mm/dd/yyyy")
Result: 110
NETWORKDAYS("10/1/2012", "3/1/2013", "mm/dd/yyyy", ["12/24/2012", "12/31/2012"], "mm/dd/yyyy")
Result: 108
DATEDIFF(date_one, date_two, date_format, return)
Gets the difference between two dates strings representation
DATEDIFF(date_one, date_two, date_format, return)
The function returns an object, whose value depends on the 'return' argument
Possible values of return argument:
d - returns the number of days between two dates
m - returns the number of months between two dates, and remaining days
y - returns the number of years between two dates, remaining months, and remaining days
DATEDIFF('2013-10-27', '2012-06-22', 'yyyy-mm-dd', 'y')['months']
Result: 4
Since the third parameter tells the plugin the starting point for calculating the date difference, the resulting object for the operation:
DATEDIFF('2013-10-27', '2012-06-22', 'yyyy-mm-dd', 'y')
It would be:
{
"years": 1,
"months": 4,
"days": 5,
"hours": 0,
"minutes": 0,
"seconds": 0
}
One year, four months, and five days more.
However, the resulting object for the operation:
DATEDIFF('2013-10-27', '2012-06-22', 'yyyy-mm-dd', 'm')
It would be:
{
"years": -1,
"months": 16,
"days": 5,
"hours": 0,
"minutes": 0,
"seconds": 0
}
In this case, the value of the "years" property is -1 because the operation tells the plugin to use "months" as the starting point to calculate the difference. So, instead of 1 year and four months, the resulting object indicates the difference is sixteen months and five days.
Similarly, the resulting object for the third example:
DATEDIFF('2013-10-27', '2012-06-22', 'yyyy-mm-dd', 'd')
It would be:
{
"years": -1,
"months": -1,
"days": 492,
"hours": 0,
"minutes": 0,
"seconds": 0
}
DATETIMESUM(date_string, format, number, to_increase, ignore_weekends <optional>)
Increases the date-time string representation in the number of seconds, minutes, hours, days, months, or years, passed as parameter.
ignore_weekends is an optional parameter that applys only on days increment. It ignores the Saturdays and Sundays in the sum.
DATETIMESUM( date_string, format, number, to_increase )
DATETIMESUM('2013-10-27', 'yyyy-mm-dd', 6, 'd')
Result: The date object representation of 2013/11/01, Saturday.
DATETIMESUM('2013-10-27', 'yyyy-mm-dd', 6, 'd', true)
Result: The date object representation of 2013/11/04, Monday.
GETDATETIMESTRING(datetime_object, format)
Returns the string representation of a date object
GETDATETIMESTRING(TODAY(), 'yyyy-mm-dd')
Result: 2013-10-27
DECIMALTOTIME( decimal, format, time format )
Converts a decimal number to a time format text. The operation requires three parameters, the decimal number, character indicating the decimal representation ("y" for years, "m" for months, "d" for days, "h" for hours, "i" for minutes, and "s" for seconds), text for time format ("h:i:s").
DECIMALTOTIME(938405,"s","d days, h hours, i minutes, and s seconds")
Result: 10 days, 20 hours, 40 minutes, and 5 seconds
TIMETODECIMAL( time text, time format, output format )
Converts a time text to a decimal number. The operation requires three parameters, the text with time representation, the time format representation ("h:i:d"), character with the output format ("y" for years, "m" for months, "d" for days, "h" for hours, "i" for minutes, and "s" for seconds).
TIMETODECIMAL("20:40:5","h:i:s","s")
Result: 74405
PARSESLOTS( timeslots , date format )
Parses the values of the timeslots control. The operation accepts two parameters: a slots array (or a single slot) and a date format. It returns either an array of parsed slots or a single parsed slot, depending on the input. Each parsed slot is an object with the following structure:
{
	date: Date object,
	slot: {
		start: string (formatted start time),
		end: string (formatted end time),
		duration: number (duration in minutes)
	}
}
All Versions of the Plugin
The health-related module includes operations for a healthy lifestyle, such as a BMI calculator, recommendations for water intake, and recommendations for calories to consume depending on weight goals, among others.
IDEALWEIGHTCALCULATOR(gender, height, system of units)
Calculates the ideal weight based on gender and height. The parameters are:
gender: male or female
height: height in centimeters or inches
system of units: metric or imperial (optional parameter, metric is used by default)
IDEALWEIGHTCALCULATOR("male", 180, "metric")
Result: 72
BMICALCULATOR( height, weight, system of units, return as text )
Calculates the BMI (Body Mass Index). The parameters are:
height: height in centimeters or inches
weight: weight in kilograms or pounds
system of units: metric or imperial (optional parameter, metric is used by default)
return as text: true or false (optional parameter, false used by default). If return as a text is true, the operation returns one of the Underweight, Normal, Overweight, or Obese
BMICALCULATOR(169, 70, "metric", true)
Result: Normal
BMICALCULATOR(169, 70, "metric", false)
Result: 24.51
BMRCALCULATOR( age, gender, height, weight, system of units )
Calculates the BMR (Basal Metabolic Rate). The parameters are:
age: age in years
gender: male or female
height: height in centimeters or inches
weight: weight in kilograms or pounds
system of units: metric or imperial (optional parameter, metric is used by default)
BMRCALCULATOR(47, "male", 169, 70, "metric")
Result: 1526.25
MAINTENANCECALORIESCALCULATOR( age, gender, height, weight, system of units, activity )
Calculates the number of calories a person needs to consume each day to maintain their weight. The parameters are:
age: age in years
gender: male or female
height: height in centimeters or inches
weight: weight in kilograms or pounds
system of units: metric or imperial (optional parameter, metric is used by default)
activity: any of the texts:
sedentary (for little or no exercise),
light (exercise 1-3 times/week),
moderate (exercise 4-5 times/week),
active (daily exercise or intense exercise 3-4 times/week),
very (intense exercise 6-7 times/week),
extra (very intense exercise daily, or physical job) (optional parameter, moderate is used by default)
MAINTENANCECALORIESCALCULATOR(47, "male", 169, 70, "metric", "moderate")
Result: 2236
BYGOALCALORIESCALCULATOR( age, gender, height, weight, system of units, activity, goal, get details )
Calculates the number of calories a person needs to consume each day to reach their weight goal. The parameters are:
age: age in years
gender: male or female
height: height in centimeters or inches
weight: weight in kilograms or pounds
system of units: metric or imperial (optional parameter, metric is used by default)
activity: daily activity descriptor:
sedentary (for little or no exercise),
light (exercise 1-3 times/week),
moderate (exercise 4-5 times/week),
active (daily exercise or intense exercise 3-4 times/week),
very (intense exercise 6-7 times/week),
extra (very intense exercise daily, or physical job) (optional parameter, moderate is used by default)
goal: weight goal, accept any of the following terms: lose, maintain, or gain (optional, maintain by default)
get details: accept true or false (optional, false by default). If get details is false, the BYGOALCALORIESCALCULATOR operation returns the number of calories to consume to reach the goal. If it is true, returns a plain object with the following properties:
calories: daily calories to consume
proteins: recommended grams of proteins
carbs: recommended grams of carbs
fat: recommended grams of fat
BYGOALCALORIESCALCULATOR(47, "male", 169, 70, "metric", "moderate","lose",true)
Result: {calories: 1736, proteins: 154, fat: 48, carbs: 172}
WATERINTAKECALCULATOR( age, gender, weight, system of units, activity, climate )
Calculates how many liters of water a person should consume daily. The parameters are:
age: age in years
gender: male or female
weight: weight in kilograms or pounds
system of units: metric or imperial (optional parameter, metric is used by default)
activity: daily activity descriptor:
sedentary (for little or no exercise),
light (exercise 1-3 times/week),
moderate (exercise 4-5 times/week),
very (intense exercise 6-7 times/week),
extra (very intense exercise daily, or physical job) (optional parameter, moderate is used by default)
climate: accept any of the following terms: cold, mild, warm, or hot (optional, mild by default)
WATERINTAKECALCULATOR(47, "male", 70, "metric", "sedentary","cold")
Result: 3.09
HIPTOWAISTRATIOCALCULATOR( gender, hip measurement, waist measurement )
Calculates the hip to waist ratio, the body shape, health risks, and the hip-to-waist ideal ratio. The parameters are:
gender: male or female
hip measurement
waist measurement
Return a plain object with the properties:
ratio: hip-to-waist ratio
ideal: ideal ratio range
shape: body shape (pear, avocado, or apple)
rist: health risk based on hip-to-waist ratio (Low health risk, Moderate health risk, High health risk)
HIPTOWAISTRATIOCALCULATOR("male", 91, 86)
Result: {ratio: 0.95, shape: avocado, risk: Low health risk, ideal: 0.9-1.0}
All Versions of the Plugin
The energy-related module includes operations that help make decisions about energy investments.
CFFSOLARSAVINGS(args)
Calculate solar panel savings with optimized performance. The args parameter is a plain object with the structure
{
monthlyConsumption: Monthly electricity consumption in kWh,
electricityRate: Cost per kWh in local currency,
solarSystemSize: Solar system capacity in kW,
solarHoursPerDay: Average daily solar hours (default: 4.5),
systemEfficiency: System efficiency factor (default: 0.8),
netMeteringRate: Net metering compensation rate (default: same as electricity rate)
}
It returns an object containing a lot of useful information:
{
production: {
dailyProduction: Daily energy production,
monthlyProduction: Monthly energy production,
annualProduction: Annual energy production
},
consumption: {
monthlyConsumption: Monthly consumption,
annualConsumption: Annual consumption
},
financial: {
monthlyElectricityBill: Monthly electricity bill,
annualElectricityBill: Annual electricity bill,
monthlySavings: Monthly savings,
annualSavings: Annual savings,
savingsPercentage: Savings percentage,
excessEnergyValue: Excess energy value
},
metrics: {
productionToConsumptionRatio: Production to consumption ratio,
energyOffset: Energy offset,
excessEnergy: Excess energy
}
}
CFFPAYBACKPERIOD(args)
Calculate payback period with NPV analysis. The args parameter is a plain object with the structure
{
initialInvestment: Total upfront cost,
annualSavings: Annual energy cost savings,
maintenanceCostPerYear: Annual maintenance costs (default: 0),
incentives: Government incentives/rebates (default: 0),
inflationRate: Annual inflation rate (default: 0.03),
degradationRate: Annual system degradation (default: 0.005),
analysisYears: Years to analyze (default: 25),
discountRate: Discount rate (default: 0.05)
}
It returns an object containing a lot of useful information:
{
financial: {
initialInvestment: Initial investment,
incentives: Incentives,
netInitialInvestment: Net initial investment,
simplePaybackPeriod: Payback period,
discountedPaybackPeriod: Discounted payback period,
netPresentValue: Present value,
totalCashFlow: Total cash flow
},
analysis: {
analysisYears: Years,
inflationRate: Inflation rate,
degradationRate: Degradation rate,
discountRate: Discount rate
},
yearlyBreakdown: Array with yearly analysis
}
CFFPOWERREQUIREMENTS(args)
Calculate required power capacity for electrical installation. The args parameter is a plain object with the structure
{
appliances: Array of appliance objects {name, power, hoursPerDay, quantity},
simultaneityFactor: Factor for simultaneous usage (default: 0.7),
safetyFactor: Safety margin factor (default: 1.2),
powerFactor: Power factor for AC systems (default: 0.9)
}
It returns an object containing a lot of useful information:
{
summary: {
totalConnectedLoad: Total connected load,
peakDemand: Peak demand,
diversifiedDemand: Diversified demand,
requiredCapacityKW: Required capacity in KW,
requiredCapacityKVA: Required capacity in KVA,
recommendedBreakerSize: Recommended breaker size
loadFactor: Load factor
},
consumption: {
dailyConsumption: Total daily consumption,
monthlyConsumption: Monthly consumption,
annualConsumption: Annual consumption
},
factors: {
simultaneityFactor: Simultaneity factor,
safetyFactor: Safety factor,
powerFactor: Power factor
},
appliances: Appliance analysis,
hourlyDemand: Demand
}
CFFENERGYEFFICIENCY(args)
Calculate energy efficiency improvements and savings. The args is a plain object with the structure.
{
currentConsumption: Current monthly consumption in kWh,
electricityRate: Cost per kWh,
improvements: Array of improvement objects {name, savingsPercentage, cost, lifespan}
}
It returns an object containing a lot of useful information:
{
current: {
monthlyConsumption: Monthly consumption,
monthlyCost: Monthly cost,
annualConsumption: Annual consumption,
annualCost: Annual cost
},
improved: {
monthlyConsumption: Monthly consumption,
monthlyCost: Monthly cost,
annualConsumption: Annual consumption,
annualCost: Annual cost
},
savings: {
monthlyEnergyReduction: Monthly energy reduction,
annualEnergyReduction: Annual energy reduction,
monthlyCostSavings: Monthly cost savings,
annualCostSavings: Annual cost savings,
totalSavingsPercentage: Total savings percentage
},
investment: {
totalImplementationCost: Total implementation cost,
overallPaybackPeriod: Overall payback period
},
improvements: Improvement analysis
}
CFFBATTERYSTORAGE(args)
Calculate battery storage requirements and economics. The args is a plain object with the structure.
{
dailyConsumption: Daily energy consumption in kWh,
autonomyDays: Days of autonomy required (default: 1),
batteryVoltage: Battery system voltage (default: 48),
depthOfDischarge: Maximum depth of discharge (default: 0.8),
batteryEfficiency: Battery round-trip efficiency (default: 0.85),
costPerKWh: Battery cost per kWh (default: 400),
cycleLife: Battery cycle life (default: 5000)
}
It returns an object containing a lot of useful information:
{
requirements: {
dailyConsumption: Daily consumption,
autonomyDays: Autonomy days,
totalEnergyNeeded: Total energy needed,
usableCapacityRequired: Usable capacity required,
nominalCapacityRequired: Nominal capacity required,
capacityAh: Capacity Ah
},
system: {
batteryVoltage: Battery voltage,
depthOfDischarge: Depth of discharge,
batteryEfficiency: Battery efficiency,
cycleLife: Cycle life
},
costs: {
batteryCost: Battery cost,
inverterCost: Inverter cost,
bmsAndWiringCost: BMS and wiring,
installationCost: Installation cost,
totalSystemCost: Total cost,
costPerKWh: Cost per KWh,
costPerCycle: Cost per cycle,
costPerKWhCycled: Cost per KWh cycled
},
lifecycle: {
batteryLifeYears: Battery life years,
cyclesPerYear: Cycles per year,
replacementCost: Battery cost,
maintenanceCostPerYear: Maintenance cost per year
}
}
CFFCONVERTENERGYUNITS(value, fromUnit, toUnit)
Utility function to convert between energy units. The parameters are value to convert, fromUnit and toUnit are texts with any of units: kWh, MWh, Wh, BTU, J, kJ, MJ, cal, kcal, and therm.
CFFENVIRONMENTALIMPACT(args)
Calculate carbon footprint and environmental impact. The args is a plain object with the structure.
{
annualConsumption: Annual energy consumption in kWh,
gridCarbonIntensity: Grid carbon intensity in kg CO2/kWh (default: 0.4),
renewableEnergyRatio: Ratio of renewable energy (0-1, default: 0)
}
It returns an object containing a lot of useful information:
{
consumption: {
annualConsumption: Annual consumption,
gridEnergyConsumption: Grid energy consumption,
renewableEnergyConsumption: Renewable energy consumption,
renewableEnergyRatio: Renewable energy ratio
},
emissions: {
gridCarbonIntensity: Grid carbon intensity,
annualCarbonEmissions: Annual carbon emissions,
carbonSaved: Carbon saved,
monthlyCarbonEmissions: Monthly carbon emissions
},
equivalents: {
treesEquivalent: Trees equivalent,
carMilesEquivalent: Car miles equivalent,
coalEquivalent: Coal equivalent
}
}
CFFDEMANDCHARGES(args)
Calculate demand charges and time-of-use optimization. The args is a plain object with the structure.
{
hourlyUsage: Array of 24 hourly usage values in kWh,
rates: Rate structure object,
demandCharge: Demand charge per kW (default: 0),
timeOfUseRates: Array of TOU rate objects {hours: [start, end], rate},
baseRate: Base energy rate if no TOU (default: 0.12)
}
It returns an object containing a lot of useful information:
{
demand: {
peakDemand: Peak demand,
demandChargeRate: Demand charge rate,
monthlyDemandCharge: Monthly demand charge
},
energy: {
totalUsage: Total usage,
totalEnergyCharge: Total energy charge,
averageRate: Average rate
},
billing: {
totalBill: Total bill,
energyChargePercentage: Energy charge percentage,
demandChargePercentage: Demand charge percentage
},
timeOfUse: Time of use,
hourlyBreakdown: Hourly charges
}
Developer Version Platinum Version
The distance module integrates the Calculated Fields Form with the Google Maps (Distributed with the Developer or Platinum versions of the plugin):
DISTANCE(Address A, Address B, Unit System, Travel Mode)
Returns the distance between two addresses, in the unit system passed as parameter, and with the travel mode selected. Returns the FAIL text if at least one of addresses is invalid, or it is not possible access to Google.
The addresses A and B are posts addresses, or post codes.
The allowed values for Unit System are: km for kilometters, or mi for miles, km is the value by default.
The allowed values for Travel Mode are: DRIVING, BICYCLING, TRANSIT, WALKING, or STRAIGHT.
DRIVING is the value by default, and STRAIGHT determines the straight line between the addresses.
DISTANCE( '33122', '32801', 'mi', 'DRIVING') would be 240
TRAVELTIME( Address A, Address B, Return as Text, Travel Mode, Avoid Highways, Avoid Tolls )
Returns the distance between two addresses, in the unit system passed as parameter, and with the travel mode selected. Returns the FAIL text if at least one of addresses is invalid, or it is not possible access to Google.
The addresses A and B are posts addresses, or post codes.
The allowed values for Return as Text are: 1 to get values in text format as 11 min, or 0 to get the value in seconds, zero is the default value.
The allowed values for Travel Mode are: DRIVING, BICYCLING, TRANSIT, or WALKING, DRIVING is the value by default.
The allowed values for Avoid Highways and Avoid Tolls are: 1 or 0, zero as the default value.
TRAVELTIME('Murray BMCC, 70 Murray St, New York, NY 10007, USA', '384-386 Broadway, New York, NY 10013, USA',1,'WALKING') Result: 13 min
LATLNG( address )
Returns an array with the pair of values [latitude,longitude] corresponding to the address.
LATLNG('Murray BMCC, 70 Murray St, New York, NY 10007, USA') Result: [40.7144859, -74.0106983]
DMSTODD( value in degrees, minutes and seconds format )
Converts degrees, minutes and seconds to decimal degrees.
If value of v is 40°40'58.1"N DMSTODD(v) would be: 40.682806
Tip: You must use your personal key for Google API. Please, insert a shortcode for the variable: "google_api_key" in the webpage as: [CP_CALCULATED_FIELDS_VAR name="google_api_key" value="<your key>"]
The API Key can be passed directly in the form's shortcode, as follows: [CP_CALCULATED_FIELDS id="1" google_api_key="<your key>"]
Related Information....
All Versions of the Plugin
The managing fields module allows to process the fields objects:
getField( # or fieldname# )
Returns the internal representation of a field object.
The getField operation can be used only in the context of the equations.
For example, if there is the slider field: fieldname1, to assing it a value, for example: 50, enter as part of the equation associated to the calculated field the piece of code:
getField(1).setVal(50);
If you want pass the field's name with the format: fieldname#, the correct would be use:
getField('fieldname'+'1').setVal(50);
Or in the equation's context: getField(fieldname1|n).setVal(50);
The getField operation is more important than it appears at first glance. It allows to use in the equations fields that belong to other forms inserted in the same page.
For example, assuming you have inserted the form with id=1 in the page and assigned it a unique class name:
[CP_CALCULATED_FIELDS id="1" class="form-a"]
Now, you want to insert a second form on the page containing with a calculated field, in whose equation you want to use the value of the field field fieldname123 of the first form, for example to duplicate its value.
For this hypothetical case, the equation of the calculated field of the second form can be implemented as follows:
getField(fieldname123|n, '.form-a').val()*2
CFFSANITIZE( value, script only )
Sanitize a value. Allows to strip every HTML tag in the value, or sanitize the script tags and events only.
CFFSANITIZE(fieldname1);
CFFSANITIZE(fieldname1, true);
ELEMENTINFO( selector, info )
Get element information. It returns the value, text, or HTML of the element. The selector parameter is any valid dom selector, like "h1.post-title", and the info parameter is any of the values "text", "html", or "value"
E.g.
ELEMENTINFO("h1.post-title", "text");
If the selector does not exist, the operation returns null.
ISIGNORED( # or fieldname#, form object or form id or consecutive form number )
Return true if the fields is ignored. The second parameter is optional.
ISIGNORED(1);
ISIGNORED(fieldname1|n);
ISIGNORED('fieldname'+'1');
IGNOREFIELD( # or fieldname#, form object or form id or consecutive form number )
Set the field in the ignore state. Its value in the equations would be zero, furthermore, it would be excluded from the form's submission. The second parameter is optional.
IGNOREFIELD(1);
IGNOREFIELD(fieldname1|n);
IGNOREFIELD('fieldname'+'1');
ACTIVATEFIELD( # or fieldname#, form object or form id or consecutive form number, animation )
Activates the field for the equations and submission. The first parameter is required, it would be the numeric part of the field name or the field name. The second parameter would be a form object, or a selector with the form reference. If the second parameter is not passed, the plugin will apply the activates action to the field in the first form of the page. The third parameter is a boolean value (true or false) that instructs the plugin to display the field immediately or with a fade-in animation.
ACTIVATEFIELD(1);
ACTIVATEFIELD(fieldname1|n);
ACTIVATEFIELD('fieldname'+'1');
HIDEFIELD( # or fieldname#, form object or form id or consecutive form number )
Hide a field explicitly. Unlike IGNOREFIELD, this operation hides the field but does not deactivate it. The hidden fields participate in the equations and are submitted to the server. The second parameter is optional.
HIDEFIELD(1);
HIDEFIELD(fieldname1|n);
HIDEFIELD('fieldname'+'1');
SHOWFIELD( # or fieldname#, form object or form id or consecutive form number, animation )
Show a field explicitly. If the field was hidden by a dependency or by the IGNOREFIELD operation, it must be displayed by the ACTIVATEFIELD operation. SHOWFIELD( # or fieldname#, form or form selector, animation )
The first parameter is required. It is the numeric part of the field name or the field name. The second parameter would be a form object or a selector with the form reference. If the second parameter is not passed, the plugin will display the field in the first form on the page. The third parameter is a boolean value (true or false) that instructs the plugin to display the field immediately or with a fade-in animation.
SHOWFIELD(1);
SHOWFIELD(fieldname1|n);
SHOWFIELD('fieldname'+'1');
VALIDFORM( form object or selector, silent )
Checks if the values of the form fields are valid or not. The first parameter would be a form object or a selector with the reference to the form. If this is null, or not passed to the operation, the plugin validates the first form on the page. The second parameter is a boolean (true or false), and allows us to validate the form without displaying error messages.
VALIDFORM();
VALIDFORM("cp_calculatedfieldsf_pform_1", true);
VALIDFIELD( field name or number, form object or selector, silent )
Checks if the field value is valid or not. The first parameter is required. It is the name of the field to validate (E.g. fieldname123|n) or its numeric components (E.g. 123). The second parameter would be a form object or a selector with the reference to the form. If this is null, or not passed to the operation, the plugin validates the field in the first form on the page. The third parameter is a boolean (true or false), and allows us to validate the field without displaying error messages.
VALIDFIELD(fieldname1|n);
VALIDFIELD(fieldname1|n, "cp_calculatedfieldsf_pform_1", true);
ENABLEEQUATIONS(form)
Allows to enable dynamic evaluation of equations. Accepts an optional parameter: form object, jQuery object or selector. If the parameter is omitted, enables evaluation of equations on all forms on the page.
ENABLEEQUATIONS();
ENABLEEQUATIONS(form);
ENABLEEQUATION( # or fieldname#, form or form selector )
Enable the equation in a specific calculated field. The first parameter is required. It is the numeric part of the field name or the field name. The second parameter would be a form object or a selector with the form reference.
E.g. ENABLEEQUATION(1); and ENABLEEQUATION(fieldname1|n); in the equations context or ENABLEEQUATION("fieldname1"); in anothe place.
DISABLEEQUATIONS(form)
Allows to disable dynamic evaluation of equations. Accepts an optional parameter: form object, jQuery object or selector. If the parameter is omitted, disables evaluation of equations on all forms on the page.
DISABLEEQUATIONS();
DISABLEEQUATIONS(form);
DISABLEEQUATION( # or fieldname#, form or form selector )
Deactivate the equation in a specific calculated field. The first parameter is required. It is the numeric part of the field name or the field name. The second parameter would be a form object or a selector with the form reference.
E.g. DISABLEEQUATION(1); and DISABLEEQUATION(fieldname1|n); in the equations context or DISABLEEQUATION("fieldname1"); in anothe place.
EVALEQUATIONS(form)
Evaluates the form equations. The form object is optional. If the form object is omitted, the plugin evaluates each equation in each form on the page.
EVALEQUATIONS(form);
EVALEQUATIONS();
EVALEQUATION('fieldname#', form)
Evaluate specific equation. Requires two parameters, the field name (or the numeric part of the field name) and the form object or form selector.
EVALEQUATION('fieldname1', form);
EVALEQUATION(1, form);
GOTOFIELD( field, form object )
Jumps to a field in the form.
field, integer number corresponding to the number component in the field name or the field name (required parameter).
form object, an optional parameter corresponding to the form where the field is.
In the context of the equation, call the operation passing only the number component in the field name,
E.g. GOTOFIELD(2);
But if the operation is called from the onclick event of a button, the form object is required,
E.g. GOTOFIELD("fieldname2", this.form);
GOTOPAGE( page, form object )
Jumps to a page in a multipage form.
page, integer corresponding to the page index, starting at zero (required parameter).
form object, optional parameter corresponding to the multipage form.
In the context of the equation, call the operation passing only the page index,
E.g. GOTOPAGE(2);
But if the operation is called from the onclick event of a button, the form object is required,
E.g. GOTOPAGE(2, this.form);
COPYFIELDVALUE( # or fieldname#, form object or form id or consecutive form number )
Copies the field value to the clipboard. Supports input and textarea tags.
The first parameter is required, it would be the numeric part of the field name or the field name.
The second parameter would be a form object, or a selector with the form reference. If the second parameter is not passed, the plugin will copy the value of the field in the first form of the page.
E.g. COPYFIELDVALUE(1); - or - COPYFIELDVALUE("fieldname1");
PRINTFORM( true or false )
Print the form area.
The parameter is optional. In multipage forms, the true parameter makes all pages available for printing.
E.g. PRINTFORM(); - or - PRINTFORM(true);
If your page has multiple forms, you can specify which form to print by passing the form object, form ID, or the consecutive form number as the second parameter to PRINTFORM.
SUBMITFORM( form )
Submits the form.
Accepts an optional parameter: form object, jQuery object or selector. If the parameter is omitted, the plugin tries to identify the active form, and if it fails, it does nothing.
E.g. SUBMITFORM(); - or - SUBMITFORM('#'+fbuilderjQuery.fbuilder.currentFormId);
RESETFORM( form )
Resets the form.
Resets the form to the original fields values. Accepts an optional parameter: form object, jQuery object or selector. If the parameter is omitted, it resets all forms on the page.
E.g. RESETFORM(); - or - RESETFORM('#'+fbuilderjQuery.fbuilder.currentFormId);
All Versions of the Plugin
The Third-party Connection module allows the integration with third-party functions.
cffProxy(Function, First parameter, Second parameter, ...)
Works as proxy for calling the function passed as the first parameter, and the remaining parameters are passed as parameters of third-party function.
The first parameter is the third-party function (it is required). The cffProxy operation pass to this third-party function a callback as the last parameter. This callback should be called from the code of the third-party function, and receives as parameter the value generated by the third-party function.
cffProxy( function(a, b, callback){callback(a+b);}, 4, 5) the result is 9
Related Information....
Developer Version Platinum Version
This operations module is distributed with the "Server Side Equations add-on" and includes the SERVER_SIDE operation for calling the server side equations with AJAX:
SERVER_SIDE(Equation Name, First parameter, Second parameter, ...)
Returns the result of the server side equation.
The first parameter is required, it is a text with the equation's name, for example: 'square_root_equation'.
The rest of parameters in the operation are passed as parameters of the server side equation.
SERVER_SIDE( 'square_root_equation', 4) is equal to 2
Related Information....
Developer Version Platinum Version
The Chart.js module allwos to includes charts generated with the Chart.js API in the forms (Distributed with the Developer or Platinum versions of the plugin):
CFFCHART(canvas tag id, object with the data and options, field object)
It is a proxy for the Chart method in the Chart.js API. The functions accepts the same parameters in the Chart function.
The first parameter is the id of the canvas tag where the chart would be generated.
The second parameter is a plain object with the labes, datasets, and options, required by Chart.js. Click here for the API Documentation.
The third parameter (optional) is the object representation of the field to be populated with the chart image encoded as base64.
CFFCHART('canvas_id', {type:'bar', data:{labels:['Label A', 'Label B'], datasets:[{data:[fieldname1, fieldname2]}]}})
CFFCHART('canvas_id', {type:'bar', data:{labels:['Label A', 'Label B'], datasets:[{data:[fieldname1, fieldname2]}]}}, getField(fieldname4|n))
Note: The second parameter accepts the version attribute to decide the ChartJS API version to use. E.g.
CFFCHART('canvas_id', {version:'3.7.1', type:'bar', data:{labels:['Label A', 'Label B'], datasets:[{data:[fieldname1, fieldname2]}]}});
It is possible to register ChartJS plugins by passing an objects list with the plugins' URLs and a callback function to call after loading the plugin:
CFFCHART("my-chart", {
    type: "bar",
    data: {
        labels: ["Foo", "Bar"],
        datasets: [{
                label: "bad",
                data: [5, 25],
                backgroundColor: "rgba(244, 143, 177, 0.6)"
            }, {
                label: "better",
                data: [15, 10],
                backgroundColor: "rgba(255, 235, 59, 0.6)"
            }, {
                label: "good",
                data: [10, 8],
                backgroundColor: "rgba(100, 181, 246, 0.6)"
            },
        ],
    },
    options: {
        indexAxis: "y",
        plugins: {
            stacked100: {
                enable: true
            },
            "datalabels" : false
        },
    },
    register_plugins:[
        {
            "url":"https://cdn.jsdelivr.net/npm/chartjs-plugin-stacked100@1.0.0",
            "callback":function(){Chart.register(ChartjsPluginStacked100.default);}
        }
    ]
});
The process would be as follows:
* Insert a "HTML Content" field in the form with the canvas tag as its content:
<canvas id="canvas_id"></canvas>
* Uses the CFFCHART operation as part of the equation:
('canvas_id', {type:'bar', labels:['Label A', 'Label B'], datasets:[{data:[fieldname1, fieldname2]}]})
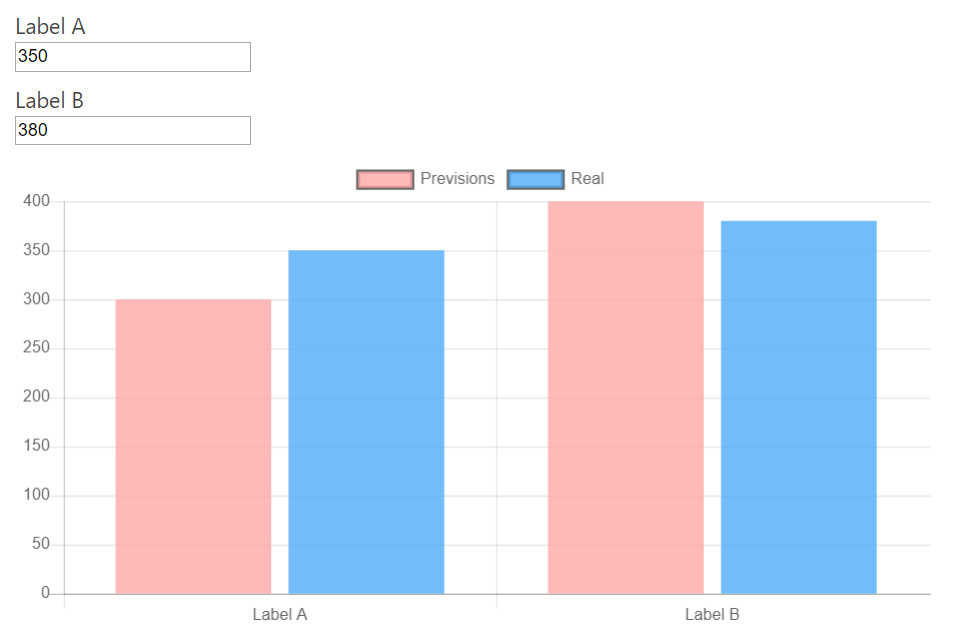
Related Information....
More information with a detailed description of parameters and practical demos in the post of the plugin's blog: Chart Generation
All Versions of the Plugin
The URL module includes the following operations:
getURL
Returns the current page's URL
getURL()
getBaseURL
Returns the base URL of the current page
getBaseURL()
getURLHash
Returns # followed by the fragment identifier of the current page URL, or empty text. getURLHash accepts an optional parameter to removes the hash (#) symbol
E.g. https://www.website.com/page#position
getURLHash() returns #position
getURLHash(true) returns position
getURLPath
Returns the initial / symbol followed by the path of the current page URL, or empty text. getURLPath accepts an optional parameter to removes the leading and trailing slash (/) symbols
E.g. https://www.website.com/pages/page1/
getURLPath() returns /pages/page1/
getURLPath(true) returns pages/page1
getURLParameters(url)
Returns a plain object with the URLs parameters. The operation accepts an URL as optional parameter
getURLParameters()
getURLParameter(parameter_name, default_value)
Returns the value of an URL parameter. The operation accepts two parameters: the parameter name and the dafault value. The default value would be returned if the URL parameter does not exist. If not default value is passed as parameter, and the URL parameter does not exist, the operation returns null
If the page's url is: http://www.website.com/?username=john
getURLParameter('username', '')
returns john
getReferrer()
Returns the URL of referrer.
generateURL(url, parameters, hash)
Generates an URL given their components. The operation accepts three parameters: the base URL (required parameter), a plain object for the URL parameters (optional parameter), a text with the hash (optional parameter).
generateURL("http://www.website.com", {"param1":"value1", "param2":"value2"}, "bookmark")
returns the URL http://www.website.com?param1=value1¶m2=value2#bookmark
redirectToURL(url, object)
Redirects the user. The operation accepts two parameters: the URL and a plain object for the parameters
redirectToURL('http://www.website.com/',{username: 'john'})
All Versions of the Plugin
The Handling Files module includes the following operations:
PDFPAGESNUMBER
Returns the pages number in a PDF file. It receives the "Upload File" field name or the numeric component of the field name and returns the number of pages.
E.g. PDFPAGESNUMBER(fieldname123|n); or PDFPAGESNUMBER(123);
If the Upload File field accepts multiple files, the operation result would be an array with the number of pages on files.
IMGDIMENSION
Returns an object with two attributes: width and height of an image. It receives the "Upload File" field name or the numeric component of the field name and returns an object with the dimensions of the image selected.
E.g. IMGDIMENSION(fieldname123|n); or IMGDIMENSION(123);
If the Upload File field accepts multiple files, the operation result would be an array objects, one of the per selected file.
VIEWFILE
Displays the files into a tag. Pass the "Upload File" field name or the numeric component of the field name and the tag id where display the files.
E.g. VIEWFILE(fieldname123|n, "tag-id"); or VIEWFILE(123, "tag-id");
If the Upload File field accepts multiple files, the operation will include multiple viewers.
CSVTOJSON
It takes the client CSV file and converts it into a JSON object you can use with the equations and DS fields.
CSVTOJSON(field name, arguments(optional))
Pass the "Upload File" field name or the numeric component of the field name and the arguments object with CSV attributes like, headline (the CSV file includes headline or not), delimiter (the columns delimiter symbol, uses comma by default), quote (the quote symblo to enclose text columns, uses double-quote by default).
E.g. CSVTOJSON(fieldname123|n); or CSVTOJSON(123); or CSVTOJSON(fieldname123|n,{headline:1,delimiter:","});
JSONTOCSV
It takes an array or JSON object and generates a CSV file the user can store on his computer.
JSONTOCSV(array or JSON, columns delimiter (optional), CSV file name (optional))
Pass the array or JSON object, the columns delimiter symbol (the plugin uses the comma symbol by default), and the file name (Like data.csv). If the file name is omitted, the operation returns the output in CSV format but does not generate the file
E.g. JSONTOCSV([{a:1,b:2}, {a:34,b:8},{a:7,b:2}], ",", "data.csv");
Related Information....
All Versions of the Plugin
The Text Operations module includes the following operations:
WORDSCOUNTER
WORDSCOUNTER(text)
Returns the number of words in text.
E.g. WORDSCOUNTER(fieldname123|r);
CHARSCOUNTER
CHARSCOUNTER(text, ignore blank characters)
Returns the number of characters in text. The second parameter allows ignoring blank characters in the text.
E.g. CHARSCOUNTER(fieldname123|r); or CHARSCOUNTER(fieldname123|r, true);.
INTEXT
INTEXT(to search, text, case insensitive)
Returns the number of times the word, character, phrase, or regular expression appears in the text. The search can be case-sensitive or case-insensitive (optional parameter, case-sensitive by default).
E.g. INTEXT(fieldname12|r, fieldname34|r); or INTEXT(fieldname12|r, fieldname34|r, true);.
CHARAT
CHARAT(text, index)
Returns the character located at the specified zero-based index position (Index zero by default). If no character exists at that index, it returns an empty string.
E.g. CHARAT("ABC"); returns A
CHARAT("ABC", 1); returns B
CHARTOCODE
CHARTOCODE(letter)
Returns the Unicode value of the given letter. If multiple characters are provided, CHARTCODE returns the value of the first.
E.g. CHARTOCODE("A"); returns 65
CODETOCHAR
CODETOCHAR(number)
Returns a string created from the specified sequence of UTF-16 code units.
E.g. CODETOCHAR(65); returns A
All Versions of the Plugin
The Location Operations module includes the following operations:
COUNTRY
COUNTRY(timezone/country id)
It returns an array of country names based on the time zone (Europe/Berlin) or country id (DE). The parameter is optional. If the parameter is empty, the operation returns the visitor country.
E.g. COUNTRY('MX');
Returns: ['Mexico']
REGION
REGION(timezone/country id)
It returns an array of region names based on the time zone (Europe/Berlin) or country id (DE). The parameter is optional. If the parameter is empty, the operation returns the visitor region.
E.g. REGION(Europe/Berlin);
Returns: ['Europe']
TIMEZONE
TIMEZONE(country id)
Returns an array of timezones based on country id (MX). The paramater is optional. If the parameter is empty, the operation returns the visitor timezone.
E.g. TIMEZONE('GB');
Returns ['Europe/Belfast', 'Europe/London'].
Purpose: This group of controls is designed to resolve conflicts with third-party plugins, theme scripts, character encoding issues, spam protection, performance optimizations, and advanced form behavior. Use these settings only when standard form behavior fails or specific compatibility problems arise.

ccscriptload)cccharsets)ccoptimizationplugin)cccaptchadirectmode)ccencodingemail)ccemailheader)ccdisablerevisions)ccjscache)ccformcache)ccearlysession)cconlyvisible)ccdirectform)ccampform)cctypcache)ccexcludecrawler)cchoneypot)ccusenonce)ccminimumtimetosubmit)Yes. Calculated Fields Form (CFF) can connect directly to the Akismet anti-spam service to check form submissions before they are processed. The integration can identify legitimate submissions, probable spam, and high-confidence spam. A separate Akismet WordPress plugin is not required, but you must have a valid Akismet API key.
ccenableakismet)ccakismetapikey)ccakismetactivitylog)ccakismettestmode)is_test=1 parameter to requests so you can test the integration without treating the request as normal production traffic.When a visitor submits a protected form, CFF sends the submission to Akismet before completing normal processing. The result determines what happens next:
When Akismet protection is enabled, the CFF Entries or Message List screen includes a Spam Status column. Stored entries classified by Akismet also include a feedback button:
submit-spam feedback to Akismet and changes the stored status to Spam.submit-ham feedback to Akismet and changes the stored status to Legitimate.These buttons do not delete the entry. They correct the classification and send feedback that helps Akismet identify future spam and legitimate submissions more accurately.
The feedback button is displayed only when Akismet protection is enabled and the stored entry already has a recognized Legitimate or Spam status. Entries created before Akismet was enabled, or entries with an unknown status, do not display a feedback button. A valid API key is required for feedback to be sent.
CFF sends the aggregated form content, website URL, visitor IP address, browser user agent, referrer URL, and the first email-type field found in the submission. Site owners should account for this third-party processing in their privacy information and applicable consent requirements.
No. Akismet is an additional classification layer. For stronger protection, use it together with the CFF honeypot, nonce protection, and minimum submission time. Each control blocks a different type of abusive or automated request.
⚠️ Important guidance: The "Troubleshoot Area" is intended for conflict resolution only. Before toggling these options, ensure you have a backup. The recommended defaults (Classic script load, Keep current charset, enabled nonce, direct form access, AMP access, and visible forms optimization) work for most standard installations. Change one setting at a time and test form behavior after each update.
The plugin calls the following list of filters and actions:
cpcff_pre_form: Filters applied before generate the form, is passed as parameter an array with the forms attributes, and return the list of attributes, modified or not.
cpcff_the_form: Filters applied after generate the form, is passed as parameter the HTML code of the form with the corresponding <LINK> and <SCRIPT> tags, and returns the HTML code to include in the webpage.
cpcff_delete_form: Action called after delete a form, passing the form's id as parameter.
cpcff_clone_form: Action called after cloning a form, passing two parameters, the original form's id, and the id of the new form.
cpcff_export_addons: Filters applied when the form is exported, to export the add-ons settings too. Passes two parameters, an array with all the add-ons settings, and the id of the form that is being exported.
cpcff_import_addons: Action called when a form is imported, to import the add-ons settings. Passes two parameters, an array with all the add-ons settings, and the id of the form that was imported.
cpcff_valid_submission: Filters applied for checking if the form's submission is valid or not, returns a boolean.
cpcff_redirect: Filters applied to decide if the website should be redirected to the thank you page after submissions, passes a boolean as parameter, and returns a boolean too.
cpcff_csv_query: Allows modify the query of messages, passing the query as parameter, returns the new query.
cpcff_price: The filter allows modify the calculated prices. Passes two parameters to the filter: the calculate price, and an array with the list of fields and their values. The cpcff_price filter is called before applying the coupon discounts.
cpcff_get_option: Filters applied before returning a form option. Passes three parameters to the filter: The value of option, the name of option and the form's id, returns the new option's value.
cpcff_messages_query: Allows modify the query of messages, passing the query as parameter, returns the new query.
cpcff_process_data: Action called after be submitted the form, and processed the information in the server side.
cpcff_payment_processed: Action called after receive the payment confirmation, passing as parameter the information collected by the form.
cpcff_file_uploaded: Action called after upload a file through the form. It is passed as parameter the object returned by the wp_handle_upload function.
cpcff_custom_tags: Action called after special tags are replaced in the notification emails and thank you pages. It receives two parameters: the text, and post id.
cpcff_update_submission: Action called when a submission is updated, the submission ID is passed as parameter.
cpcff_delete_submission: Action called when a submission is deleted, the submission ID is passed as parameter.
cpcff_messages_filters: Additional filtering options, allows to add new fields for filtering the events in the messages screen.
cpcff_messages_list_header: Action called to include new headers in the table of events in the messages screen.
cpcff_message_row_data: Action called to add related data to the events in the messages screen, the row is passed as parameter.
cpcff_message_row_buttons: Filter called to modify the buttons of events in the messages screen. The callback function receives two parameters, the HTML code of buttons, and the row.
cpcff_script_after_validation: Action called in the generation of javascript code to validate the forms data before submission.
cpcff_summary: Filters applied after generate the summary in the thank you pages. Passes the summary as parameter.
cpcff_send_notification_email: Filter called before sending the notification email. It returns true or false to send the email or not. The callback function requires three parameters: boolean, submission object, form object.
cpcff_send_confirmation_email: Filter called before sending the copy to user email. It returns true or false to send the email or not. The callback function requires three parameters: boolean, submission object, form object.
cpcff_notification_email_attachments: Filter applied when the files are attached to the notification emails. To the callback function are passed four parameters: the attachments list, the submitted data, the form's id and the submission's id.
cpcff_confirmation_email_attachments: Filter applied when the files are attached to the "Copy to the user" emails. To the callback function are passed four parameters: the attachments list, the submitted data, the form's id and the submission's id.
cpcff_wp_head: Action called within the head tag of the form page when the form is opened on its own page or loaded into an iframe. The form ID is passed as a parameter.
cpcff_wp_footer: Action executed before closing the body tag of the form page when the form is opened on its own page or loaded into an iframe. The form ID is passed as a parameter.
<SCRIPT>
function setSliderValue( clss, value )
{
var id = fbuilderjQuery('.'+clss+' input').attr( 'id' );
var fId = id.match(/_\d+$/);
fbuilderjQuery.fbuilder.forms[fId].getItem(id).setVal(value);
}
</SCRIPT>
(function(){
var v = fieldname1+fieldname2;
setSliderValue('my-field', v);
return v;
})()
(*) With the "Managing Fields" operations module the process is very simple, assuming the slider field is the fieldname1 and you want assign it the value: 50, include as part of the equation the piece of code:
getField(1).setVal(50);
Assuming there are two date fields: fieldname1, and fieldname2
To configure as min date of fieldname2 the date selected in fieldname1, enter fieldname1 in its "min" attribute:
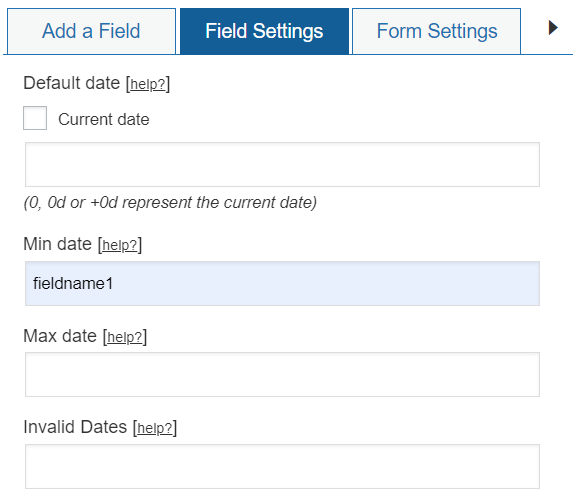
To configure as max date of fieldname2 the date selected in fieldname1, enter fieldname1 in its "max" attribute:
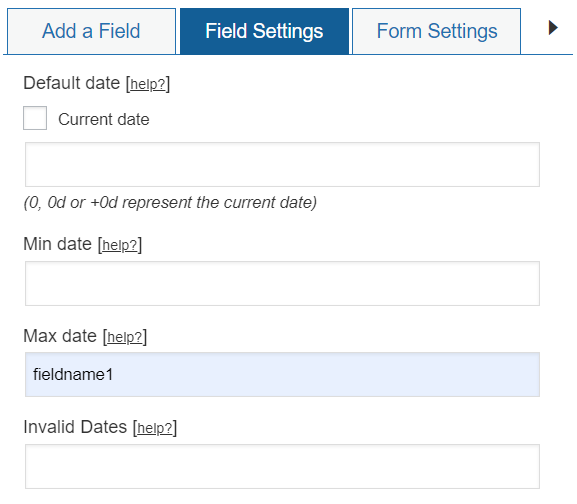
For selecting in the fieldname2 field the fieldname1 date plus "X" days (in the code below, 3 days after):
Insert a "Calculated Field" in the form to use as an auxiliary, and enter the equation:
getField(fieldname2|n).setVal(CDATE(fieldname1+3, 'mm/dd/yyyy'));
In some situations is required that the fields values have a specif format, or maybe allow to enter only a list of values. In these cases the current validation rules (digits, numbers, max value, min value, text length, required) are not sufficient, and would be needed new rules. This section describes how to create a new validation rule, and assing it to a field.
Assuming you need restricts the values of the fieldname1 field as US Zipcode, with the formats: #####-#### or #########, the regular expression used to validate the field's value is: /^\d{5}([\-]?\d{4})?$/
Insert a "HTML Content" field in the form, with the piece of code below as its content:
<SCRIPT>
fbuilderjQuery(document).on('formReady', function(){
	fbuilderjQuery
	.validator
	.addMethod(
		"zipcode",
		function(v,e)
		{
			return this.optional(e) || /^\d{5}([\-]?\d{4})?$/.test(v);
		}
	);
	fbuilderjQuery.validator.messages['zipcode'] = 'The  zipcode is invalid';
	fbuilderjQuery('[id*="fieldname1_"]').addClass('zipcode');
});
</SCRIPT>
The previous code adds a new method to the "validator" object, applied to all input fields with the class name "zipcode", the method returns true if the input field is optional, or its value satisfies the format of an US zipcode. With the instruction: fbuilderjQuery.validator.messages['zipcode'] = 'The zipcode is invalid'; is configured the error message to display when the validation rule fails. The last instruction assign the class name: zipcode to the fieldname1 field, to apply on it the new validation rule.
The Developers version of the "Calculated Fields Form" plugin, allows storing the data submitted in a database different to the own plugin database.
To use this feature are required some basic skills, because should be edited the "cp_calculatedfieldsf_insert_in_database.php" file included in the code of plugin.
This file is a mockup to integrate the plugin with other database. The file should be modified manually because each database has its own structure, and gives to the users a total control on the process.
The file's edition:
Open the file with the text editor your choice. There are some text editors, widely recommended for code editing, like: Notepad++, Sublime Text, Vim, Atom, UEditor.
The first section in the file's code allows defining the constants needed for connecting with the database, and its authentication:
define( 'DATABASE_HOST', '' );
define( 'DATABASE_USER', '' );
define( 'DATABASE_PASS', '' );
define( 'DATABASE_NAME', '' );
define( 'DATABASE_TABLE', '' );
The name of constants are auto-descriptives:
The plugin checks if the constants have been defined, before for running the insertion queries.
The second section to be edited by the developers, is the creation of the variables to use in the queries. The file includes some variables as a guide of section:
$field1 = mysqli_escape_string( $db_link, $params[ 'fieldname%' ] );
$field2 = mysqli_escape_string( $db_link, $params[ 'fieldname%' ] );
$field3 = mysqli_escape_string( $db_link, $params[ 'fieldname%' ] );
I'll explain this section with an example. Suppose you want store in the "my_users" table, the firstname, lastname, and email of the user, submitted through the form, and the corresponding fields in the form for these information are: fieldname1, fieldname2, and fieldname3, respectively. So, the variables are created like follow:
$field1 = mysqli_escape_string( $db_link, $params[ 'fieldname1' ] );
$field2 = mysqli_escape_string( $db_link, $params[ 'fieldname2' ] );
$field3 = mysqli_escape_string( $db_link, $params[ 'fieldname3' ] );
In the previous code has been created a varaible for each field in the form. All fields are included in the $params array.
After create the variables, is time to generate the insertion queries. The plugin includes a mockup for a hypotetical insertion query, that must be replaced with the structure of your database and the fields created previously.
mysqli_query( $db_link, "INSERT INTO `".DATABASE_TABLE."` (field1, field2, field3) VALUES ('$field1', '$field2', '$field3');" );
Returning to the previous example. If the columns of the table are: firstname, lastname, and email, respectively, the query should be modified like follow:
mysqli_query( $db_link, "INSERT INTO `".DATABASE_TABLE."` (firstname, lastname, email) VALUES ('$field1', '$field2', '$field3');" );
Pay attention, if the type of data in a column of table is a numeric value, should be removed the quotes around the variable name. For example, suppose the form includes a DropDown field for the year of birth, that evidently is a numeric value, I will assume this is the fieldname4. So, you should create a new variable for the new field:
$field4 = mysqli_escape_string( $db_link, $params[ 'fieldname4' ] );
and modify the insertion query too:
mysqli_query( $db_link, "INSERT INTO `".DATABASE_TABLE."` (firstname, lastname, email, year) VALUES ('$field1', '$field2', '$field3',$field4);" );
The $field4 variable is not closed between quotes.
A last tip: It is possible create as many insertion queries as needed, even can use the table name directly without using the constant defined in the first section.
Pay attention: The plugin includes a mechanism to prevent overwrites the "cp_calculatedfieldsf_insert_in_database.php" file in the update process. However, I recommend to copy the file into the "/wp-content/uploads/calculated-fields-form" directory, and the plugin would use this copy of the file instead.
A simpler alternative would be to use the "Database Queries for Calculated Fields Form" plugin.
Related Information....
The plugin adds a consecutive number to each form inserted in a webpage to prevent conflicts between different copies of a same form, starting in "1". The process will be explained in an example. I will suppose your form includes only one form created with the "Caculated Fields Form", and the form includes three fields: - a numeric field (fieldname1), a DropDown field (fieldname2), a checkbox field (fieldname3), and a single text field (fieldname4). Furthermore, the form fields should be prefilled with the values: 3 for the fieldname1, the choice with the value 4 in the fieldname2, tick the choices with the values: 1, and 2 for the fieldname3, and the "qwerty" text in the fieldname4, follows the steps below:
<PRE style="display:none;"><SCRIPT>
cpcff_default = { 1 : {} };
cpcff_default[1][ 'fieldname1' ] = 3;
cpcff_default[1][ 'fieldname2' ] = 4;
cpcff_default[1][ 'fieldname3' ] = [1,2];
cpcff_default[1][ 'fieldname4' ] = "qwerty";
</SCRIPT></PRE>
Pay attention to the values of the fieldname3 and fieldname4. The fieldname3 is a checkbox, as it is possible select multiple choices, should be assigned an array of values. For the fieldname4, whose value is a text, it should be closed with quotes or double quotes.
The process will be explained with an example. Assuming will be populated the fields: fieldname3, and fieldname7 in the form B with the values of the fields: fieldname1, and fieldname2 submitted by the form A:
Note: I'm assuming here the form B is the unique form inserted in the thank you page, or at least the first one. For this reason in the next code the index or attribute in the cpcff_default variable is 1 (cpcff_default = { 1 : {} };)
[CP_CALCULATED_FIELDS_RESULT]
<PRE style="display:none;"><SCRIPT>
cpcff_default = { 1 : {} };
cpcff_default[1][ 'fieldname3' ] = '<%fieldname1_value%>';
cpcff_default[1][ 'fieldname7' ] = '<%fieldname2_value%>';
</SCRIPT></PRE>
[/CP_CALCULATED_FIELDS_RESULT]
A particular case: If there are two forms in the thank you page, and you want populate the fields: fieldname3, and fieldname7 of the first form in the page, and the fields: fieldname2, and fieldname3 in the second form, the piece of code to use would be:
[CP_CALCULATED_FIELDS_RESULT]
<PRE style="display:none;"><SCRIPT>
cpcff_default = { 1 : {},2 : {} };
cpcff_default[1][ 'fieldname3' ] = '<%fieldname1_value%>';
cpcff_default[1][ 'fieldname7' ] = '<%fieldname2_value%>';
cpcff_default[2][ 'fieldname2' ] = '<%fieldname1_value%>';
cpcff_default[2][ 'fieldname3' ] = '<%fieldname2_value%>';
</SCRIPT></PRE>
[/CP_CALCULATED_FIELDS_RESULT]
As you can see in the previous examples, the indices (or attributes) in the cpcff_default variable don't have relationship with the forms' ids. These indices (or attributes) indicate the possition of the form in the page, the first form, index 1, second form, index 2, and so on.
The "Caculated Fields Form" plugin includes multiple templates to be used in the forms. The template is selected from the "Form Settings" tab, in the toolbar of the form builder, but can occur that the existing templates are not sufficient to create a form with the look and feel you want.
The template's module in our plugin, can be extended easily to create new designs, to be used in the forms of website.
Into the "/wp-content/plugins/calculated-fields-form/templates" directory there are multiple folders, a folder for each template. The folders names have not restrictions, you simply should create a new folder for the custom template, with the name you want.
The only one required file in a template is the "config.ini" file, whose structure is:
prefix="cp_cff_custom"
file="style.css"
title="Custom Template"
thumbnail="thumbnail.jpg"
description="This is my custom template"
The description of attributes:
To implement a custom template to apply your forms, creates a new directory for the template into the path "/wp-content/uploads/calculated-fields-form/templates", for example "/wp-content/uploads/calculated-fields-form/templates/custom-template". Into the new directory, create a config.ini file with the template properties (described above), and the .css file with the custom design. Finally, select the new template from the "Form Template" attribute in the "Form Settings" tab. More information in the following post of the plugin's blog:
BLOG: How do I create a new template to use with my forms?
For printing the form only, insert a button field in the form and select the "Print" option as its type:
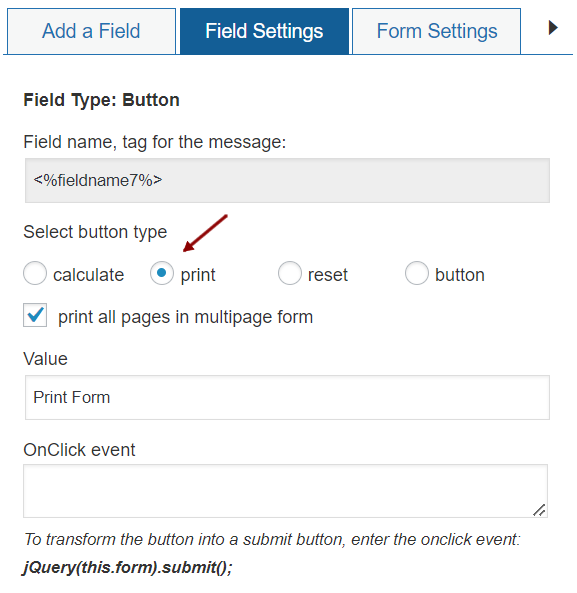
Or call the PRINTFORM operation through the button onclick event:

Related Information....
